• Technique
    • Latest Techniques
    • FREE TIPS
    • Quick Tips
    • Video
    • Site Search
    • Blog
    • Archives
  • Mentoring
  • >Online Workshops<
  • Workshops
  • Studio Lighting Books
  • Contact
    • Newsletter
    • Contact
    • Statement
Jake Hicks Photography
  • Technique
    • Latest Techniques
    • FREE TIPS
    • Quick Tips
    • Video
    • Site Search
    • Blog
    • Archives
  • Mentoring
  • >Online Workshops<
  • Workshops
  • Studio Lighting Books
  • Contact
    • Newsletter
    • Contact
    • Statement

Lighting Setup: Bounced Top Light

Technique Tuesday lighting setup bounced top light.jpg

Studio lighting can be tricky, but in reality shooting, in a big open studio space with all the fancy modifiers and stands is a damn sight easier than shooting in a small, cramped on-location space.

“But Jake, surely all professional photographers get to shoot in nice big, bright, airy studios all the time right?”

Even impressive looking lighting like this can be achieved in spaces as small as 2.4m wide, 3.3m long and 2.4m high.

Even impressive looking lighting like this can be achieved in spaces as small as 2.4m wide, 3.3m long and 2.4m high.

Wrong. In fact part of the job is having the ability to shoot almost anywhere and for those of us who end up shooting fashion and editorial style work, we need to shoot in some very awkward spaces. From underground nightclubs, fancy bathrooms, or even smaller European homes, all of these small spaces present a multitude of problems and if the client wants to shoot there, it’s your job to make it happen.

Eurasians shooting from home

But what if you’re not shooting commercially? What if you just love taking pictures of people and you’re limited to shooting from a home-studio space? To many of my U.S. readers, this is not always an issue, many of you are blessed with a little extra space at home compared to those of us in Europe and Asia. In fact, during one workshop in the U.S., one attendee was concerned about how little space they had to shoot in….. it turned out they only had a double-garage as a home-studio! That’s an American double-garage too, so it was likely bigger than my entire home! ;)

So to my Eurasian readers, the following tips for shooting in small spaces may be of more use to you than others. (Of course I only partly jest, I am fully aware that many Americans living in big cities are still in ‘cramped’ apartments, so I’m sure the following will be of use to you too ;) )


Awkwardly Small

The following lighting setup is the result of me trying to make the best of an awkwardly small space to shoot in. I knew my subject had some beautiful long, blonde hair and I knew that I wanted to shine a vivid colour onto it with some wind blowing the hair to get some fiery coloured hair effects.

The problem was the space we had to work in…

Click to enlarge: The space measured 2.4m wide, 3.3m long and 2.4m high.


Adding Top Lights

The space measured around 2.4m wide, 3.3m long and 2.4m high. Don’t get me wrong, that is very small and yes it’s very rare that you’d have to contend with space constraints like this, but this setup does prove what’s possible with a little ingenuity, even in spaces a tight as these.

Click to enlarge: This is what it looks like, had we tried to top-light the shot the normal way.

To illustrate the issue further, here’s what a top-light looks like in this space. And this is just a 60cm softbox.

Of course the simplest solution is to get the model to sit down. Lowering them in the shot will give you a little more space to work with above them. But even with them sat down, it still deosn’t give me enough space to use a large enough modifier, after all, I want the light to be big enough so that it can spread over a larger area. Having a spot or even a small soft box up there isn’t going to spread the light anywhere near enough in the space we have.

Click to enlarge: Using a large modifier above your subject ensures that the light spreads very evenly over a large area. But a large modifier simply isn’t possible in a small space like this.

So the problems we’re facing so far are as follows:

  • Very low ceilings

  • No space to use a boom

  • No way of getting a large enough modifier above our subject without that boom and higher ceilings.


The Solution

The solution I came up with miraculously fixes all of these issues perfectly and thankfully, the solution doesn’t require any fancy kit, pulley systems or holes in the ceiling!

The solution came from adding a false background behind the subject, and then placing (hiding) a hair light behind that. That hair light is actually placed low, but it’s angled up to the ceiling above the model.

In turn, the ceiling now has a large silver reflector pinned up against it via two light stands. These stands keep the reflector in place above the model thereby allowing the hair light to bounce its light off of it, over the background and then back down onto the model.

Click to enlarge: This shot above shows the introduction of a false background that we hide a light behind. Of course this false background makes are room even smaller, but the trade-off is worth it to have that beautifully big top light.

In the BTS image above, we see the large reflector pinned to the ceiling and we can also see the gap between the ceiling and backdrop. Note how flooded with colour that reflector is too. For context you can even see the stool at the bottom of frame …

In the BTS image above, we see the large reflector pinned to the ceiling and we can also see the gap between the ceiling and backdrop. Note how flooded with colour that reflector is too. For context you can even see the stool at the bottom of frame too.

One of the key factors for this lighting setup to work is that top-light. We want that light above the model to be pretty big, big enough in fact that it not only lights the hair, but the whole top of the body when they are sat down.

By placing a large silver reflector up there, we are effectively making that reflector the light source and it’s now a huge light source if we place our light correctly.

For that reflector to do its job properly, it needs to be bouncing as much light as possible. For that to happen, you need to ensure you’ve placed that pink light behind the subject low enough so that the light has space to spread before it hits the reflector. Look at the image above again and you’ll see that the pink light is completely covering that reflector, that is the only way this will work properly.

In terms of the modifier on the actual light itself, I’d recommend an open dish of some kind, but really any dish that will cover the reflector above.

Note: I’d be wary of using grids or honeycombs on that dish behind the background. Focusing the light too much will ruin the effect. Just use an open dish and if you’re concerned about the light spreading too much, just raise the light so that it’s closer to the reflector.


The Easy Part

Thankfully, now that we’ve set that pink light up, the actual key light for this setup is pretty straight forward. All we really need to do is get a large softbox behind or above us when we’re shooting and that’s it.

Rather than trying to gel an entire softbox, simple open it up and place a gel over the flashbulb instead.

Rather than trying to gel an entire softbox, simple open it up and place a gel over the flashbulb instead.

For this setup I did also add a blue gel to the interior of my softbox for that contrast in colour to the pink top light.

Note: When gelling a softbox; remember that you don’t need huge sheets of gel to make this happen. Rather than adding a large sheet of gel to the exterior of my softbox, I instead prefer to open up the softbox and place a smaller piece of gel over the flashbulb. This method is just as effective and will ensure all light leaving the softbox is gelled. This is certainly far easier and far cheaper than trying to gel the entire outside. Just be careful the gel inside is not sat on a hit tungsten bulb. Turn off the modelling lamp if that is the case.


Once your softbox is gelled, position it as far back as you can and get it up nice and high so that you are able to shoot underneath it.

Click to enlarge: Even in tiny, tiny spaces like this, great looking lighting is possible with a few clever tricks.

My advice in terms of modifier here is going to be a softbox over anything else and I’d also recommend as large of a softbox as you can stand in this space. I ended up using a 100cm Octa here, but 100+cm wide rectangular softbox is just as suitable.

The trick here is to use your understanding of light to your advantage. Having your big softbox super-close to the subject like this means that you need to have the power of it turned right down. As a result of this low power and closeness to the subject, the light drops-off to shadow VERY quickly, which in turn adds shadows to the edges of the model that can be coloured pink by the top light.

Try to think of it like your subject is just reflecting the light rather than you actually lighting them (yes I know all light is reflected, but I’m just trying to labour how low you want the power of that light to be). This very low powered blue light gives you far more control than you might think and as a result you are able to craft shape and form with just a single large modifier in the front.

Take a look at the shots below to see what we created from the shoot and this setup.

Click to enlarge

Click to enlarge

Click to enlarge

Click to enlarge

Click to enlarge

Closing Comments

Let’s not kid ourselves here, this is a cramped shooting space. But even with limited space like this, with a little ingenuity and refined light control, great lighting and great results are more than possible.

Look again at the shots included here and pay close attention to where the pink light is actually falling. See how it’s actually covering the entirety of the body from above? This is far more than a simple hair light and this is due to the sheer size of the light above our subject.

The reason I’ve pointed that out to you again, is because this is only a 2 light setup, yet it feels like it has the drama of more, thanks to how much that pink light is actually doing.

Note: Check the pink highlight on the underside of the right leg - I think that’s the light also bouncing underneath the background and coming up from below. -An unintended bonus.

Final Points to Remember:

  • Use a big enough silver reflector above. It should be as wide as your background and you can see the size of mine in the BTS shot above.

  • Get your pink light low in height. You want that light to be low so as to allow for the light to spread wide enough before it hits the reflector above.

  • Don’t use a grid or honeycomb on that reflector dish behind the background. If you’re worried about light-spill, move the light higher and control the spill via the height of the light. Using a grid will likely reduce too much light from hitting the reflector.

  • Use a big key light even though it seems like it’s not needed in that small space. By using a large key light, you can actually have more control of your light than you think. Bring it in close and turn it right down.

  • Get you subject sat-down - This does a couple of things. 1. It allows for the light to not be so intense on the head compared to the body when standing. 2. It allows for more of the body to be hit by the pink light when sat down. None of that pink light on the legs would be visible if she was standing.

  • Using a dark background is pretty mandatory. There is a huge amount of coloured light bouncing around in this small space and anything but black or dark grey back there results in a very messy background.

Lastly…

I appreciate that there are probably a couple of people out there who don’t like to use gels in every shoot they do. I’m personally not too sure what that’s all about, but for the two people out there who aren’t fans of gels, yet still managed to read all the way down here….. here’s an idea for you to try instead.

Click to enlarge: For those of you who aren’t interested in taking incredible looking photos, you can also try this setup without gels too.

As you can see in the example above, you could also try this setup without gels too. Obviously it wont look as good, but you already knew that. In this example I’ve just added a coloured backdrop to add a little contrast between the subject and that brighter top light, but any background could be used here instead.


Thank You

Thanks for checking out this article and spending a little bit of your day with me here. I hope you found it useful and that you get a chance to give it a try yourself. If you do and you have any questions, then all means fire-away in the comments below and I’ll do my best to answer what I can. Thanks again and I’ll see you in the next one.

Don’t forget to sign up to my newsletter to be sent all of these photo tips and techniques articles every month in case you miss one.


Have you downloaded my FREE 50 page book yet?

I recently released a huge50 page studio lighting book, absolutely free.

Book 1 - ‘Understanding Light’ is available now and it covers the fundamentals of reading the light in a studio. Follow the link below and download your copy now. This book is free to anybody who wants to check it out, but all donations to the project are certainly greatly appreciated.

Download now
banner book 2.jpg

CSL mar 7.jpg

art of proj mar 28.jpg

banner offer text 2000px gel packs.jpg

banner offer text 2000px video tuts combined.jpg
Tuesday 02.18.20
Posted by Jake Hicks
Comments: 8
 

Social Media Analytics for Jake Hicks Photography - end of 2019

You can breath a sigh of relief as I promise to keep this quick. The reason for this brief look at 2019 in terms of social media is simply because I have good news to share.

2018 saw a horrendous decline in all aspects, consequently, this post last year was certainly far more analytical as I tried to manage the fallout of what was a pretty aggressive decline on my core social media platform, Facebook. If you’re interested to see what happened back then, you can see the full article here

Growth in 2019

Thankfully though, 2019 saw some growth and the ship began to rise again. So let's look at what happened on my Facebook business page over the last couple of years.

Above you can see the total followers for 2018 compared to 2019. Now granted, follower growth is extremely marginal on Facebook right now and that goes for many people, not just me. Conversely, I can share a picture of my morning cup of coffee on Instagram and get more followers overnight than I can get on my Facebook Page in a month!

The total number of followers is not everything, but for me, it’s the quality of the followers that’s important. I’d take 100 engaged and enthused followers on Facebook over a million bots on Instagram.

Yes, I’m exaggerating, but the point still stands that I prefer the Facebook platform for its ability for me to discuss and communicate with other creatives compared to just getting ‘likes’ or emojis on Instagram. I’m not saying its better, but I am saying it’s what I prefer for my community.

Engagement in 2019

Now let’s look at the actual engagement of those followers. Sure, you can have thousands of fans, but it’s pointless if you’re not posting engaging content.

I’m sure many of you who are here are not confused by these figures, but if you’re new to Facebook, let me explain the significant dissonance between total followers versus ACTUAL people seeing and engaging with anything you post.

So how can a page with well over 20,000 followers only get a 1000 or so people engaging with its content? This is just business along with the fact that people have been leaving Facebook in droves in recent years. So on one hand, if you want all of your followers to see your posts, you have to pay for that privilege. On top of that, there are of course many people who liked my page and then left facebook resulting in that distance between the two figures.

For me, the most important and TRUE figure to look at is ‘post reach’. This is the number of people who actually see your post and thankfully, that number grew nicely. Sure this is not a big number, but remember, people are leaving Facebook in droves so any growth is a significant one compared to many others.

Most Liked Content of 2019

Again, we see a nice bump this year compared to last. Heres the top 10 liked images of 2019.

So at first glance, this looks pretty good. But most importantly for me, these are all consistent numbers. For example I don’t have a number 1 with 1000 likes and number 2 with 150. From 1 to 10, the likes are consistent. What isn’t really shown particularly clearly here though, is that all of these, bar one, are all in the last half of 2019. In fact, the first half of 2019 saw horrendous figures in many of the shots.

To give you a little context, here’s the total number of likes (adding up all likes for all 10 shots) one the past few years.

Total number of combined likes for all Top 10 images in 2015 = 2978

Total number of combined likes for all Top 10 images in 2016 = 2567

Total number of combined likes for all Top 10 images in 2017 = 4297

Total number of combined likes for all Top 10 images in 2018 = 2597

Total number of combined likes for all Top 10 images in 2019 = 3204

Conclusions

By all means, you can interpret the data however you like, but for me, this is positive news. The media has done nothing but tell us that Facebook is dead and that everybody is leaving etc. etc. Although, I’m sure they’re not technically wrong. I mean, I doubt many children are signing up to be a part of the same social media platform as their kids, but it could actually be that many are coming back to Facebook from Instagram.

Of course, counter to all of this speculation, it could just have been that the growth was down to something that I actually did. 2019 saw me really drive my page with more time being spent on it with me ‘Share-a-Shoot’ posts every Monday. In fact, the last part of 2019 saw me actually do live feedback once a month for a couple of hours each time. I introduced prizes and gifts for long time fans of the page and Ive done nothing but encourage interaction and feedback with the community.

So regardless of whether people are ‘coming back’ to Facebook, or if I’m simply creating a more generation engaging community to be a part of, whatever it is, it’s working and I aim to continue it into 2020!

P.S. Of course one possible reason for the community growth in 2019 that wasn’t mentioned in the main body of text could be…. no it’s so unlikely that I wont bother mentioning it….unless….. could it be that I’m producing better photography in 2019 than in 2018?!?!?

Surely better work coudnt’t be the reason for more likes on my images!!!!!

Heretic! Burn the witch!


THANK YOU

Thank you as always for checking out my article and spending a little bit of your day with me here. I know this wasn’t a particular exciting article, so if you made it all the way to the end, you have my respect.

If you have any questions about this one, then feel free to let me know in the comments below. I can’t promise to have all the answers, but I’ll certainly do my best to answer what I can. Thanks again for stopping by.


1477588220230-2.jpeg

Don’t miss a killer article in 2020!

Be sure not to miss a great photo tip or technique in 2020. Sign up to my monthly newsletter and I’ll send you all of my -Technique Tuesday- articles each month so you’ll be among the first to test and play with any new lighting setups and photo hacks before anyone else.

Also, if you sign up to my monthly newsletter now, you’ll get instant access to my FREE PDF on studio lighting tips.

Sign up now and you’ll get yourself a FREE 10 PAGE PDF of my all time ‘Top 10 Photography Tips and Techniques’!

NEWSLETTER SIGN UP - PLUS FREE 10 PAGE TECHNIQUES PDF

banner+offer+text+new+2020+col+exp.jpg

banner offer text 2000px gel packs.jpg
Tuesday 01.14.20
Posted by Jake Hicks
 

Using Low Contrast Lens Filters in Portraits

Technique Tuesday Using Low Contrast Lens Filters in Portraits.jpg

As the name of the filter alludes to, these lens filters do indeed lower the overall contrast of a shot. To clarify what that means in relation to photography; these filters will reduce the darkness of the shadows by allowing light to bleed into them from surrounding highlights.

Click to enlarge: The images above show you exactly what a low contrast filter does. For context, this is a black piece of velvet in front of a spotlight.

Click to enlarge: The images above show you exactly what a low contrast filter does. For context, this is a black piece of velvet in front of a softbox.

From the example images above, you should get a very good idea of what the low contrast filters do. Both of these example images are taken with exactly the same camera settings and are displayed straight out of camera. So although they’re shot with the same settings, the image with the low contrast filter clearly has a certain subtle glow, or haze effect.

Now that we’ve established what they technically do, let’s look at how low contrast filters actually translate into practical uses.


Low Contrast Filters - Past to Present

Historically, lens filters were always far more popular than they are now. The obvious reason for this decline is thanks to the proliferation of post-production techniques and all the options and flexibility that working on images after they’ve been captured offers you.

Years ago, low contrast filters were often used to give skin a certain ‘glow’ and to also flatter some of the skins imperfections. Remember, this was in a time before ‘retouching’, anything that softened or hid those minor lumps and bumps in camera was extremely useful.

But, low contrast filters are seemingly making a comeback as the cameras and lenses being made today are simply ‘too sharp’ for some projects. For example cinema and T.V. still use lens filters a lot and the low contrast filters are often used on period pieces where the razor sharp images of modern cameras simply feels out of place in many historical dramas.


Low Contrast Filters in Action on the Screen

The Crown

Cinematographer Adriano Goldman spoke about his particular visual look for the hugely successful Netflix show ‘The Crown’.

“The show uses the Sony F55, Cooke Panchros and, often, Tiffen Glimmer Glass.”

-Adriano Goldman

Pay close attention to how bright those shadows are where the curtains meet the window. Now imagine how dark those shadows would be with no low contrast filter in place. They’d be extremely dark and we’d lose separation and depth with the subject.

Pay close attention to how bright those shadows are where the curtains meet the window. Now imagine how dark those shadows would be with no low contrast filter in place. They’d be extremely dark and we’d lose separation and depth with the subject.

Many shooters will often tell you how unbelievably sharp their lenses are, and ‘unbelievably’ sharp is the right verb here. Many lenses are indeed ‘too’ sharp and clear for some projects and Goldman uses the Tiffen lens filter for beautiful effect in the Crown series. For those unfamiliar with the filter, here’s how Tiffen describes what their Glimmer Glass does.

“Тhе multіfunсtіоnаl dіffuѕіоn/bеаutу Тіffеn 4х4 Glіmmеr Glаѕѕ 1 Fіltеr hаѕ thе аbіlіtу tо bоth ѕоftеn thе fіnе dеtаіlѕ іn аn іmаgе, аnd рrоduсе glоwіng hіghlіghtѕ. Рrоvіdіng а mіld rеduсtіоn іn соntrаѕt, іt сrеаtеѕ а mоrе еthеrеаl іmаgе.”

-Tiffen


Peaky Blinders

Another example of a period piece using low contrast filters ‘in-camera’ during shooting is the gangster epic show ‘Peaky Blinders’. Those familiar with the show will no doubt be aware that this is a polar opposite show to ‘The Crown’, but the atmosphere and depth a low contrast filter can add to visual storytelling is universal.

Director of photography Si Bell goes on to speak about the look of the show and what they were keen to achieve.

“A Tiffen 1/4 black satin filter was deployed most of the time with NDs and rotating polarisers just to take the shine and reflections off certain things.”

-Si Bell

It’s worth bearing in mind that many of these dramas are set in areas with multiple points of light. Many of Peaky Blinders scenes are set in bar scenes and very dark rooms with extremely bright spots of light around them and occasionally even bare …

It’s worth bearing in mind that many of these dramas are set in areas with multiple points of light. Many of Peaky Blinders scenes are set in bar scenes and very dark rooms with extremely bright spots of light around them and occasionally even bare candle light in shot. Care needs be taken to give those lights a warm glow without them being too overpowering. Look at the spot of light behind the head here. See how it appears to have a warm glow and isn’t burning out to pure white?

Bell mentions the use of a Tiffen ‘Black Satin Filter’. Not familiar with that filter? Here’s what Tiffen says it does.

“Тhе Вlасk Ѕаtіn fіltеrѕ gеntlу соntrоlѕ hіghlіghtѕ, rеduсеѕ соntrаѕt аnd аddѕ а grіttіеr, wаrmеr lооk thаn rеgulаr Ѕаtіnѕ, whіlе ѕuррrеѕѕіng fасіаl blеmіѕhеѕ аnd wrіnklеѕ.”

-Tiffen


There are many, many more example of this in modern television and if you were so inclined, you could simply Google ‘insert TV show name + camera setup’ and you’d be astounded to see how many shows actually use some form of low contrast filter on their lenses.

I had a hunch that the Crown and Peaky Blinders used them, Googled it and boom, they did. Trust me, the list of modern cinematographers and directors of photography using these filters on their lenses is huge. In fact, it’s possibly more common than ever before and that is in part due to the rise of incredibly sharp digital camera and lens technology.

It’s worth nothing here that many of these shows will often introduce artificial atmospheres to their sets like smoke and haze, and although they produce a very similar look to the blacks as the low contrast filters, the haze and smoke is far harder to control and it doens’t help the highlights.

Many of these media productions want huge files for 8k televisions and theatre screens, but many cinematographers in the early 2000’s were hesitant to switch away from film as the digital options lacked a certain character and richness. These low contrast lens filters, along with a host of other ‘in-camera’ filters can take an edge off a heavily digital look that is often far more appealing to audiences. To further cement this point, I was also reliably informed that Tom Cruise refused to be shot on the more modern digital cameras as they were too unflattering.


Low Contrast Filters in Photography

So now that I’ve shared a couple of examples of how low contrast filters are being used in pop-culture, you should be a little more receptive to the idea of actually using an in-camera technique that involves lens filters yourself. If shows like ‘The Crown’ or ‘Peaky Blinders’, that seemingly have an infinite budget are using lens techniques over post-pro hacks, maybe there’s something to them.

Like I mentioned at the top, photographers have been using low contrast filters forever and even before cinema was, but their popularity has waned, especially in portraits. Of course there’s still a market for them and any self-respecting landscape shooters would never leave home without one.

Imagine you’re a landscape shooter and you’ve set up your shot ready for that perfect sunset. The sun dips down low and now everything is heavily silhouetted with that big hot-light in the sky behind that gnarly old tree you wanted to photograph. Sadly you can’t just whip out a spare fill light to pop some light in that deep shadow, so you can either go for the silhouette shot, or you can give your raw file some extra detail in the shadows by popping a low-contrast filter on the lens. The filter will scatter just enough light into the shadows thereby giving you a little extra detail in those shadows where you previously had none.

Seems an obvious solution, but this basic principle is sorely overlooked by portrait shooters. I so often see some heavily backlit shot where the highlights are so horrendously blown out as the photographer has increased the exposure to see detail in the foreground shadows. But as we also previously discussed, this is actually a modern problem.


Is your lens too good?

This is clearly subjective, but hear me out. Years ago lenses were good, but they weren’t quite as crystal clear as they are today. As a result, some older or even vintage lenses have a sort of low-contrast filter built into them. Their glass naturally scatters light that enters them and we see some of the tell-tale signs of halos and glowing edges associated with some of the modern low-contrast filter shots.

Click to enlarge: There is NO low contrast filter being used in either of these shots, but you can clearly see that an older Nikon lens from the 70’s had a certain ‘glow’ to it. Fast forward 20 years and we’ve all but eradicated all trace of that glow today.

You should be able to see what I mean from the shots above. A modern lens provides a very clean and clear edge between light and dark and the shadows are all but jet black throughout the shot. For many of us, that’s what we want, but there’s still a place for that older lens look too. To me it feels a little more organic and truth be told, it actually feels a little more ‘real’.

Technically Perfect, But Not Realistic

Most lens technology is now so good that it actually far surpasses our own eye quality. When I look at the sun or a bright light, there is a glow around it… do I need to upgrade to the pro version?! The older lenses and the more modern low-contrast filter ‘look’ actually feels more reminiscent to us as this is how we would visually see the world in real life! This is one of the key reasons we see it so much in cinema and T.V.


Examples of Low Contrast Filters in Action

Let’s be honest, I’ve been pretty defensive up until this point. If you’ve read this far then you’ll undoubtedly be surprised that I’ve firstly not tried to sell you anything yet, but secondly, I’ve yet to show you any results of low-contrast filters in action with portraits. The reason for this is that the vast majority of photographers simply write off lens filters as ‘Photoshop for old people’.

Yes there are lens filters that can be replaced by Photoshop actions and filters if you want, but I honestly believe there is no short-cut or Photoshop hack for what low-contrast filters do.

“Can’t I just reduce the contrast in Photoshop though?”

No. The low contrast filter is doing far more than simply ‘lowering the contrast’. With a lens filter like this, it’s actually scattering the light as it enters the lens and as a result you’ll have far more detail to work with in supremely contrasty images.

“Sounds good. I’ll use it for every shot!”

No. Please do not use it for every shot, or even most of your shots for that matter. The low contrast filter has a very specific use and that’s often for heavily backlit images where the light, or multiple lights is set against far darker subjects like silhouettes or where we have a lot of strong directional light just out of shot pointed towards to the camera.


Let’s look at some examples.

Example 1 - Strobe just out of shot pointed at camera.

Click to enlarge: This image sees me using a LEE Filters Low Contrast Filter No. 1

Click to enlarge: This image has no low contrast filter being used.

This image has no bare bulb or direct highlight in shot, but it does have a blue light just out of shot to camera right pointed over the subjects shoulder, plus it had a red bulb just out of shot in that lampshade.

Both of these shots were processed in the same way, but it should be clear to see the very significant difference between the two shots. In the image with the low contrast filter we have more detail in the shadows and although we’ve chosen to not pull out too much of that detail (look at the fabric on the jacket lapel for example), it’s there.

Also, look again at the highlights. At the very top of frame where the light is brightest in the image with the no low contrast filter, the lamp with a red bulb has lost nearly all of its colour in the brightest areas. Compare that to the shot with the filter and you see not only more detail, but a lot more colour too.


Example 2 - Heavily back-lit by natural light.

Click to enlarge: This image sees me using a 3/4 power Low Contrast LEE Filter on the lens.

Here we have a mix of strobe and natural light. It’s worth noting that the majority of this set is lit by that very bright natural light window to camera right. I’d also like you to consider how much light is appearing in the shadows of this room. Look at the corners and the area around the window. I have no light pointed at that due to absurdly limited space in this room, so instead I opted to use a low contrast filter on the lens to ‘simulate’ the effect of light being in the dark areas.

…and because I know there’s already a millennial in comments typing about how they’re ‘entitled’ to see the raw file! Here’s a couple of test shots below where I experimented with the low contrast filter on and off the lens.

Click to enlarge: The left image shows the raw, straight out of camera file with NO low contrast filter. On the right we have the raw, straight out of camera shot with the LEE Low contrast filter on the lens.

Again, it should be extremely clear to see the difference between these shots and just how much that low contrast filter is doing to the shadows in the image. You have to remember that this filter is giving you options. If you want to pump the contrast up a little later on in post then you can do. But me not using a low contrast filter here would have been detrimental to the shadow detail in the final shot.


Example 3 - Strong strobe backlight behind subject.

Click to enlarge: This image has a backlight as the entire background and here I’m using a LEE Low Contrast Filter No.1

Click to enlarge: This image has a backlight as the entire background and here I’m using a LEE Low Contrast Filter No.1

This particular setup was built around the fact that I knew I wanted to use a low contrast filter on my lens. Behind the subject we have a large softbox that covers the entirety of the background. This understandably kicks a lot of light directly into the camera and I knew that if I used a low contrast filter on the lens here, it would create this slightly hazy effect that nicely mimicked the hazy plant effect we had behind her.
If you’re interested in learning more about this particular setup in detail, it’s fully explaining here Imitating Hazy Backgrounds with Diffusion Gels

Are you curious to see what the low contrast filter is actually doing? Take a look at the side by side below, with and without the filter.

Click to enlarge: On the left you have a shot with the low contrast filter over the lens. On the right you have the shot with nothing in front of the lens. Both of these shots are raws, straight out of camera with zero adjustments.

You get the idea now?

With these three examples, you should now have a pretty strong idea of exactly what these low contrast filters do. Bottom line; they aren’t for everyday use. In fact these filters will not even work in every situation. For example, if you have zero light coming straight into the lens, or you have no bright highlights in shot, you could have the low contrast filter on the lens and not even know it. This is a very situational filter but it can have such a huge impact on your shots if you use it correctly.


The Low Contrast Filter I Use

I personally use a pack of Low Contrast filters from LEE Filters. The pack comes in a range of strengths from a 1/4, 1/2, 3/4 and 1. The number 1 offering the most dramatic effect. Truth be told, I’ve not used any of the other brand low contrast filters out there to compare and as you probably noticed from the start of the article when we looked at examples in TV shows, there’s a ton of them by other brands that seemingly do the same thing.

The LEE ones I have work for what I need, but if you want to dig into the low contrast filter options further, you’ll be looking at variations in how they deal with highlights, halos, glow, sharpness, diffusion and more. Trust me, the variances in low contrast filters is a full time job in its own right. For more details on the ones I use, take a look on LEE’s site here LEE Low Contrast Filters

Click to enlarge: I personally use the LEE Filters Low Contrast filter set. This includes filters of varying powers including 1/4, 1/2, 3/4, and 1.

Click to enlarge

Click to enlarge

I personally just hold mine in front of the lens with my hands for the shots that I need them for, but you can get a holder that will attach to any size lens you have. I personally prefer this method over the circular screw on ones as I can switch lenses during a shoot without having to buy lens filters for each of them.

Click to enlarge: You can simply hold the filters in front of your lens with your free hand, or place them in a proper filter holder.


Frequently Asked Questions

Is it blurry?

I can hear you now,

“But do low contrast filters blur or soften my shot?”

The reason I know you have that question, is because I asked it too. Technically I guess yes, anything in front of your lens will potentially ‘soften’ your shot. I’ll be totally honest though, I can’t see it. Granted, these slightly more expensive ones from LEE are of exceptional quality and you get what you pay for, but from the tests I’ve done, these filters do not ‘blur’ the shot to reduce contrast. Take a look at the zoomed in shot below to make your own judgments though.

Click to enlarge: Here we have a very zoomed in crop of an image that had the low contrast filter in use. The eye looks pretty sharp to me.

I showed you this shot earlier in the article and this was one of the test images I took with the low contrast filter in place. You’ll notice that everything is still very much pin-sharp. Also note that we have that very bunched up histogram in the top right of frame. This is showing us that all the data is very much in the middle and this is what we’d expect to see from an image with less contrast.


Low Contrast or Diffusion?

Long time followers of my work will no doubt know that I also regularly use another lens filter called a ‘diffusion filter’ aka ‘soft filter’. The low contrast filter is very different and you should not expect to simply use a diffusion filter in its place. Think of a diffusion filter causing a more focused area of flare. A low contrast filter will evenly spread the light over the entire scene compared to the more focused flare of the diffusion filter.

Click to enlarge: Here we have there shots. One with no filter, one with the low contrast filter and one with the diffusion filter.

I’d be wary of using your diffusion filter as replacement for the low contrast filter. You can see from the images above that the diffusion filter is far more aggressive. It has a brighter centre point next to the highlight and it drops off to shadow far quicker. Don’t get me wrong, diffusion filters have their place, but consider them for more of a ‘dreamy’ look where as the low contrast will provide more of an ‘atmospheric’ look.


Closing Comments

The short version here is that I recommend everyone has a low contrast filter if you can afford one. This goes doubly to the mirrorless users who have systems with their painfully sharp files. Yes, you may love the razor sharp images where you can see the DNA in the pores of your subjects, but consider what your subjects and clients may also like to see as well. I personally think that although sharp images are fine, there are times where many creatives are trying to put a little more ‘soul’ and realism back into their shots.

For example, I could go into more detail on how the video games industry spends millions each year on developing purely artificial in-game lenses with bokeh, halos, fringing and diffusion in an attempt to make us feel more ‘immersed’ in a synthesised world. That entire industry strives to make their imagery look less artificial and I find it odd that as one art form struggles to trick us into being immersed with visual artefacts, another simultaneously strives to make things feel hyper-real by removing all trace of them.

The video games industry spends millions to make games more realistic. One common tool they employ to do this is by replicating visual artefacts in their games that we’re more familiar with seeing in real life (or that films have taught us are in ‘r…

The video games industry spends millions to make games more realistic. One common tool they employ to do this is by replicating visual artefacts in their games that we’re more familiar with seeing in real life (or that films have taught us are in ‘real life’). We’ll skip the irony of adding bokeh to first person shooters, but let’s assume we’re all wearing dirty glasses on the battlefield. -From left to right ‘Killzone’, ‘Black Ops 4’, ‘Battlefield 4’.

Older readers may also recall the era when ‘Industrial Light and Magic’ specifically strived to create these ‘visual-effects’ in films like ‘Star Wars’ and ‘Close Encounters of the Third Kind.’ These are of course ‘styles’ and although JJ Abrams may have famously overdone the infamous ‘lens flare’ a little in his more modern work, the fact still remains that there’s huge scope to get away from this purely crystal-clean and perfect look the entire time.

‘Close Encounters of the Third Kind’ released in 1978 showcasing some very revolutionary lens flare effects at the time.

‘Close Encounters of the Third Kind’ released in 1978 showcasing some very revolutionary lens flare effects at the time.

Fast forward 30 years and JJ Abrams get’s a little overzealous in his famously heavy-handed lens flare effects in 2009’s ‘Star Trek’.

Fast forward 30 years and JJ Abrams get’s a little overzealous in his famously heavy-handed lens flare effects in 2009’s ‘Star Trek’.

No, video games and movies are not photography, but it’s always advisable to look outside of our own industry to see how others deal with similar aesthetics and what trends are emerging.

A New Generation

It’s also worth noting that we’re starting to see the first generation of photographers that are coming of age who have NEVER used a film camera before or have even seen one! Feel old yet?!

As with everything else, fashion and styles are often cyclical to new generations that come along behind us. I guarantee young people will fall on these old film ‘effects’ and claim them as new and original (which they are to them). I’m calling it here and now, but don’t be at all surprised if you see a resurgence in these ‘in-camera’ looks with photography as we see young photographers emulating looks they see in gaming and cinema.

Lens filters like low contrast filters are a tool and unlike JJ, we should use them sparingly. But in the right situation, these low contrast filters can do what no Photoshop filter can do and we need to have them ready to hand when the situation presents itself.


THANK YOU

Thank you as always for checking out my article and spending a little bit of your day with me here. I know this was a monster article, so if you made it all the way to the end, you have my respect.

If you have any questions about this one, then feel free to let me know in the comments below. I can’t promise to have all the answers, but I’ll certainly do my best to answer what I can. Thanks again for stopping by.


1477588220230-2.jpeg

Don’t miss a killer article in 2020!

Be sure not to miss a great photo tip or technique in 2020. Sign up to my monthly newsletter and I’ll send you all of my -Technique Tuesday- articles each month so you’ll be among the first to test and play with any new lighting setups and photo hacks before anyone else.

Also, if you sign up to my monthly newsletter now, you’ll get instant access to my FREE PDF on studio lighting tips.

Sign up now and you’ll get yourself a FREE 10 PAGE PDF of my all time ‘Top 10 Photography Tips and Techniques’!

NEWSLETTER SIGN UP - PLUS FREE 10 PAGE TECHNIQUES PDF

banner offer text new 2020 col exp.jpg

banner offer text 2000px gel packs.jpg
Tuesday 01.07.20
Posted by Jake Hicks
Comments: 2
 

Top 5 Jake Hicks Photography Articles of 2019

Technique Tuesday Top 5 Jake Hicks Photography Articles of 2019.jpg

With 2020 less than a fistful of hours away, let’s look back over the past 365 sleeps to see what was popular in the JHP Archives.

Number 1

Lighting Setup: The Corona

Even though this article in only weeks old, it quickly stormed to the number 1 spot. My new ‘Chroma’ lighting setup has certainly proved popular with many, and for good reason. This lighting technique shows you that you can produce engaging and dynamic lighting on a subject with minimal effort, space and equipment… No wonder this article saw such success.

Lighting Setup: The Corona

Technique+Tuesday+Lighting+Setup-+The+Corona+-2.jpg

Number 2

Emulating Dappled Light in the Studio

Ever seen some beautiful light pouring through tree branches on a warm summers day and thought, ‘I wish I could recreate that in the studio’. Hard sunlight is tricky at best to recreate in the studio, but couple that with some beautiful dappled shadows and it becomes nearly impossible. Thankfully, I finally found a solution and it’s actually not to tricky to do, it just uses a clever little hack to make to it work. Take a look at this dappled lighting in the studio setup and see what put this article in this years number 2 spot.

Emulating Dappled Light in the Studio

Technique+Tuesday+Emulating+Dappled+Light+in+the+Studio-2.jpg

Number 3

Optical Snoot Review

As luck would have it, number 3 here follows on nicely from the previous article. As I mentioned above, creating very hard, directional light in the studio can be tricky. Sure there are lighting modifiers that can make it happen, but they tend to be a little pricey. Our third most popular article of 2019 goes over and reviews an alternative, the optical snoot. So if you’re after a way to create some very hard light in the studio that wont cost more than a family holiday to the riviera, check this out.

Optical Snoot Review

Technique+Tuesday+Facebook+optical+snoot.jpg

Number 4

Imitating Hazy Backgrounds with Diffusion Gels

Coming in at number 4 is a hefty article on how to imitate a foggy, hazy background behind your subject. Ever wanted to fire up the smoke machine but space and fire alarms have prevented you from pulling the trigger? Maybe you already have a smoke machine and love using it, but would really like to only limit the smoke effect behind the subject and not all over the front of them. This article on how to imitate hazy backgrounds has you covered. Side note: This was actually one of my favourite discoveries in the studio for 2019. I can’t wait to use it again sometime soon.

Imitating Hazy Backgrounds with Diffusion Gels

Technique+Tuesday+Imitating+Hazy+Backgrounds+with+Diffusion+Gels.jpg

Number 5

DIY Mottled Backdrop

Last but certainly not least, here’s a clever hack to make those fancy mottled backdrops for next to nothing. Mottled backgrounds are making a comeback and thanks to big budget editorials in the likes of Vogue and Harpers Bazaar, those terrifyingly cheesy cloudy backdrops from your school photo, can actually look good. So although the best of these unique canvas backgrounds can cost many hundreds of dollars to buy, we can also make a version that is pretty effective for less than $20! Intrigued? Check the article to learn more.

DIY Mottled Backdrop

Technique+Tuesday+DIY+Mottled+Backdrop-2.jpg

So there you have it, the top 5 articles from the Jake Hicks Photography archives of 2019. I hope you all found something useful in there and I hope you all learned a tip or two. Big thanks to all of you who stuck around during 2019 to check these out as they were published and if you missed any of them at the time, I hope this was handy refresher of the best of the best.


Don’t miss a killer article in 2020!

1477588220230-2.jpeg

Be sure not to miss a great photo tip or technique in 2020. Sign up to my monthly newsletter and I’ll send you all of my -Technique Tuesday- articles each month so you’ll be among the first to test and play with any new lighting setups and photo hacks before anyone else.

Also, if you sign up to my monthly newsletter now, you’ll get instant access to my FREE PDF on studio lighting tips.

Sign up now and you’ll get yourself a FREE 10 PAGE PDF of my all time ‘Top 10 Photography Tips and Techniques’!

NEWSLETTER SIGN UP - PLUS FREE 10 PAGE TECHNIQUES PDF

col+and+exp+jan+25th.jpg

banner offer text 2000px gel packs.jpg
Tuesday 12.31.19
Posted by Jake Hicks
Comments: 3
 

Creating Separation Between Model and Background in Photoshop

Technique Tuesday Creating Separation Between Model and Background in Photoshop.jpg

Every Monday I ask my FB Page community to participate in my -Share-a-Shoot- post whereupon they share a recent shot they’ve taken in exchange for some feedback from myself. I’ve been doing this every week for what feels like years now, and each and every week I am often mentioning the same things in my responses. Often it’s the subject being lit from below, badly placed hair lights, awkward posing and so on. But the one area that I probably talk about the most is ensuring you have a clear separation between subject and background.

Even in extreme cases where you’re photographing black on black, you still have to ensure you show separation between subject and foreground.

Having a clearly defined subject set apart from a background is key to making a pleasing image.

Our eyes are always seeking to understand the world via shape and form, so if our subject is blending into their surroundings in a confusing way, this is not only quite often unflattering, but it also makes for a visually confusing image.

This subject-to-background separation is nearly always present in daylight photos thanks to the abundance of easy to use light, but when we light a subject with studio strobes, we often forget to light our backgrounds properly. The out of focus area behind our subjects needs a little light as well if we are to avoid that jet-black void behind them. This lack of separation or blending between subject and background is especially noticeable on shots that contain dark styling against a dark background so even more attention to that separation is required here.

Thankfully though, even if we do forget or we simply run out of lights to light our background as well as our subject, we can cheat the effect a little in post-production and that’s what I’m going to cover here.


Step 1 - Cut that out

Screenshot 2019-12-03 at 15.51.23 copy.jpg

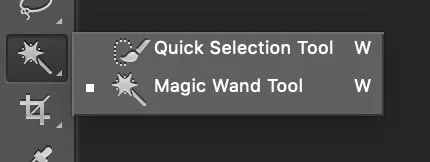
It’s up to you how you do this and there are many ways to select a subject. I personally use the Magic Wand Tool as well as the Quick Selection Tool.


Spend the time to cut the subject out properly as rushing this or cutting corners here will ruin the effect extremely quickly. Once I’ve got my basic selection of the subject then I often pop into the ‘Refine Edge…’ menu to make any minor adjustments to the styling or hair. This menu can be found in a variety of places dependant on your version of Photoshop but my preferred version of Refine Edge is found at the top of the screen when you have a selection tool active.

Note: I use an older version of Photoshop (even though I have access to the newest version via CC) mainly because of the power of this refine edge menu. Subsequent versions were a major step backwards in my opinion… but that’s a topic for another day.


Step 2 - Using our Mask

The hard part is now done. With our mask still active, create a new layer: Layer -> New Layer … (Shift+Command+N).

With the new layer simply create a Mask on it with the selection you’ve made. Layer -> Layer Mask.. -> Reveal Selection … (Or simply click the ‘Add Layer Mask’ button at the bottom of the layers palette.

If done correctly, your selection should disappear and your new blank layer should not have a black silhouette of your subject in the mask next to it.


Step 3 - Adding a base coat

Screenshot 2019-12-03 at 16.29.56.png

Even though we may have an even background already, I like to add a base coat to this layer so that we don’t highlight any marks back there when we lighten it up later on.

First select the Gradient tool. This can be found in the tools palette or simply hit the G key.

With the base layer selected, hit the gradient palette at the top of the screen so that the Gradient Editor opens up. Now make a gradient by selecting one point at the top of your background and one at the bottom of your background. Mine here is almost identical from top to bottom, but yours might not be. Once you’ve done that hit ok.

With our new gradient we can now paint it across our new layer. Select the new layer, make sure you have the Linear Gradient selected at the top, then simply click and drag a new gradient from the top to bottom of your empty layer.


Step 4 - Keep it real!

At present, we have a pure pixel gradient that will likely have some amount of colour banding within it. We do not want that anywhere near our shot and although it might not be very visible now, it will be very noticeable once we lighten it later.

First we need to add some noise to eliminate that banding. With the new layer selected, go to Filter -> Noise -> Add Noise…

Once in here, select a noise amount of around 2-5 dependant on your shot.

Next we need to soften that noise as it’s looking too digital at the moment.

With the new layer selected, go to Filter -> Blur -> Gaussian Blur…

Once in the Gaussian Blur menu, select a low blur that will just take the sharp edges off of the noise.

Usually an amount of 1 - 2 is enough.

Lastly, I often choose to knock back the background a little to bed it into the original background. I will lower the opacity to around 50 -70% to help achieve this.


Step 5 - Lighten up

Next we need to brighten up that background so as to give us that separation we’re after. With your mask layer selected, add a curves adjustment layer. Layer -> New Adjustment Layer -> Curves… Or simply hit the little Curves icon on the Adjustments Palette.

With our new curves layer selected, simply double click it and then drag a point up from the centre of the curve to lighten up the whole image.

Clearly this is not the look we’re after and we need to isolate the effect to the background only.

With the Curves layer selected, go to Layer -> Create Clipping Mask (Option+Command+G). If done correctly, you should now see an arrow pointing down from your curves layer to the mask layer.


Step 6 - Vignette it

We are nearly there and now that we have a brighter background, we just need to make it look a little more natural and less dominating over the subject.

With your curves layer selected, create another mask for it. Go to Layer -> Layer Mask -> Reveal All.

With our new mask selected, we are going to add a vignette. To do this, simply select the Gradient Tool (G) again. Make sure you have the ‘Radial Gradient’ checked in the top left, select a white-to-black gradient and then simply click and drag a large gradient from the centre of your shot.

If all of this is done correctly, your curves layer mask should now have a little vignette in the thumbnail. You can now reduce the opacity of this to your tastes, but otherwise you’re done.


Final Before & After

Before

After


Closing Comments

This is one of those techniques that is far from flashy or dramatic, but more about adding a subtle yet effective result. In fact, post-production is often about adding many, many subtle effects that all add up to a big impact and this technique is a good example of this.

Final tips

Masking: Take your time on the mask. Failing to do so, will result in you not being able to lighten the background as much as you may like. If you’ve rushed the portion around the hair for example, you may end up with an odd looking halo effect which will be distracting.

Keep it subtle: This is probably the most important factor out of everything. We are not adding this glow behind the subject to emulate a light back there. Remember, we are ONLY adding this to add separation between subject and background. When people view the image for the first time, they should NOT notice you’ve added this effect.


Lastly…

If you are interested in learning more about my creative process in post-pro, why not join us on December 14th for an entire day of post production. To learn more about what topics in Lightroom and Photoshop I’ll be covering, check out the link Jake Hicks Photography - Post-Pro Workshop

post pro dec 14 2019 2email banner.jpg

THANK YOU

Thank you as always for checking out my article and spending a little bit of your day with me here. If you have any questions about this one, then feel free to let me know in the comments below. I can’t promise to have all the answers, but I’ll certainly do my best to answer what I can. Thanks again for stopping by.


1477588220230-2.jpeg

More Free Tips & Techniques

If you’re after more tips and tricks on studio lighting then don’t forget to check out my monthly newsletter and my free 10 page pdf on studio lighting techniques. If you’re interested then follow the link below and download it immediately.

Did you receive my FREE 10 page PDF on Studio Lighting Tips yet?

Sign up to my monthly newsletter and receive my free 10 page pdf of my all time ‘Top 10 Photography Tips & Techniques’.

Once a month I’ll send you a newsletter of at least four photo related tips and tricks (one for each week I post them on here if you miss them) plus I’ll also keep you apprised of my new workshop dates as well.

Sign up now and you’ll get yourself a FREE 10 PAGE PDF of my all time ‘Top 10 Photography Tips and Techniques’!

NEWSLETTER SIGN UP - PLUS FREE 10 PAGE TECHNIQUES PDF

post pro dec 14 2019 2email banner.jpg

col and exp jan 25th.jpg

banner offer text 2000px gel packs.jpg
Tuesday 12.03.19
Posted by Jake Hicks
 
Newer / Older