• Technique
    • Latest Techniques
    • FREE TIPS
    • Quick Tips
    • Video
    • Site Search
    • Blog
    • Archives
  • Mentoring
  • >Online Workshops<
  • Workshops
  • Studio Lighting Books
  • Contact
    • Newsletter
    • Contact
    • Statement
Jake Hicks Photography
  • Technique
    • Latest Techniques
    • FREE TIPS
    • Quick Tips
    • Video
    • Site Search
    • Blog
    • Archives
  • Mentoring
  • >Online Workshops<
  • Workshops
  • Studio Lighting Books
  • Contact
    • Newsletter
    • Contact
    • Statement

PSA: How to Avoid the Adobe Price Increase

Donate & Support

I've always wanted my photography education on here to be free, so although there is no paywall to any of my -Technique Tuesdays-, any and all support is greatly appreciated. ❤️

PLUS: Donate any amount and I’ll send you a link to the hi-res print version of my studio lighting book.

||

PLUS: Donate any amount and I’ll send you a link to the hi-res print version of my studio lighting book. || PLUS: Donate any amount and I’ll send you a link to the hi-res print version of my studio lighting book. ||


READ THIS BEFORE JANUARY 15TH 2025

Avoid the Adobe Price Increase

This is a very brief PSA so I won’t be talking about by Adobe is desperate for a quick injection, but if you’re someone who pays around $9.99 a month for the Adobe and Lightroom 20GB package, your price is about to go up on January 15th.

Here’s how to avoid that and below is how to keep that same price. The only downside is that you’ll have to pay for your year in advance and you won’t be able to pay monthly for that grandfathered-in price.

I just did this myself 2 minutes ago, I grabbed some screenshots of what’s involved so take a look below if you’re interested.

Step 1

Open up the Creative Cloud app on your system.

Typically, the symbol is found in the top right of your desktop on a Mac, and it is that cloud/infinity-shaped symbol.

Step 2

This will open up your Creative Cloud app pop-up. Next, you’ll need to click on the ‘Manage Account’ in the top right.

Step 3

This should automatically open up the Adobe Account in your browser. You’re looking for the Manage Plan button. Mine was on the bottom left.

Step 4

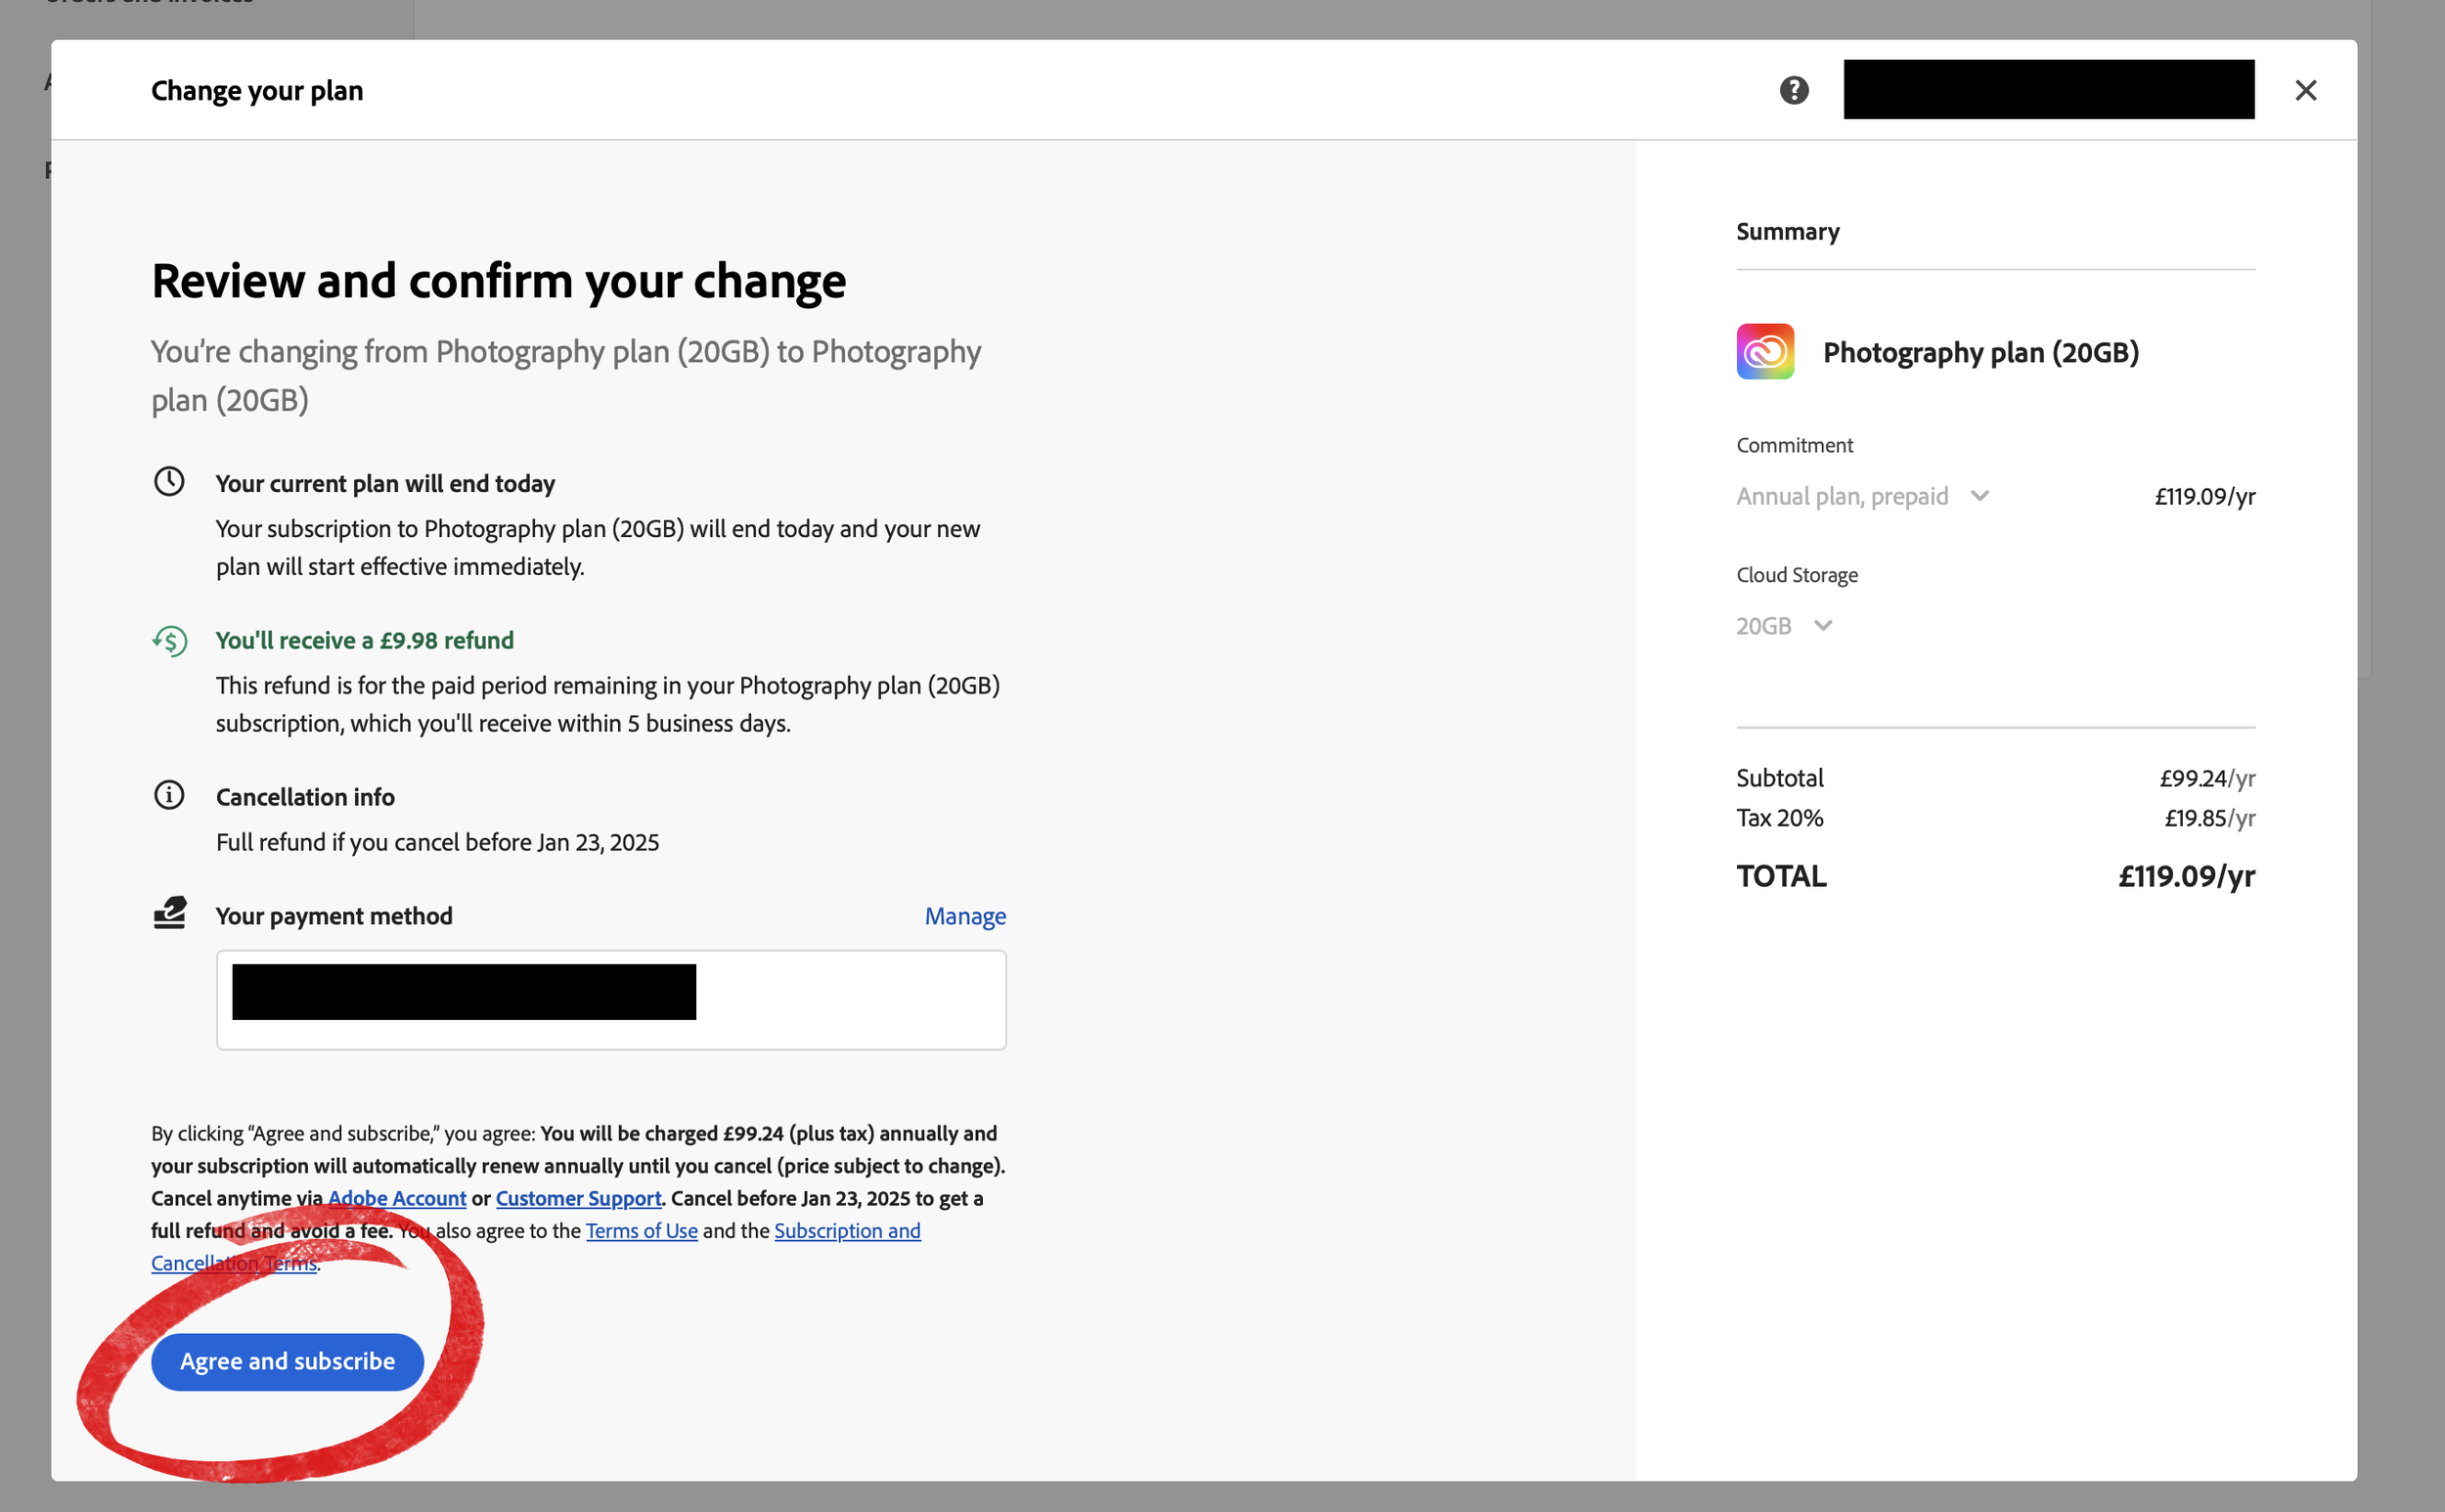
Next, you’ll want to find the ‘Update Subscription’. Remember that the only way to keep your current price is to pay annually so you're not actually looking to change your plan. *Others have mentioned that this button is also called ‘Manage Commitment’ in some regions. All have been the button alongside the notepad and pencil icon though.

Step 5

The text will change, giving you the option to pay annually. Double-check this, but it should be your current monthly price (currently $9.99), multiplied by 12 and as you see here, mine changes to $119.

Step 6

Lastly, it should pop up asking you to confirm payment, etc. *I just paid my £9.99 monthly fee earlier today, so that is why Adobe is refunding that after I upgraded to the annual price.

Hit ‘Agree and Subscribe’ at the bottom and your’re done.

That’s it

Once you you hit Agree, it takes a few seconds and you’re all confirmed.


Final Thoughts

My understanding is that the price changes take effect from January 15th 2025 and your next billable month after that date will reflect the new price increase. Ive seen conflicting reports, but the price for some plans is doubling so in my opinion, this annual lock in is worth doing if you can afford it.

Please look into this yourself, especially if your plan is different to the 20GB Photography Plan. I’ve just highlighted the process I went through here in the UK so this may vary from region to region. If you have any further advice or tips to add to this, please leave them in the comments below.


JHP Livestreams…

I livestream every other Tuesday night via YouTube and there I answer your questions, critique your shots, take community images into Photoshop to work on them and discuss all manner of lighting tips and techniques. I look forward to seeing you and your work there real soon. Jake Hicks Photography - YouTube


All of my more advanced lighting classes are now available online!

||

All of my more advanced lighting classes are now available online! || All of my more advanced lighting classes are now available online! ||

LEARN MORE ABOUT MY ONLINE WORKSHOPS

 
Thursday 01.09.25
Posted by Jake Hicks
Comments: 6
 

Lighting Setup: Still Life Portrait

Donate & Support

I've always wanted my photography education on here to be free, so although there is no paywall to any of my -Technique Tuesdays-, any and all support is greatly appreciated. ❤️

PLUS: Donate any amount and I’ll send you a link to the hi-res print version of my studio lighting book.

||

PLUS: Donate any amount and I’ll send you a link to the hi-res print version of my studio lighting book. || PLUS: Donate any amount and I’ll send you a link to the hi-res print version of my studio lighting book. ||


If you’re looking for a tried-and-true lighting technique, then it doesn’t come much more stress-tested than this one. In fact, this is a lighting technique that I’ve been utilising in one form or another for over 25 years, and I learnt it way back in art college. The only difference between then and now is that this lighting was originally designed for still-life shots; now, I’ve scaled it up and use it on my portraits instead.

This ‘dark field illumination’ technique, as it’s often referred to, is a common technique in still-life shoots. It’s typically used to light dark, very shiny objects like wine bottles, for example.

Back in art college when I was lazy and inexperienced - I shot black and white! We all gotta start somewhere.

The technique's basic principle is to place a light behind the subject and then block off most of that light, except a slim bead of light at the edges. When shot with that bead of light cropped out in-camera, the light appears to wrap around the subject.

As you can see in this image here, the blue light is the light behind and it wraps around this lens beautifully.

As you may well imagine, this is a popular technique for several reasons, but chief among them is the fact that this complete ring of light around the object can be achieved with just a single light.


Scaling it Up

So what’s the best way to scale this up for a portrait? Let’s first look at the setup and then I’ll break it all down.

Cut Out & Keep


TL;DR/ADHD/Artist Setup Explanation

  • Place large softbox oriented vertically behind the subject

  • Attach large sheet of black of velvet in front of softbox leaving a gap above and on either side of softbox

  • Position large beauty dish in front and above subject

  • Bring in a small softbox as a fill-light and add a gel to it


Kit Used

  • 3x lights - these can be flash or LED

  • 1x large softbox - 100cm x 80cm

  • 1x 21” beauty dish

  • 1x small softbox - 60cm x 60cm

  • Coloured Gels (not optional)


Camera Settings

  • Camera - Nikon D850

  • Lens - 24-70mm f2.8

  • Shutter Speed - 1/125th

  • Aperture - f5.6

  • ISO - 100

  • Kelvin - 4400K

  • Focal Length - 70mm


The Results

Click to enlarge any of the shots below.

Image with just softbox behind turned on

Image with softbox and beauty dish turned on (FYI there also looks to be a very small amount of coloured fill present here too)

Final shot with all 3 lights turned on

Model: Kayt Webster-Brown


Breaking it Down

Black Velvet

Good news this week boys and girls as this is an easy setup! No need to trawl through pages of nerd-speak this week as the only real trick to this setup is the clever use of that black velvet behind the model.

Black velvet is a great material to use here as its very dense texture soaks up all the stray light resulting in a very dark background behind. The trick is to get the gap around the edge of the softbox right as that’s what dictates the faux edge and top light look.

As you can see in the images I’ve provided here, the gap is about 6 inches at the top and on both sides. No need to worry about the bottom as we won’t see that. I’m suspending the black velvet with simple small bulldog clips with a piece of clear catgut (that’s fishing line to those of you with a 2 at the start of their year of birth) suspending it. Granted, it’s not very technical, but it does allow for a lot of flexibility when adjusting it.

The Top and Edge Lights

Once you have the softbox set up, the other two lights are very simple additions. My advice though, set the softbox up first and get that dialled in. Get the very visible and clear bead of light around the subject before even turning on the other two lights. If you’re not sure what to look for, take another look at the initial shot I shared with only the big softbox on behind.

Here you can see there is no light falling on the front of the subject and that I have a very even spread of light all the way around the subject.

To achieve this even spread of light all the way around, you need to adjust the gap of light all the way around to be even. That means the gap needs to be the same size all the way around, but the model also needs to be in the middle. The other aspect to watch for is the top gap lighting the top of the head. Don’t be tempted to make that gap bigger or smaller, instead, try raising or lowering the height of the softbox behind until the top gap of light is the same distance away from the model as the sides.

The Other Lights

As I said, with that backlight sorted, the other two lights are very easy to manage. Simply bring in the beauty dish key light. Position it high and angled down and ensure that it casts a visible shadow under the chin and nose etc. It’s this shadow area that we can then fill in with, you guessed it, our fill light. I personally think a small softbox is fine here, but a small umbrella will also work. Lastly, add your coloured gel for that extra visual drama and you’re done.


Closing Comments

This is a quick and simple setup, but the final shot looks very impressive for just 3 lights. That backlight is quite literally doing the job of 3 lights alone as that bead of light around the subject is simulating 2 edge lights and a top hair light all on its own. The trick here is getting the black velvet sorted, but once you have that cut to the size of your softbox and the clips attached, it’s very quick to simply throw that back up there next time. I will just leave you with one final pro-tip and that’s to make sure you stingy buggers don’t scrimp on the velvet! Obviously, I would never make this mistake to save a few quid, but just be wary of the cheap black velvet that’s actually shiny! There’s tons of the cheap stuff about at this time of year as it’s a very economical black fabric to make Halloween costumes from, so just be sure to get the slightly more expensive kind. The crushed velvet is the bad one as it’s shiny and the other more expensive one is often referred to as ‘plush’ velvet. Tune in next week for more tips from ‘Haberdashery at Home with Hicks’!


BIG Studio Lighting in small Spaces

You may have noticed that this week’s setup is also a very compact setup. Not that you’d ever do it, but you could technically shoot this setup in an area as small as a corridor. This lighting technique is just one of the setups from my very popular BIG Studio Lighting in small Spaces workshop and the whole premise behind this course is showing you inventive ways to create very dramatic-looking lighting with minimal kit and very limited space. This setup mimics a 5-light setup with only 3 lights and it does it in a way that negates the need for a lot of width and height in your space. These space-saving setups are great if you’re shooting on location with limited resources, but they’re also perfect for those who are working in smaller home studios. Just because you don’t have a ton of room to shoot in, it doesn’t mean you can’t still be very creative with your lighting too.

To learn more and to see what setups are covered and explained in this workshop, follow the link below.

|| LEARN MORE ABOUT THE BIG STUDIO LIGHTING IN SMALL SPACES WORKSHOP ||

Super Simple 2 Light Still-Life Setup

If you were curious about the still-life lighting setup this was originally scaled up from, you can check out my previous article on it here….

Super Simple 2 Light Still-Life Setup


JHP Livestreams…

I livestream every other Tuesday night via YouTube and there I answer your questions, critique your shots, take community images into Photoshop to work on them and discuss all manner of lighting tips and techniques. I look forward to seeing you and your work there real soon. Jake Hicks Photography - YouTube


All of my more advanced lighting classes are now available online!

||

All of my more advanced lighting classes are now available online! || All of my more advanced lighting classes are now available online! ||

LEARN MORE ABOUT MY ONLINE WORKSHOPS

 
Tuesday 11.12.24
Posted by Jake Hicks
 

Impromptu Lightroom Preset Pack 2024

Donate & Support

I've always wanted my photography education on here to be free, so although there is no paywall to any of my -Technique Tuesdays-, any and all support is greatly appreciated. ❤️

PLUS: Donate any amount and I’ll send you a link to the hi-res print version of my studio lighting book.

||

PLUS: Donate any amount and I’ll send you a link to the hi-res print version of my studio lighting book. || PLUS: Donate any amount and I’ll send you a link to the hi-res print version of my studio lighting book. ||


It’s time to thank your fellow togs! Why? Because I’m hurriedly putting together this free LR Preset pack for everyone in response to the incredible submissions to my recent Halloween Photo Competition!

Less than 24 hours ago I suggested an impromptu Halloween Photo Comp in place of my normal Monday -Share-a-Shoot- (ordinarily people submit images to my FB Page for feedback and critique). I simply thought it would be a nice change and a chance to see some fun and spooky photos given the time of year. ‘Themed’ submissions are often hit and miss as they can severely limit the pool of available images being shared, plus I gave no advance notice of this competition.

Boy was I wrong and I had no idea how seriously so many of you take Halloween as I quickly saw scores of incredible images being submitted!

I woke up this morning and knew there was no way I was going to be able to choose just one or two winners from all these great shots, so I decided to swiftly put together this free Lightroom Preset pack for everyone who entered…. and then I realised it would be more work to then try and get each every person the pack individually…. so now literally everyone is a winner! 🤣

So, huge thanks to those who submitted all of your incredible Halloween images and due to your incredible talent and my inherent laziness to reward you all separately, here is a free Lightroom Preset Pack for everyone!❤️

Scroll down to grab the free Presets, but on the way, check out just some of the incredible work that was shared.


Winner!

I did just say that everyone was a winner today, but some are winning more than others and if I had to pick my personal favourite shot from the 80+ (and still rising entrants) shots submitted, it’d have to be this incredible shot from Chris Juengel.

As many of you know, I love the cinematic look, striking colours… and shiny skin. So this shot immediately caught my eye. I will say that I know from experience how hard it is to play with very dark images like this. Keeping a lot of your image hidden in ‘clipped’ data is a daunting task for many of us and keeping a lot hidden whilst only giving away just enough is very tricky to do and Chris has nailed it here.

Couple all of that with some subtle light from below, incredible makeup and a pose that ties it all together and you have a very powerful image indeed! Great work Chris and a very well-earned +10 internet points to you my friend!

Chris Juengel


Honourable and Very Incredible Mentions

Of course, I would be remiss if I didn't take a moment to call out some of the other truly remarkable shots shared, so here are a few very honourable mentions…

Ludwig Oblin

Olivia Patterson

Wibbly Wobble

Whitney Minten

Jamie Mahon


Plus, arguably the most adorable Halloween shot I’ve ever seen goes to…

Chris Stevenson

I’d also encourage you to take a look at all the other fabulously spooky (and often downright terrifying) images submitted by the community and thanks again to all who shared an image. JHP Halloween Photo Competition 2024


The Impromptu Lightroom Preset Pack 2024

>>The Download Link will appear once you’ve clicked the [Submit] button below<<

-

>>The Download Link will appear once you’ve clicked the [Submit] button below<< - >>The Download Link will appear once you’ve clicked the [Submit] button below<< -

Name *
Please Confirm *

Thank you! Enjoy your free Jake Hicks Photography Impromptu Lightroom Presets 2024 via the download link below…

LINK >>> JHP Impromptu Lightroom Preset Pack 2024

Note: The download link above should start to download as soon as you click it.


Donate & Support

I've always wanted my photography education on here to be free, so although there is no paywall to any of my -Technique Tuesdays-, any and all support is greatly appreciated. ❤️

PLUS: Donate any amount and I’ll send you a link to the hi-res print version of my studio lighting book.

||

PLUS: Donate any amount and I’ll send you a link to the hi-res print version of my studio lighting book. || PLUS: Donate any amount and I’ll send you a link to the hi-res print version of my studio lighting book. ||


JHP Livestreams…

I livestream every other Tuesday night via YouTube and there I answer your questions, critique your shots, take community images into Photoshop to work on them and discuss all manner of lighting tips and techniques. I look forward to seeing you and your work there real soon. Jake Hicks Photography - YouTube


All of my more advanced lighting classes are now available online!

||

All of my more advanced lighting classes are now available online! || All of my more advanced lighting classes are now available online! ||

LEARN MORE ABOUT MY ONLINE WORKSHOPS

 
Tuesday 10.29.24
Posted by Jake Hicks
 

Lighting Setup: Simple 2-Light Cinematic Setup

Donate & Support

I've always wanted my photography education on here to be free, so although there is no paywall to any of my -Technique Tuesdays-, any and all support is greatly appreciated. ❤️

PLUS: Donate any amount and I’ll send you a link to the hi-res print version of my studio lighting book.

||

PLUS: Donate any amount and I’ll send you a link to the hi-res print version of my studio lighting book. || PLUS: Donate any amount and I’ll send you a link to the hi-res print version of my studio lighting book. ||


Let’s be honest, ‘cinematic’ lighting is almost the new C-word in our industry at the moment. Many of my older readers may remember a time when clients would ask for their images to be more ‘edgy’ and now the ‘cinematic’ word is quickly becoming a similarly esoteric buzzword that is simply far too overused. But can we distil this all-encompassing trend into a simple and effective setup? Let’s take a look.

I’ll be upfront from the get-go here, this is an introductory lighting setup designed to whet your appetite into the world of cinematic studio lighting. If you like the look of this, please take a look at my now very popular ‘Cinematic Studio Lighting Workshop’. This new course takes things a great deal further beyond this simple setup as go over how photographers are sorely underutilising so many incredibly effective cinematography techniques. I’ll provide more details at the end of this article if you’re interested.

Obligatory self-promotion aside, let’s examine some core tenets of the ‘cinematic’ look and try to incorporate them into our simple yet engaging lighting setup.

Upstage Lighting

This is an interesting and foreign concept to us stills shooters, but I need you to remember that the subjects on screen NEVER look to the camera! In every film you’ve ever seen (4th wall-breaking art films aside), the subjects never look at the camera, and this means cinematographers light their subjects very differently from us. Where we use key-lights in front of our subjects, cinematographers will often use lights behind or ‘up-stage’ of their subject.

Page 28 of 61 from my Cinematic Studio Lighting PDF

In the above images, you can see exactly what I mean. Nobody looks to camera so the light is often behind them and this is referred to as up-stage lighting. The style does mean that it only works when the subject looks away from camera so you need to keep this in mind for your interpretation of cinematic lighting. Do you want your subjects looking to camera? If so, you’ll need to adjust the light accordingly and for the setup I’ll demonstrate below, I opted to take the inspiration of the upstage light and have a strong light from behind, but I also wanted my subject to have the option to look to camera. With this in mind, I kept the light pushed back and more of a strong back light and off of the face.

This simple yet very important element that characters never look to camera in cinematic looks is a very powerful tool. Being cognisant of this decision will quickly and dramatically alter the way you light your subjects as many of us are so engrained to light our subjects with the ability to look to camera. I’ll be honest, as a fashion and portrait shooter of over 20 years, it’s extremely hard for me not to have my subjects look to camera, but I’d urge you to try it as a personal project at the very least.


Depth and Atmosphere

If you ever wanted to know the worst-kept secret of how to achieve the ‘cinematic’ look, it’s atmosphere and by atmosphere, I mean simulated depth.

For many of us studio shooters, depth is pretty simple; spend 2 grand on an f1.2 lens and call it a day (you know who you are). As studio shooters, we typically only have two planes of depth, the subject and the background…. that’s it. Why is depth so important? Ultimately it’s about managing that depth and determining what’s important in the scene. For us in the studio, it’s the subject and it’s extremely easy to make that subject a priority when there’s nothing else in the frame for the viewer to look at. But on far grander film sets, they have a lot of distracting elements that can potentially pull the viewer away from the importance of the character. Sure, a colossally wide aperture lens helps to throw the background out of focus, but sometimes that’s not always the answer.

I know, I know. It’s tantamount to heretical doctrine to even suggest that the widest possible aperture isn’t always the answer, but set down your pitchforks and hear me out.

Often in cinema, the scene or background is very important to the character and story, simply throwing it completely out of focus isn’t the answer. Instead, many scenes will employ smoke, haze and other techniques to subdue the background in the scene whilst still allowing it to be relevant and recognisable. There are a multitude of reasons for doing this, but ultimately it’s about separating the subject from the background so that we are immediately drawn to the subject in a subtle and believable way. You can’t just throw a spotlight on the subject, the subject needs to exist organically in the scene so instead of lighting them more dramatically than the background like us studio shooters would do, cinematographers often opt to subdue the background rather than simply highlight the subject.

Page 19 of 61 from my Cinematic Studio Lighting PDF

For larger sets, haze is a very easy and very effective tool to add depth, but it’s not always practical. I will say that if you have time and are able to, haze does give you the best results and most believable depth, but if that’s not possible for the aforementioned reasons, a lens filter is a great substitute in a pinch and it’s actually what I used in this setup I’ll go over it in more detail below.


Colour Contrast

The idea of colour contrast is more stylised and highly dependent on the project of course, but the basic principle of drawing attention to the subject with contrast is always applicable, it’s just that we’ll be employing colour as a tool as well as the basic luminance contrast. For example, David Fincher is a master of luminance contrast in his films. Many of David Fincher’s movies have a darker more sinister plot and much of them are shot at night. Se7en is a great example of this as there is actually very little colour contrast in that, but the lighting is impeccable and every element is visible without being overly lit as he’s a master of the checkerboard style of light. Counter to this are lighter (in mood) movies and they will often use colour contrast in a scene that is more evenly lit. Wes Anderson is an obvious example of this and he’ll often forgo any attempt at ‘normal’ colourings in favour of what simply looks best visually.

I make the very real distinction between luminance contrast and colour contrast here because they both play a vital role in understanding how to manipulate light and mood in a scene. I spoke about David Fincher’s film Se7en earlier. That’s a movie about chasing a serial killer, you wouldn’t light that with soft washes of colour and light. Instead, he opted for strong contrast and edge light that leaves an area of darkness that instils unease and tension in the viewer. You need to know what you’re trying to say with your image or portrait and choose appropriate lighting.

Page 16 of 61 from my Cinematic Studio Lighting PDF

In the above image, you can see some examples of colour contrast. The top left is the most obvious as I bathe the subject in a very subtle blue tone and then light the background with an orange glow. On the top right, I use colour contrast in the subject's outfit to make them stand off from the background, but I’m also using a very hard light on them to increase the colour contrast in the clothing. You may have missed it, but look at the razor-sharp chin shadow again. See how it’s a very hard light illuminating her, but it’s filled in with beautifully soft light as well. This is an extremely effective hard-light technique that isn’t plagued by heavy, visually distracting shadows.

Lastly, look at the bottom image and see how completely different the black-and-white version is. This is the very powerful difference between luminance contrast and colour contrast. The colour shot on the left draws us to the face and separates it from the somewhat dominant surroundings, whereas the black-and-white version loses all depth due to it all being of a similar luminance.

Learning how to drive visual direction with colour is crucial and you simply cannot rely on the basics of lighting ratios and light meters to direct attention in a scene. Having a firm grasp of visually dominant and recessive colours will quickly elevate your shots.


The Setup

I’ve covered a few of the basics above and upstage lighting, atmospheric depth and colour contrast are just a couple of the ‘cinematic’ triggers that you’ll often see in movies, but let’s now look at employing some of that knowledge in our simple 2-light setup.

First off, let’s look at the setup itself and then I’ll explain some of the finer details below to hopefully answer some of the questions you may have.

Cut Out & Keep

The grid isn’t strictly necessary, but it was on and it isn’t hurting.

ZHIYUN G300 can be placed very close to the ceiling

Here you can see just how close that top light is to the model.

Note: Shutter speed too fast for the LED screen here

ZHIYUN X60 set to its warmest Kelvin of 2700K.

JHP Patent Pending Pile’o’Crap - AKA Shiny/Translucent Foreground Elements


TL;DR/ADHD/Artist Setup Explanation

  • Setup curtain backdrop with folds to catch light

  • Position 90cm softbox directly above subject

  • Adjust this to be ‘cold’ AKA 6500K

  • Position smaller hard light back behind subject and up high angled down

  • Adjust this to be ‘warm’ AKA 2700K

  • Try to position this to light the model, hit the camera and also scrape across the backdrop

  • Include shiny/translucent foreground elements in front of camera lens


Kit Used

  • 1x ZHIYUN Molus G300

  • 1x ZHIYUN X60

  • 1x 90cm Parabolic Softbox

  • 1x Bare Reflector Dish

  • 1x Large Brown/Grey Curtain

  • Foreground Elements

  • Lens Filters


Camera Settings

  • Camera - Nikon D850

  • Lens - DC-Nikkor 105mm f2

  • Shutter Speed - 1/125th

  • Aperture - f2

  • ISO - 100

  • Kelvin - 4600K

  • Focal Length - 105mm


The Results

Click to enlarge any of the shots below.

Model: Jaye Hicks


Breaking it Down

The good news is, it’ll be quick, after all, there are only 2 lights, so how complicated can it be? But as we tentatively navigate around complacency, there are still a few core creative elements that I’d like you to consider and adjust to your own taste.

Upstage Lighting

You’ll need to determine how much you want to lean into this style yourself but to stay true to the upstage look, you’ll need to think of that strong, hard light from behind as more of your key light. That means it won't often look great when the model looks to camera as it’ll awkwardly catch their nose or worse. I know I can’t help myself and I never do a shoot where the model doesn’t look to camera for some of the best shots. So I often opt to be inspired by the upstage look, but push the light further around behind so it won’t catch the nose. I’d urge you to experiment with the look though and see what works for you.

Take a look at some of the Cinematic Lens Flare Filters I’ve used in the past.

Depth & Atmosphere

Arguably, one of the best parts of the cinematic look is the atmosphere and visual refractions you can get away with. An easy trick for this cinematic haze is to use lens filters. I personally think actual haze is best for the true depth look, but if time or environmental limitations prevent that, a lens filter is a great substitute. I’ve tried scores of these filters over the years and you can see which ones I prefer here Cinematic Lens-Flare Filter Comparison. Ultimately, you’re after a lens filter that will add a little flare to the image and you can get ones that produce everything from blooms in the highlights, lowers contrast, simulates haze and even ones that fake the anamorphic horizontal flares.

Lens Filters

If you’re curious as to how much these filters are doing in a shoot like this, I shot with several filters both on and off in this shoot, so here are the examples if you missed them above.

No lens filter attached - You can see no flare at all.

These 3 images show a good range of looks and as you can see, lens filters can play a very significant role in how the final image looks.

The most popular choice is arguably the bloom-style filter and you can see that it creates large flares with light hitting it. If you look carefully you’ll also see it blooming off of bright highlights like the models cuff button too.

Standard bloom-style filter - Very distinctive flaring and blooming

Anamorphic flare filters - a very distinctive, yet subjective look.

Colour Contrast

A very well-established and popular technique used in many TV shows and movies today is the colour contrast seen between either end of the Kelvin scale. Yes, the orange and teal look is arguably overused today, but hey, I was doing it before it was cool so you’re just gonna have to live with it! Ego aside, the idea of mixing Kelvin contrast is essential to understand and it’s not too tricky, you simply have some lights far warmer than other lights that are far cooler.

In this setup I had the back, upstage light set to be very warm at 2700K and the light above at a cooler 6500K. The trick then is to set your camera Kelvin somewhere between the two so you get both blue and orange tones present in the shot and for this particular shoot, I was around 4600K.


Foreground Elements

Many cinematic sets and spaces are often fairly small, especially if you’re shooting on-site or in a home studio. One very strong element of a cinematic look is depth, but how do we create depth where there is none?

Depth in a scene is very important as it helps lead the viewer through it or into it and having foreground elements in the frame is an easy way to do that, so what do we do when these foreground elements simply aren’t there or more typically, aren’t in the right place? The simple solution is to fake them and you can do this in any number of ways, but I often prefer to grab random elements from the scene around me and place them in the foreground of the shot to attempt to make it a little more believable. As you can see in the above BTS shot, I really am grabbing any random object that will catch the light.

In case you weren’t sure what I meant by ‘foreground elements’, it’s these very out-of-focus bokehs and distortions.

There are a couple of tips I’ll share for this but the biggest one is that this foreground element effect really only works when we have a light behind the subject firing back into the lens. That light will catch on all of these objects and will in turn refract and flare into the lens.

We also want to find elements that will reflect or catch the light. Think anything silver or reflective and here I’m even using cutlery clamped into C-Stand knuckles to get the shine where I want it. One big tip is to use glasses of water. You can all but guarantee every location will have a glass and some water, but this combo works so well due to it refracting and distorting the light that enters it. You can even see the very clear distortions in the image shown above too.

Couple all of this with light pointing towards the camera, a fancy lens filter and a very wide open aperture and the foreground elements will be very visible.


Sure, you can slap a cool-looking Lightroom Preset on any image and it’ll look more ‘cinematic’, but there are a lot more elements we can incorporate into our setups to get the best from this popular style.

Final Tips & Points to Remember

As I stated at the start, the word ‘cinematic’ is, in my opinion, very often overused and nearly everything with a basic Lightroom Preset on Instagram gets called cinematic today. But the overuse is simply due to how popular the idea of the cinematic style is and if we can understand and utilise what made that style so popular to begin with in our own work, we will likely create some very engaging imagery.

With that in mind, let’s recap some of the core tenets of the cinematic style.

Upstage lighting - try to light your subjects with a strong light from behind. Couple this with a fill-light in front and as long as the subject looks away from camera, you’ll quickly develop a cinematic aesthetic with light alone.

Depth & Atmosphere - this is the easiest way to get that cinematic look and whether you’re simply adding smoke from a can at a wedding to get those ‘god-rays’ or you’re filling an entire studio with haze to get a dramatic sci-fi night shot, faking atmosphere is extremely powerful.

Colour Contrast - although orange and teal are often overused today, you cannot ignore the power of successfully using contrasting colours, especially ones on the Kelvin scale, to add drama and separation to your scene. Don’t just look at luminance contrast, pay very close attention to colour contrast as well.

Foreground Elements - this is easier to do than it first looks and yes if you have something on-site that you can shoot through or past then perfect, but don’t be afraid to get creative with foreground elements and positioning reflective and translucent objects in front of the lens is a powerful visual look to lead a viewer into a frame.

Compress the Scene - simply put, use a long lens. Although this isn’t a strict rule, much of cinema is shot on longer lenses as a lot of what makes a powerful scene, is a close shot of a subject with minimal distractions. Roughly translated to stills-photography, look to use an 85mm or 105mm lens to get the best results.

Blur the Background - you guessed it, shoot wide open! Many of you are already doing this, but shooting on a wide-open aperture is an easy way to reduce distracting elements in a scene. Blurring the background keeps the visual power on the subject and not the potentially distracting elements behind them.

Shoot Landscape Orientation - as portrait shooters, this is very hard for us to do, but yes, the obvious trait of cinematic-looking shots is of course to shoot in landscape orientation… but after 20+ years of portraits, I fail at this, so do what I say and not what I do!

Bonus Tip:

Add a little grain - this one is more subjective, but a lot of cinematic looks are reminiscent of film and by film I mean the analogue kind. Much of cinema is about nostalgia and with that comes the romantic memory of older movies and many of them have an organic look thanks to film grain. In all of the images here, I experimented with a new LR Preset from a friend of the community VMoldo. He sent over a new way of applying grain to images with masks for luminance values in each image and it produces a more natural and believable grain than simply applying it uniformly throughout the shot. If you’re interested, head over and take a look at his Filmic Tone Limiter


Good luck if you’re giving this setup a go, let me know how you get on and as always, if you have any questions, fire away in the comments below.


You’re just getting started…

The cinematic style is so popular for a reason as it’s extremely fun to play with lighting in a way that incorporates a subject into a scene over simply sticking them in the scene like many of us do with traditional studio lighting.

Light the scene in such a way that the subject exists within it effortlessly and you’ll go a long way in making your portraits less contrived and far more cinematic.

What I’ve covered here today is really only the basic bullet points of incorporating a cinematic look to your portraits and I’ve not even covered any specific cinematic lighting techniques that are used in nearly every film we see today. How do we light a small environment to look bigger than it is? How do we light a tight space and subject with beautifully soft light if we can’t use big lights or bring lights further away? How do we sculpt a subject in light to both flatter them and enhance elements like fabric and textures and do it in a way that minimises the post-pro required?

If you’re interested in learning all of this, plus a whole lot more about the cinematic style and how we as photographers can incorporate all of those skills into our own work, I have written a course specifically designed for photographers called ‘Cinematic Studio Lighting’.

|| LEARN MORE ABOUT THE CINEMATIC STUDIO LIGHTING WORKSHOP ||

Products Used

ZHIYUN

As I mentioned in previous articles ZHIYUN sent me these lights to review, but I am not being paid to share my thoughts. Below is a link to the lights and modifiers I used, supposedly if you use them, I will earn a very small amount of commission from them. It is minimal though and beer money at best so if you find a better deal elsewhere, please feel free to take it. All that said, they have provided me with a discount code for you to use on their official site. Use code ‘JakeHicks’ to earn 10% off anything on their site.

ZHIYUN MOLUS G300

I’m sure you don’t need me to explain this light further, but here's the link to the ZHIYUN website below.

ZHIYUN MOLUS G300 Website Link


ZHIYUN X60

This link is for the COMBO RGB Kit I had. That includes the battery, power cable, diffusion dome, carry case etc.

ZHIYUN X60 Website Link


ZHIYUN 90cm Parabolic Softbox

An excellent, generously sized softbox that is very well made and seems robust - most importantly, it’s very easy to put up!

ZHIYUN 90cm Parabolic Softbox Website Link


JHP Livestreams…

I livestream every other Tuesday night via YouTube and there I answer your questions, critique your shots, take community images into Photoshop to work on them and discuss all manner of lighting tips and techniques. I look forward to seeing you and your work there real soon. Jake Hicks Photography - YouTube


All of my more advanced lighting classes are now available online!

||

All of my more advanced lighting classes are now available online! || All of my more advanced lighting classes are now available online! ||

LEARN MORE ABOUT MY ONLINE WORKSHOPS

 
Tuesday 10.22.24
Posted by Jake Hicks
 

Review: What makes the new ZHIYUN Molus G300 unique?

Donate & Support

I've always wanted my photography education on here to be free, so although there is no paywall to any of my -Technique Tuesdays-, any and all support is greatly appreciated. ❤️

PLUS: Donate any amount and I’ll send you a link to the hi-res print version of my studio lighting book.

||

PLUS: Donate any amount and I’ll send you a link to the hi-res print version of my studio lighting book. || PLUS: Donate any amount and I’ll send you a link to the hi-res print version of my studio lighting book. ||


We see new LED lights being released every week now, so how do we pick them apart? Even entry-level LED lights are good these days, and it can seem a little daunting to know where to start. So, when all LED lights seem to do the same thing at first glance, what makes an LED light stand out in today's seemingly limitless sea of choice? Let me introduce the ZHIYUN Molus G300.

Disclaimer: As always, let’s clear the air here; I was contacted by ZHIYUN whereupon they offered to send over some of their lights. I don’t make a living or any direct money from reviewing products, so I’m typically pretty hesitant to accept them. Sure, ‘free-stuff’ sounds cool, but the cost of a light is very marginal compared to the cost of my time to test, retouch images and write a review! That said, ZHIYUN was relatively new to the lighting space and I’d recently heard of a few products they’d been putting out, plus I’ve been looking at single-point (S-fit) LEDs to compliment my LED panels so I agreed to take a look. TL;DR ZHIYUN have not and are not paying me to share my thoughts on these lights.


Who are ZHIYUN?

I spoke at length on the lore of ZHIYUN a couple of weeks ago when I reviewed the ZHIYUN X60, so I won't be going into detail on the brand again here. Of course, If you’re interested in exploring the origin story of this relatively new lighting manufacturer, I recommend you take a look at my previous review to learn more.

Review: ZHIYUN - Molus X60 RGB LED


What is the Molus G300?

Unsurprisingly this is a 300w LED light. It has no RGB capability, but it does have the ability to adjust the Kelvin range from 2500K up to 6500K. Plus, I’m sure the keen-eyed among have also spotted that this isn’t a regular LED panel, but a single-point S-Fit LED. Meaning, it’ll accept all your current S-Fit modifiers you already own.

That’s the G300 bio; 300w, bi-colour and takes S-fit. But as we all know, nobody reads the bio, it’s all about the looks, right?

Surely I’m not alone in thinking that’s a sexy light! My personal and questionable illumination proclivities aside, this is a very stylish light and as soon as it came out of the box, I was immediately struck and impressed by the build quality. This is not a cheap-feeling light.

Immediate first impressions aside, what’s going on with this light? Why is it in two pieces?


Light Design

As you likely spotted in the shots above, this light comes in two parts, you have the lighting unit where the big yellow LED ‘bulb’ is and then you have the control box where you adjust the power output and temperature control.

Both of these sections are a similar size at slightly larger than the palm of your hand and they weigh a similar amount at around 2 to 3 KGs each. The one core feature among them of course, is that jumbo red fan that takes up the majority of the space. Both of these boxes are joined together via a cable and the control box has another cable which is in turn is plugged into the wall. While we’re here, I’ll just mention that this light is only powered via the cable and this light cannot be battery powered.

As I mentioned, the unit that produces the light, the section that takes the S-fit modifiers, has no switches or dials and everything is controlled from the control box. This has several benefits and with a 3m cable connecting the two units, the light itself can be up very high or even in an awkward spot and you can still control the light easily via the control box hanging on the lightstand.

Speaking of cables, the control box also has a 4.5m power cable to the wall too. Again, these cables are of a very high quality and the connectors are all smooth and snug.


Details

I’ve already mentioned first impressions, but I do want to reiterate how much I was struck by every design choice and build quality one last time before I move on. The cable that powers the light unit is brushed metal with a satisfying sleeve-lock and looks extremely sleek. But, it’s not just about the looks, as the mount that holds the light to the stand is extremely sturdy. When this light was first announced, my immediate response was to be extremely sceptical of that bracket. As we can see, the light has no main body to balance it out, so when we mount a large modifier on the front of this, all of that weight and tension is put on that bracket alone. But my concerns we alleviated as soon as I saw it and used it as the bracket is extremely heavy-duty and although it may look like moulded black plastic in my images, the whole thing is actually brushed metal (seems obvious to me, but more lights need to be brushed metal to avoid any and all refections). The bracket is very sturdy along with a very snug and easy-to-lock handle that is easy to grip, even if the light is up high.

P.S. That metal bracket also has an umbrella hole and screw lock which is located very close to the actual light source, which is a big plus!

The Molus G300 comes with an extremely sturdy and robust all metal light attachment point with an easy-to-lock handle.


What’s included

  • Molus G300

  • Standard Reflector

  • Protective Cover

  • Power Cable

  • Power Adapter/Box

Price: £599 - Price from official ZHIYUN website - September 2024


Specs at a Glance

  • Power: 300W

  • Overclock up to: 500w - I’ll get to that later

  • CCT Range: 2700K - 6500K

  • CRI: 95

  • TLCI: 97

  • Power: AC Power only - No battery option


Core Functionality

This is no nonsense light. You turn it on, choose the colour temperature with one dial and choose the power with the other. If you want a light that does what it’s supposed to immediately, this is it.

CCT Mode …. that’s it!

As I said, you turn it on and it’s instantly pushing out light and you’re instantly presented with the 2 core options of Kelvin and power without the need to scroll through a dozen features you’ll never use.

All of the functionality is on the control box, not the light itself and the left-hand dial controls power in individual percentages from 0% to 100% and the right-hand dial controls the Kelvin from 2700K to 6500K in 100K increments. This isn’t the biggest range of Kelvin out there, but for most people, this will be plenty as it covers the core tungsten colours as well as most daylights beyond extreme blues.

Of course, the benefit of this condensed Kelvin range is more consistent power throughout.

I took a shot at varying power ranges and measured the brightness falloff as the light utilises differing amounts of LEDs to change the overall colour.

Shots taken at max power (300w) 1m from white wall - ISO 100 - Shutter Speed 1/125th

  • 2700K - f8

  • 3200K - f8.1

  • 3700K - f8.2

  • 4200K - f8.2

  • 4700K - f8.3

  • 5200K - f8.3

  • 5700K - f8.3

  • 6200K - f8.2

  • 6500K - f8.2

    Note: Decimals shown here represent tenths of a stop

TL;DR The power output (brightness) of this light is very consistent no matter what you set the Kelvin value to and from the lowest to the highest, we only gain/lose 3 tenths of a stop.

Kelvin Consistency

One aspect that’s rarely looked at too deeply with these LED lights that tout a CCT mode, is the actual Kelvin values these readings really display. Sure, we can turn the dial to 3200K, but are we actually getting that colour? For example, many cheap LED lights will have wildly varying colour discrepancies so let’s see how the G300 light fares.

Above you can see images taken at a variety of Kelvin steps and I simultaneously matched the Kelvin of the light to the Kelvin in the camera for each image. To be clear, this is far from a definitive test as there are often variances in white balances from camera to camera and manufacturer to manufacturer, plus I’m not using a colour meter, but it does illustrate how variances in colour can occur at different Kelvins. Note that these tests were done at full power (300w) to allow for the LEDs to achieve their best possible colour.

In a perfect world, both the light Kelvin and camera Kelvin would match perfectly and all of the above images would be a clean and neutral white tone. Yes, you can clearly see some variance in colour across the range, but remember that this isn’t a full RGB light so we can’t tweak the tint range to manage some of those green/magenta shifts. That said, this light is actually pretty good. Many of the cheaper LED lights vary wildly when tested like this and I’d be very comfortable using this light knowing that what I dialled in, is (pretty-much) what I’m going to get.

Side-Note/Pro-Tip: You’ll often notice the cleanest tones at the top and bottom end of these tests as that is when only one set of LEDs is being used - This isn’t always the case with RGB lights as we can tweak the tints, but for the cleanest colours with these CCT lights, it’s often worth sticking to one end or the other, but again this is a mute point if you’re adjusting the Kelvin later in post anyway.

Of course, all of these variances are rarely an issue due to you being able to white balance it out in post, but with multiple lights on set and often from multiple brands, this becomes harder to do.


Boost Mode gives you access to a 500w light - albeit at the cost of having to shoot at 4300K whilst needing to shout over the noise of a jet engine!

Beast/Boost Mode

Of course, I’d be remiss if I didn't talk about one of the more interesting features of the Molus G300, its ‘boost mode’. To access this mode, you simply hold down both the Dim & CCT buttons for a couple of seconds and…. you’re now in Boost Mode!

Once in this mode, the light will be boosted to its maximum brightness instantly which enables a 500w output up from the base 300w. This gives you about two thirds of a stop more power and is nice if you really need just a little bit of extra light.

This feature is cool to have of course and having access to 500w of power is good in a pinch if you need it. There are some caveats to this super-power though and that includes the light automatically switching to 4300K. I’ve mentioned this in the past, but remember that CCT lights utilise two sets of LEDs to achieve this extended Kelvin colour range. Typically, this means that these CCT lights will be brightest in the mid-range of their Kelvin as that’s the spot when both sets of LEDs are being used. This is why the G300 automatically switches to that 4300K for maximum brightness.

The other very noticeable caveat to accessing the G300 turbos, is the need to also access the jet engine fan that has been dormant up until this point! Yes, when you redline this light up 500w, the fans kick-in and when I say kicks-in, I mean a small platoon of hair stylists simultaneously turn their hairdryers to full power right next to you. AKA it’s LOUD! Yes, it is distractingly loud and filming video on the same continent is off the agenda, but if you need an extra boost of light for a while, the option is there for you….. just warn everybody in the building you’re about to use it before engaging it!


Good News: It’s S-Fit

I’m sure you’ve realised this by now, but I will briefly mention it in case it wasn’t clear, but this is an S-Fit light. This means it will accept all of your old Bowens modifiers as well as any of the newer Godox modifiers. Many of you know that I typically use the panel-style lights from Rotolight, namely the AEOS 2 Pro. These panels are excellent, but I cannot modify them in any meaningful way with other lighting modifiers. Having at least a couple of S-Fit LED lights like this Molus G300 here is essential if you aim to get into creative lighting and ZHIYUN making this light S-Fit means it has hundreds of third-party lighting modifier attachments already on the market. That said, I used a couple of the new ZHIYUN S-Fit modifiers whilst I was testing this light and they were excellent too. More on that below.


The Results

Enough nerd-talk and number crunching from the spec-sheet, let’s see what the ZHIYUN Molus G300 can actually do!

Set 1 - ZHIYUN Molus G300 - Outside Kelvin-Push

Click to fit to screen

Cut Out & Keep

Click to fit to screen

Camera Settings

  • Camera - Nikon D850

  • Lens - 24-70mm f2.8

  • Shutter Speed - 1/100th

  • Aperture - f2.8

  • ISO - 1000

  • Kelvin - 2700K

  • Focal Length - 56mm

Comments

If you were paying attention, you may have noticed the ISO 1000. No, that’s not a typo, it was indeed set to that. The reason for this is due to the shoot getting a late start and by the time I started taking pictures, the ambient dusk light had all but disappeared. Yes, I could have easily set the G300 to overpower that dusk light, but I wanted to play with a little opposing Kelvin colouring here. As you may know, dusk light is very blue/cold, and all of the blueish light you see in these final shots is from that ambient dusk light. To make that ambient light blue, the camera was set to a very low Kelvin of around 2700K and then the Molus G300 was also set to that same Kelvin colour to make it appear neutral in-camera. From here I just worked with apposing shadows to make the blue tone appear where I wanted it. This is also why the Molus G300 was set to 1% power! Any brighter and I wouldn’t have been able to balance the shot accordingly.

Note on the ZHIYUN 85cm Lantern

This thing is awesome (the big white globe thing hanging in the BTS). Very quick to pop-up and it even comes with a skirt if you need to flag off some of the light from spilling back into shot. The quality of light speaks for itself, but it is interesting to note how even the spread of light is within this thing. Remember, this isn’t an exposed bulb, in fact, it’s a recessed disk of LEDs and yet the light emanating from this lantern is beautifully even and soft. Definitely worth a look if you’re interested in this type of light.


Set 2 - ZHIYUN X60 + Molus G300 - Hard & Soft

Click to fit to screen

Cut Out & Keep

Camera Settings

  • Camera - Nikon D850

  • Lens - 105mm f2

  • Shutter Speed - 1/250th

  • Aperture - f2

  • ISO - 1000

  • Kelvin - 3700K

  • Focal Length - 105mm

Comments

The key premise of this setup is the mounting of the soft light directly behind the hard light. In this setup, the ZHIYUN X60 is the hard light as it’s a small light source with no modifier and the soft light is the ZHIYUN G300 with the 90cm Parabolic Softbox directly behind it.

There are many benefits to this, but the most apparent one is the absence of dual shadows and more importantly, no crossed shadows. With 2 lights mounted on the same axis like this, you have very clean light with no competing shadows as the soft-light simply compliments the hard-light by filling in the shadows the hard-light creates.

The only other aspect of this very simple setup, is the colour shifting I’m achieving via the Kelvin differences between these two lights. The colder hard-light (X 60) is creating those slight blue highlights on the skin and the softer G300 that’s set slightly warmer behind is filling those shadows with that orange glow. This only works of course if you set the camera Kelvin somewhere between the two.


Set 3 - ZHIYUN X60 + Molus G300 - Cinematic

Click to fit to screen

Click to fit to screen

Note: The screen on the light is fine, it's just my shutter speed is too fast to capture it properly in these BTS shots.

I took a ton of gorgeous shots from this last setup and as you can see, it’s a little more involved than the other sets, that said, it’s still only utilising the two ZHIYUN lights!

This article/review is already monstrous, but I promise to revisit this set and share the full lighting breakdown very soon.

Camera Settings

  • Camera - Nikon D850

  • Lens - DC-Nikkor 105mm f2

  • Shutter Speed - 1/125th

  • Aperture - f2

  • ISO - 100

  • Kelvin - 3750K

  • Focal Length - 105mm

Comments

As I mentioned above, I will provide a full breakdown on this setup in the coming weeks so keep an eye out for that, but in the meantime, I did want to comment on a couple of key factors about the G300 that I’ve not really spoken about.

Light Design… again

As you can see from the above photo, the G300 is mounted right up against the ceiling for this shot. Granted, I left a small gap for airflow, but essentially this light will lay flush to the ceiling above which gives you the absolute maximum use of space. Couple that with the G300 body itself only being a couple of inches deep and I’m able to mount this 90cm deep parabolic softbox above the subject in a small studio!

I also glossed over it in that first setup outside, but the G300 is a perfect light to mount these lights vertically like this, not just for space, but weight as well. The main weight is in the control box and that’s not the thing mounted up high. For safety, obviously, I used sandbags on all of these sets, but let’s just imagine a world where I was lazy and clearly very irresponsible, I am very reliably told by someone I trust, that all of these sets and suspended lights are absolutely fine to be suspended up there without sandbags! Like I said, I would never do that myself, but I just thought I’d mention it here anyway.

The other major benefit of this lights design is that with the light up high and above the talent like this, you have all the light control down here with you. The control box on the lightstand has the power and Kelvin dials and yes, lighting apps exist, but if you prefer shooting and not faffing on your phone, the benefit of the controls next to you is a huge plus for me personally.


The ZHIYUN App

I typically don’t bother including the lighting company apps in my review as they’re always awful, but I’ve been called out on it in the past, so I thought I’d take a look.

The TL;DR on the ZHIYUN app which is actually called the ‘ZY Vega’ app, is that the app is amazing!

I sang its praises in my previous review of the X60 and nothing has changed here. Typically these apps are a pain to sync and then drop out, aren’t recognised, won’t talk back and forth etc. etc. This means I NEVER use lighting apps, but I know others do and rest assured none of those aforementioned issues are present here.

I opened the app and the G300 was instantly there. I clicked on it and was instantly in the interface. Seems too good to be true, right? The G300 doesn’t have many modes and features anyway so it’s pretty bare-bones in there, but it did have a few light presets like tungsten and daylight etc which were nice along with a few CCT gel presets. The only other mode is a CCT matcher, which means you point your phone camera at a light source and the light will instantly match the Kelvin.

These are a bunch of useful and easy-to-use features that aren’t accessible on the light so it’s great to have them here in the app as a bonus.

Open the app and the light is instantly there! - Note you can even access Boost Mode here via that MAX button.

There are also several commonly used CCT gel presets.

Inside you have access to several real-world lighting presets and the list actually carries on off-screen to the right.

The app also allows you to colour-match a Kelvin with your camera phone.


Final Thoughts

Alright guys, we’re on the final stretch now, let’s start splitting hairs.

Pros

  • Very small profile head allowing for tight work in low ceiling studios

  • Lightweight head allowing for heavy modifiers to be attached with minimal burden to booms and stands

  • Very cool-looking design (it’s important, accept it)

  • Boost-mode is a nice bump in power if you need it

  • Clean-ish colour throughout the Kelvin range

  • S-Fit - need I say more

  • App that actually works even though I know you dont believe me

Cons

  • The thing wants to propel itself across the studio when you engage boost-mode AKA loud AF

  • No case - I would have liked a snug case to keep the separate pieces together

  • A lot of cables - a case would help with this as the light and control box adds another cable

  • Limited functionality - but you know that before purchasing


Who is this light for?

An LED light that isn’t full RGB and costs just under £600 is a tough sell. That said, this is an excellent piece of kit and as soon as I took it out of the box it felt like quality. The light does feel very well made and has a weight to it that feels like it’ll last a long time. 300w at base isn’t the most powerful unit you can get for your money, but you can boost this to 500w if needed. I’ve not tested how long it’ll last redlined in this mode and I assume it’ll kick itself back down to 300w when it needs to…. or when your ears start to bleed. Whichever happens first.

Ultimately, I think this purchase will come down to whether you need a unique light like this and by that, I mean a light that has a very low profile lighting unit that weighs very little and a light that can be positioned up high or in awkward positions if need be.

Couple that with a control box that you can keep with you and control without hassle and you have a very compelling product. I for one have several modifiers and setups that will absolutely benefit from this feature alone and I know that I will definitely be using this light long after this review is written. If you have the budget, then I think many studio and location shooters will see the merits of having at least one of these unique Molus G300 units in their kit.

As always, thanks for reading this and good luck with your future shoots. If you have any questions, fire away in the comments below or find me on socials.

Featured Model: Jaye Hicks


Products Used

ZHIYUN

As I mentioned at the top, ZHIYUN sent me these lights to review, but I am not being paid to share my thoughts. Below is a link to the lights and modifiers I used, supposedly if you use them, I will earn a very small amount of commission from them. It is minimal though and beer money at best so if you find a better deal elsewhere, please feel free to take it. All that said, they have provided me with a discount code for you to use on their official site. Use code ‘JakeHicks’ to earn 10% off anything on their site.

Use Code: 'JakeHIcks' for 10% Discount on the ZHIYUN Website ||

||

Use Code: 'JakeHIcks' for 10% Discount on the ZHIYUN Website || || Use Code: 'JakeHIcks' for 10% Discount on the ZHIYUN Website || ||

ZHIYUN MOLUS G300

I’m sure you don’t need me to explain this light further, but here's the link to the ZHIYUN website below.

ZHIYUN MOLUS G300 Website Link


ZHIYUN X60

This link is for the COMBO RGB Kit I had. That includes the battery, power cable, diffusion dome, carry case etc.

ZHIYUN X60 Website Link


ZHIYUN 90cm Parabolic Softbox

An excellent, generously sized softbox that is very well made and seems robust - most importantly, it’s very easy to put up!

ZHIYUN 90cm Parabolic Softbox Website Link


ZHIYUN 85cm Lantern Softbox

If you’ve never used a lantern softbox, I’d encourage you to try one, especially if you like a more ‘natural’ looking light to your portraits. This one is a great size and surprisingly easy to put up and take down.

ZHIYUN 85cm Lantern Softbox Website Link


JHP Livestreams…

I livestream every other Tuesday night via YouTube and there I answer your questions, critique your shots, take community images into Photoshop to work on them and discuss all manner of lighting tips and techniques. I look forward to seeing you and your work there real soon. Jake Hicks Photography - YouTube


All of my more advanced lighting classes are now available online!

||

All of my more advanced lighting classes are now available online! || All of my more advanced lighting classes are now available online! ||

LEARN MORE ABOUT MY ONLINE WORKSHOPS

 
Tuesday 10.08.24
Posted by Jake Hicks
 
Newer / Older