• Technique
    • Latest Techniques
    • FREE TIPS
    • Quick Tips
    • Video
    • Site Search
    • Blog
    • Archives
  • Mentoring
  • >Online Workshops<
  • Workshops
  • Studio Lighting Books
  • Contact
    • Newsletter
    • Contact
    • Statement
Jake Hicks Photography
  • Technique
    • Latest Techniques
    • FREE TIPS
    • Quick Tips
    • Video
    • Site Search
    • Blog
    • Archives
  • Mentoring
  • >Online Workshops<
  • Workshops
  • Studio Lighting Books
  • Contact
    • Newsletter
    • Contact
    • Statement

Lighting Setup: Mylar made easy - Don't use it!

Donate & Support

I've always wanted my photography education on here to be free, so although there is no paywall to any of my -Technique Tuesdays-, any and all support is greatly appreciated. ❤️

PLUS: Donate any amount and I’ll send you a link to the hi-res print version of my studio lighting book.

||

PLUS: Donate any amount and I’ll send you a link to the hi-res print version of my studio lighting book. || PLUS: Donate any amount and I’ll send you a link to the hi-res print version of my studio lighting book. ||


I’ve made several Mylar infused lighting setups over the years and yes, I’m sure you think you’ve seen them all by now, but this one is different…. I promise!

Your scepticism aside, I will capitalise on the fact that you’re still reading this and cover the basics first…. although I know you’ve probably already skipped down to the lighting diagram!

What is Mylar?

I’m specifically referring to silver Mylar, a very thin sheet of highly reflective film, most commonly used in gardening. A seemingly odd addition to a photographers kit for sure, but the extremely thin and very shiny nature of this material is used to wrap plants for warmth and it’s that same material those helium balloons are made of. Now that you know what it is, how is it useful to us photographers?

Why do I use it?

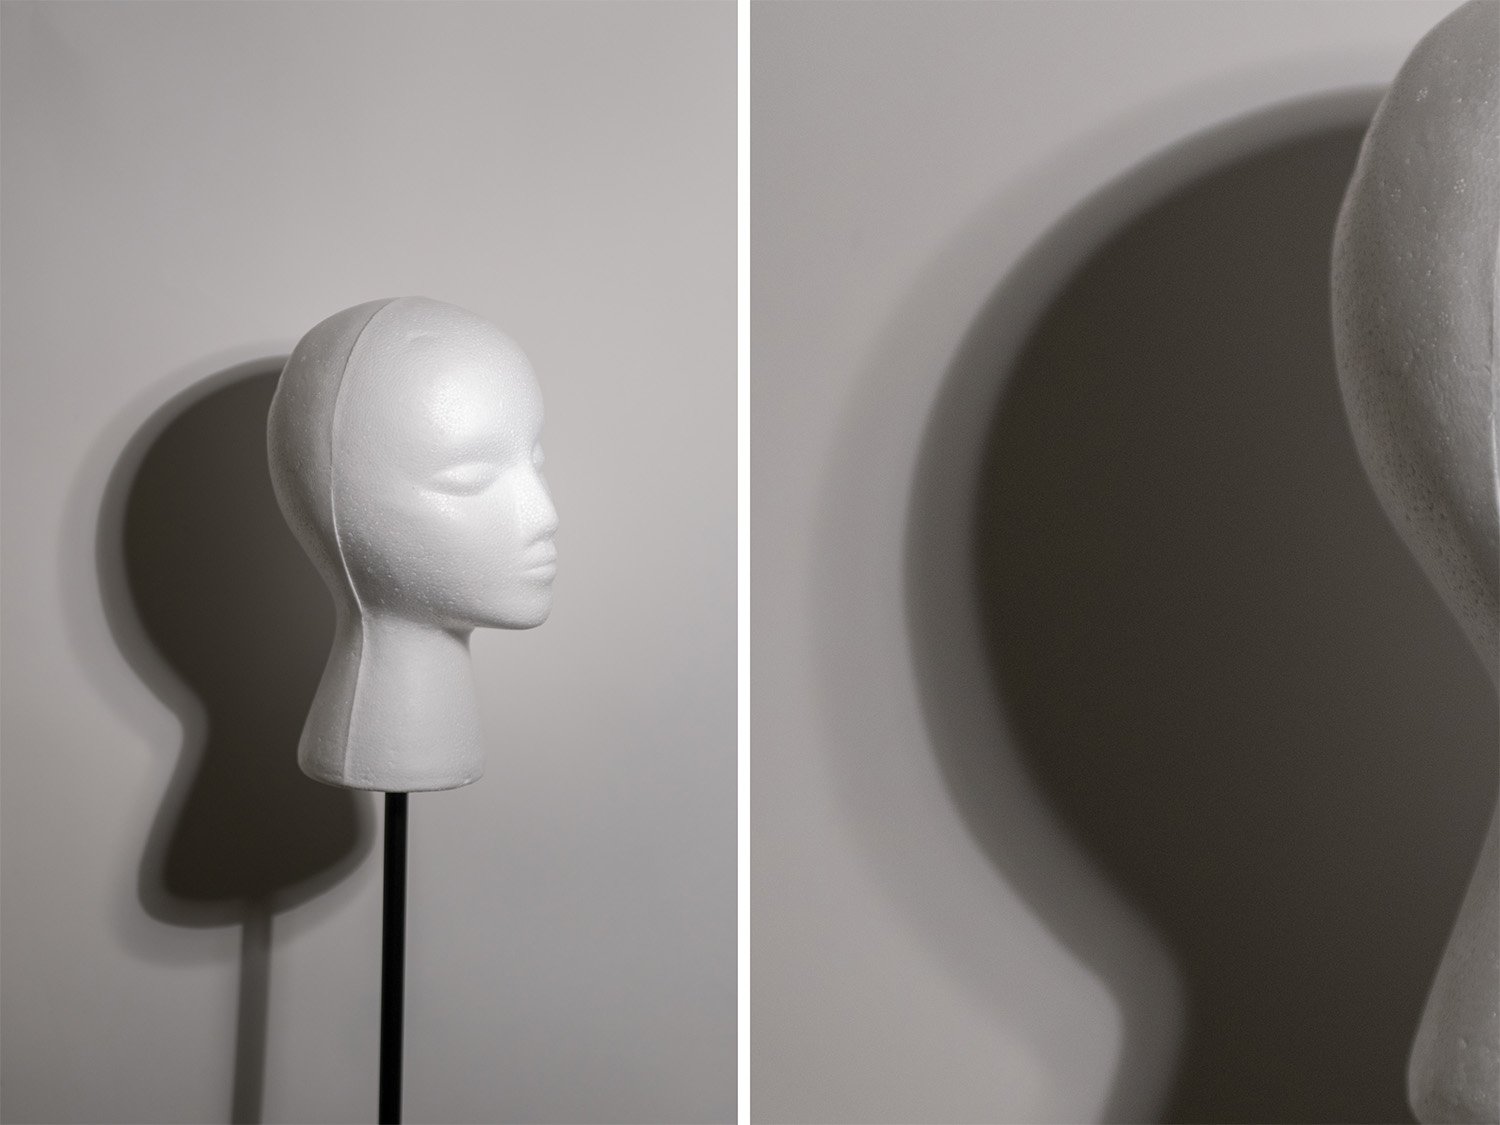
For years I’ve been buying rolls of Mylar and suspending it either in front or above the subject in my fashion and portrait shots. I then bounce a very strong light source into it that ultimately ends up on the subject. The resulting light is a mottled and dappled effect, similar to standing under trees on a sunny day or even the caustics seen at the bottom of a swimming pool.

The dappled or textured reflective light you see behind the model here is from light bounced into silver Mylar.

I’ll admit, I’m always on the lookout for new ways to add ‘texture’ to my light and this comes from someone who spends 90% of their time in a studio. Many photographers very sensibly look for the cleanest light they can and that’s an admirable endeavour, but that type of light can look overly sterile and boring very quickly. Don’t get me wrong, that lighting has its place, but when you want something to look more engaging than a LinkedIn profile pic, it’s time to get creative with your light.

Why is it popular?

I assume the popularity of Mylar is simply due to its ability to create light reminiscent of ‘naturally’ occurring light patterns, like the light coming through trees or ripples in water. Studio lighting is often quite impersonal and emotionless and this lighting effect will add some of those more organic and natural-looking elements into an otherwise cold image.

Why reinvent the wheel?

This is likely my 3rd or 4th Mylar-related setup, so why am I sharing yet another one? Many of you have likely tried at least one of those setups in the past and if so, you’re likely very aware of the issues that working with Mylar can present. Yes, Mylar creates a very cool effect and it can be achieved very cheaply, but the biggest downside of Mylar is actually controlling that cool effect.

The beauty of the Mylar look is that randomised light and dark highlight contrast that shimmers across the subject. This is great for video of course as we can see it moving, but for stills, we ideally want that highlight to be on the face and if we’re being really greedy, the eyes. Sadly, the greatest strength of Mylar, being its random texture, is also its greatest weakness.

The Problem with Silver Mylar

To get that cool-looking textured light, we need to move or ripple the silver Mylar sheet. If we don't do this then the flat sheet simply doesn't prodcue any texture or highlights. In the past, I've used fans or assistants to push, waft, hold, stretch and crinkle that damn sheet, but even then the resulting highlights move and getting them just right on the subject's face (that's also moving) is very tricky. So tricky in fact, that I often just cheat and keep the effect on the background where it doesn’t need to be so precise.

Typically, the only way to get those beautiful highlights and textured light is by moving and rippling the silver Mylar in some way. This made it tricky to get consistent and manageable results.

The Solution

So on the off-chance that you can’t get a fan to do exactly what you want for every single frame you take, or you can’t find some poor soul to stand there clutching and tugging the silver sheet for an hour, here’s the solution I found.

Don’t use silver Mylar!

Mirrored Vinyl

Ironically I bought a roll of mirrored vinyl years ago for a separate project and had a bunch left over. I wasn’t sure what to do with it and had an idea to make a portable/foldable silver reflector. I cut my mirrored vinyl into these small squares and stuck them to a sheet of cardboard with the intention of making it foldable. This idea didn’t work at all as it reflected the light in all sorts of odd directions, but these seemingly ugly ‘flaws’ for one project, could be turned into boons when it comes to looking for ways to texture the light.

Mirrored vinyl is very easy to come by and not very expensive either. Maybe you have some leftovers from that time you tried to wrap your G-Wagon!

Since I made that ‘failure’ some years ago, I’ve acquired a far harder light source in my Spotlight and so I decided to see what this new light would look like bounced into the mirrored vinyl. The results were instantly gorgeous and I knew this would be a great solution to my Mylar problem.


The Setup

As always, let’s look at the setup first and then I can break down the details and cover any questions you’ll likely have.

Cut out & Keep

Metallic Vinyl squares stuck to a sheet of cardboard.

As you can see here, the squares all reflect the light in slightly different ways.

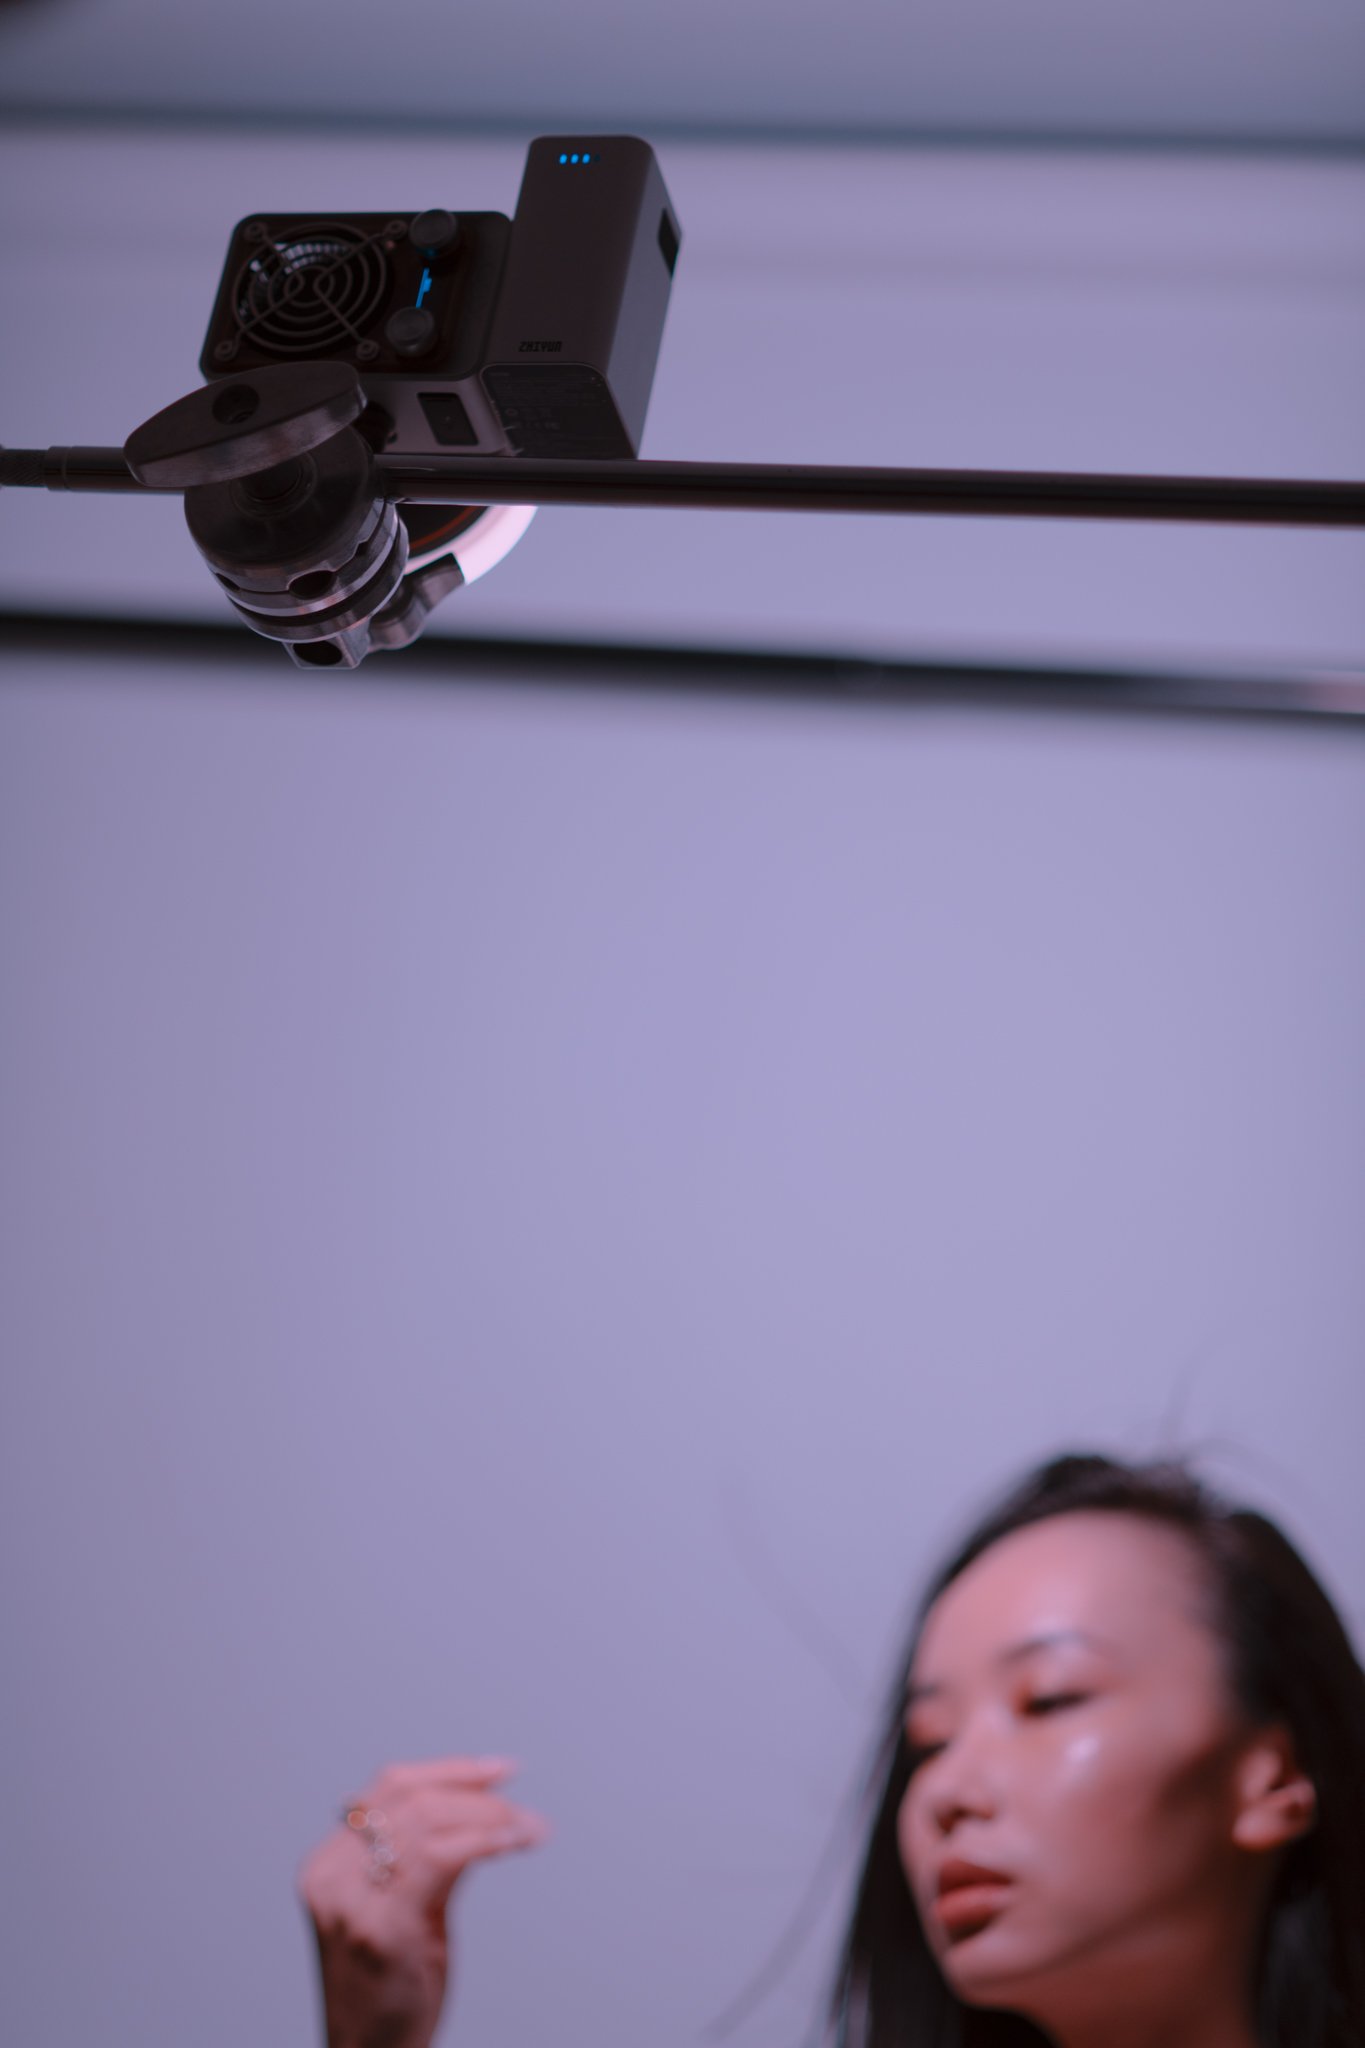
The Godox Spotlight with the ZHIYUN Molus B500 hanging off the back!

Here you can see that the Spotlight is positioned just out of shot to the left of where the model would be standing. This is of course pointed towards the sheet of metallic vinyl squares next to me from where I took this shot. - Also note the mottled and dappled lighting pattern on the background, this is the result of the bounced Spotlight.


TL;DR/ADHD/Artist Setup Explanation

  • Set up hand-painted backdrop behind subject

  • Place subject about 3ft/1m in front of that

  • Suspend cardboard with metallic vinyl squares attached to your right, pointed at the backdrop

  • Position hard light (Spotlight in my case) to the side of model pointed back at metallic vinyl squares

  • Set large softbox (Rotolight AEOS 2 Pro + R120cm) to your left pointed at backdrop

  • Set Spotlight to 3000K and softbox to 10,000K


Kit Used

  • 1x Rotolight AEOS 2 Pro

  • 1x Large Softbox (Rotolight R120cm)

  • 1x ZHIYUN Molus B500

  • 1x Godox Spotlight

  • 1x Hand-Painted Backdrop

  • 1x Cardboard sheet with Metallic Vinyl Attached


Camera Settings

  • Camera - Nikon D850

  • Lens - DC-Nikkor 105mm f2

  • Shutter Speed - 1/125th

  • Aperture - f2

  • ISO - 100

  • Kelvin - 4600K

  • Focal Length - 105mm


The metallic vinyl squares are all stuck to the cardboard using their own adhesive and although it may not look pretty, these seemingly poorly glued squares and their subsequent bumps and bulges, are actually what create the lighting effect we're after.

The Metallic Vinyl Squares

As you likely saw in the images above, there is absolutely nothing fancy about this DIY modifier. I just got an old cardboard box, broke it down and then attached the squares to it. I’m making a point here of how ‘scuffed’ this is, because I think it’s actually helping the effect. The cardboard the vinyl is stuck to is not dead-flat, so this added a slight warp to the backboard the squares are mounted to and this may well be helping to exaggerate the final textured lighting effect.

Each of the squares was cut to be 6 inches x 6 inches (15cmx15cm) and I stuck 24 of these squares to the cardboard. The metallic vinyl roll I bought was self-adhesive, as many of them are, so it really didn't take very long at all to make.

Another important aspect, although not immediately obvious, is just how crucial the irregularity of the squares can be to the final outcome. For example, if we had a perfectly flat, pristine mirror, we wouldn’t get any mottled or dappled light at all, it would simply be an even square of reflected light. The beauty of this setup really does come from how badly glued these squares are. You can see the bumps and bulges in all of the squares and it’s these irregularities that create the distorted and textured light.

The point I’m trying to make here, is don’t be too overly precious when it comes to making this reflective sheet.


The Results

Click to enlarge any of the shots below.

Model: Snyperr


Very controllable patterns like this can make the job of getting the shots you want a lot easier, plus you can achieve it considerably faster too!

Breaking it Down

This is only a 2 light setup and the diagram explains most of it, but I will go over a few key details you should be aware of before attempting this one.

Odd Angles

This seems obvious at first, but let me explain a couple of the more salient points. The light that is illuminating the subject and background, is actually placed next to the model and almost pointed straight back at you, the photographer. This seems dumb right? But this is of course so we can get that light to be pointed at the metallic vinyl squares placed beside you.

Avoiding Flare

One aspect to be wary of when doing this, is flare. That Spotlight is almost pointed straight to the camera so if we’re not careful, we can get flaring into the lens. I didn’t suffer from any as most modern lenses are very resilient to flare so you should be fine, it’s just something to be mindful of.

Keep it Flattering

The position of the board of metallic vinyl squares is also important. Yes, it needs to angle the bounced light onto the subject, but we also need to make sure that angled light isn’t striking the model in an unflattering way. Try to position the board up high so that the bounced light does its best to fall down the subject as we dont want any ugly up-lighting to occur.

Colour

You’re about to step into my domain (expansion) here, so this is where things can get a little nerdy. As many of you know, colour is always a significant factor in all of my images and what isn’t made very apparent in the diagrams above, is just how much colour this setup actually has.

All of the colour in this shoot is thanks to us abusing the Kelvin sliders on not only both of our lights but also our camera as well. The Spotlight (hard-light) is set to 3000K (warm light), the softbox (soft-light) is set to 10,000K (cold light)…. and the camera is set to neither of them!

The JHP CKC Look

This contrasting Kelvin colour setup and many variations of it is one I’ve done countless times before. The core feature of all of them though, has been a desire to create 'great-looking' colours and not 'perfect-looking' colours. This is a very important distinction to make and one that I carry across all of my work. I’m not interested in perfect colour, but I am interested in the best looking colour and that means I’m playing with those colours by eye as the shot presents itself to me.

There is no ‘Correct’ Kelvin

Why is this an issue in this setup? Why can’t I simply set my cameras Kelvin to that of one of the lights in the setup like a normal photographer would? The main reason this doesn’t work here is because both of those different Kelvin lights are hitting the subject in the same place. Both the 3000K hard-light is illuminating the subject as well as the 10,000K soft-light. This is why we have to set our cameras Kelvin somewhere in the middle and this is why we have to do it by eye. Look at the images again and see where the bright dappled highlights are striking the subject. These brighter areas are of course brighter due to both of the hard and soft lights illuminating the same region of skin on the model and it’s at these brighter, merged light areas where both warm and cool Kelvin ranges merge. See how these regions are not only brighter but also a more neutral colour? These combined regions are where we want to be looking to set our cameras Kelvin.

Ultimately, I had my camera in the 4600K-5000K region and I suggest you start with that too. That said, I would encourage you to experiment with varying camera Kelvins so you can check you don’t prefer a cooler or warmer look than me.

Seeing Colour is a Skill

I appreciate that for many, especially those starting out, having a few guidelines for these seemingly esoteric properties like the ‘best colour’ can be helpful and me simply saying ‘just tweak the colour as you see fit’ is often not useful. But you having the ability to see accurate colour and better still, the best colour will come with experience and this is something that will come to you over time, just like a musician can tune an instrument by ear or a chef can adjust a recipe by taste. It is a skill that naturally comes to us.


Closing Comments

The main premise of this article and lighting setup is to show you a viable alternative to the typical silver Mylar setup. The silver Mylar is still an excellent setup and there are many of them, but they really look their best in moving images. The shimmer and light-play that silver Mylar creates is simply beautiful, but it can be a real pain to control and manipulate constantly for stills shooters, especially if we want the shimmer to appear perfectly across the face.

Take a look at my images from this setup again and should notice the glimmer is very consistent on the model's face and more often than not, I even had a catch-light or two. Of course, this strength of consistency could well be a significant downside for you. Maybe you want a lot of randomness to the shots and maybe you want a different-looking glimmer pattern in every frame. If that’s the case, absolutely use the silver Mylar.

But, if you don’t have a fan to waft the sheet of Mylar and if you don’t have an assistant to sculpt the perfect caustics and if you don’t want a completely random pattern in each and every frame, the metallic vinyl is a very simple and very consistent alternative.

Good luck if you’re giving this one a go, let me know how you get on and as always, if you have any questions, fire away in the comments below.


Previous Silver Mylar Articles

I told you there were a lot!


Products Used

Metallic Vinyl

As promised, a cheap roll of metallic vinyl. Be sure to think about how big you want your cardboard metallic vinyl reflector to be and purchase the appropriate size roll. Mine was made up of 24 6”x6” squares for reference.

A link to you local Mega-Corp for reference


Rotolight

Although I am sharing my own personal thoughts and findings about the lights mentioned in this article, many of you will want to know that I am now a ‘Master of Light’ for Rotolight. As such, I have been given a discount code to share with you when purchasing any of their products via the Rotolight website. Use my code ‘JAKEHICKS10’ when purchasing and you’ll save a bunch of money. I’ve never earned a penny of commission on this though, so if you find a better deal elsewhere, go for it.

Rotolight AEOS 2 PRO

With the AEOS 2 PRO, the world is your studio. Combining the shoot what you see benefits of powerful continuous light with a High Speed RGBWW strobe, AEOS 2 PRO offers unmatched versatility for photographers and filmmakers. Uniquely lightweight with an ultra-thin design, it’s never been easier to achieve beautiful soft light on the move.

AEOS 2 PRO Website Link


Rotolight R120 Sofbox

A softbox is pretty much a must-have piece of kit for any studio shooter, so if you own any AEOS 2/Pros, this is certainly worth taking a look at. It comes with internal baffles as well as the eggcrate grid on the front. Plus, it has 16 sides making this an incredibly round and clean light source.

R120 Softbox Website Link


Essential Photo - PixaPro

Please note that I’ve included affiliate links below for PixaPro and I will benefit (albeit minimally) from the sales of any of these products should you purchase them. To that end, please feel free to use my discount code ‘HICK5-OFF’ at https://www.essentialphoto.co.uk/JAKEHICKSPHOTO to receive a 10% discount on any purchase via their site.

Use Code: HICK5-OFF for 10% Discount on all Essential Photo Products

||

Use Code: HICK5-OFF for 10% Discount on all Essential Photo Products || Use Code: HICK5-OFF for 10% Discount on all Essential Photo Products ||

Godox Spotlight

S-fit spotlight that can be very finely controlled via inbuilt blades or via a range of Gobos. Due to the large lens at the front, this modifier can also produce some of the hardest-looking light available.

Godox Spotlight Link


Hand Painted Backdrop

If you’re taking portraiture seriously, you’ll likely already own at least one of these, but the hand painted canvas backdrops are a phenomenal addition to your portrait setups. I’ll be honest, I was sceptical myself until I tried them but they really do enable you to produce gorgeous-looking backgrounds when used in conjunction with a shallow depth of field lens. I’m using a 2m x 3m gold one from Essential Photo here and if you’ve ever looked at prices for hand-painted backdrops before, these ones from Essential Photo aren’t as pricey as many others out there.

Potential Alternatives

Beyond actually making one yourself, there really isn’t an alternative to this…. but again if you’ve ever tried to make one of these yourself, you’ll know it isn’t quite as easy as it looks. If you want to give it a go though, I did write an article on how to make a pretty simple alternative here DIY Mottled Backdrop

Hand Painted Backdrop

Another one of those products where you don’t realise you need it until you try it. These definitely give your portraits an instant edge of professionalism and are best used with shallow depth of fields to get some gorgeous portrait backgrounds.

Hand Painted Backdrop Link


ZHIYUN

I was fortunate enough to be sent several ZHIYUN products for testing and review and I’m currently in process of finalising those articles. First impressions are excellent though, so if you’re curious about the ZHIYUN products I used in this setup, be sure to check them out.

ZHIYUN Molus B500

A very powerful LED light in a surprisingly small package. No control box or power pack hanging off the back or swinging around on the stand, the entire light is all encased in the single head on the stand and at 500w, this LED is very bright for its size and price!

ZHIYUN Molus B500 Website Link


JHP Livestreams…

I livestream every other Tuesday night via YouTube and there I answer your questions, critique your shots, take community images into Photoshop to work on them and discuss all manner of lighting tips and techniques. I look forward to seeing you and your work there real soon. Jake Hicks Photography - YouTube


All of my more advanced lighting classes are now available online!

||

All of my more advanced lighting classes are now available online! || All of my more advanced lighting classes are now available online! ||

LEARN MORE ABOUT MY ONLINE WORKSHOPS

 
Tuesday 09.24.24
Posted by Jake Hicks
 

Refining Hard Light - Avoiding Double Shadows

Donate & Support

I've always wanted my photography education on here to be free, so although there is no paywall to any of my -Technique Tuesdays-, any and all support is greatly appreciated. ❤️

PLUS: Donate any amount and I’ll send you a link to the hi-res print version of my studio lighting book.

||

PLUS: Donate any amount and I’ll send you a link to the hi-res print version of my studio lighting book. || PLUS: Donate any amount and I’ll send you a link to the hi-res print version of my studio lighting book. ||


I hadn’t intended for this to be a full-blown article as I thought the topic of double-shadows was brief at best. As it turns out, there were a lot of questions about the double-shadows present in some hard-light portraits and if you’re not familiar with what I mean by that, I apologise in advance.

I’m apologising as it’s one of those things you simply cannot unsee once you’ve seen it and once you’ve seen it, I promise you’ll start seeing it everywhere.

What are Double-Shadows?

We often see the double shadow in modern flash photography and it’s the apparent duplication of a shadow, typically seen on a plain background when the subject is lit with a hard light and positioned next to it.

IMPORTANT: I want to be abundantly clear here; I am by no means ‘calling out’ the photographers who took the above images. I do not know how long they had to photograph these subjects, what conditions they had to photograph these subjects under and I also don’t know what kit they had available to photograph these subjects with. Photography and art in general, is extremely subjective and the following article is intended to provide you with options not ‘improvements’. My intention here is to show what is causing the effect in question and then to provide you with alternatives if you prefer them.


What Causes Double-Shadows?

As I mentioned, the double-shadow look is often found in modern flash photography due to some of the modern kit we use. The often black and white, contrasty, single-light portraits are usually taken with a single strobe and reflector dish and this is where the look originates.

The flash-tube itself will cast a shadow from the subject, but that same flash is also being bounced around a typically very reflective reflector dish. This reflective dish will then also cast a shadow from the subject and this is where the double-shadow comes from.

In reality, there can be more than 2 shadows and there are often 3 due to both sides of the dish as well as the bulb itself casting a separate shadow.

This is a very extreme case of course, but it does show you just how visually busy a single light shot can become if left unchecked. Plus, don’t forget I’m using a white wall as a clear way of showing this effect. This double and even triple shadow effect is still happening on all the shadows in your shot, including the ones on your subjects face like nose shadows.


How can we Fix/Eliminate Double-Shadows?

As I’m sure you’re aware by now, I am choosing my words carefully as although I’m certainly not saying I’m correct in wanting to remove these multiple shadows, I personally do not like the look they provide. Much of photography is about removing as much as possible whilst not taking away from your intended message. I see the extra shadows as distracting and I try to avoid causing them in my photos. Below, I will show you some of the ways in which you can avoid this look if you wish to eliminate the double-shadow look too.

As a baseline for this test, I’ll show you what the bare reflector dish looks like on our ‘subject’ against the wall.

Open Reflector Dish

As you can clearly see in the example image above, whenever we use an open dish like this, the double and even triple shadows start to show themselves.


Reflector Dish with Diffusion Gel

One of the simplest fixes for the double-shadow is to add a diffusion gel to your light. The light itself is still producing a hard light due to it remaining the same apparent size in relation to the subject, but the diffusion gel has now unified those multiple shadows into one single shadow. This is not ideal of course as that diffusion can spread light around the room and bounce back into the shadow reducing its density, but flags and negative-fills can help with that if needed. The diffusion gel is a quick fix if you don’t have alternative modifiers on hand and you see the double-shadow being an issue.


The Fresnel

I mentioned a couple of times above that this double-shadow look is a product of modern flash photography. One of the reasons for that is many of us no longer use Fresnel lights. Years ago, hot-lights or tungsten studio lights were nearly all Fresnels and due to their lens design, their collimated light means they are not bouncing their light around a dish before it reaches the subject. As you can see from the example above, the resulting shadow is beautifully clean and this Fresnel is what many professionals would typically use if they were after that true one-light, contrasty black-and-white look. If you’ve never used one, I’d encourage you to test one out. If you can’t get your hands on one of the originals, many companies now make modifier attachments for their lights instead. I would urge you to test them first though as some of their results can vary wildly and also be very wary of the smaller Fresnel modifiers.


The Optical Snoot

The Optical Snoot is a very affordable way to produce some very hard-light shots. As you may have noticed, the Optical Snoot utilises a camera lens on the front of this modifier to quite literally focus the beam of light. This means you get zero additional shadows and although that sounds good, this very strong and crisp light may be a little too much for some.


The Spotlight

Long-time readers will now know that I love this thing. I used the Optical Snoot for many years before the Spotlight, but once you try this bigger brother, there is no way you’re going back. The Spotlight is a purpose-built modifier, meaning it comes with its own very large and very bright lens on the front. This minimises light drop-off as well as nearly completely eliminating any vignetting towards the edge of this light. If you’re looking for a large and very even coverage of hard-light, the Spotlight wins every time. Again, this far harder light may be too much for a simple one-light portrait.


In Conclusion

If I’m using hard-lights on set, this double-shadow effect is something I do my best to keep an eye on and avoid at all costs. Your mileage may vary of course and if you choose to remove or reduce them, you have a few options to do so.

The basic single open dish reflector with diffusion gel attached is the easier solution. Just watch that diffused light isn’t taking away too much shadow density as it spreads around the room.

The Optical Snoot and Spotlight are of course excellent ways to shoot hard light, but they are EXTREME hard-lights and they may not be very forgiving on your subject.

If you want to shoot this type of single, hard-lit portrait, it’s tough to recommend anything other than a Fresnel. This is what portrait professionals have used for decades and they are still regularly used in TV and Cinema today for their strong yet flattering light. If you’ve not tried one and like the low-key look, you need to remedy that as soon as possible. Just be prepared to fall in love with them…. and then fall out of love with their price!

Lastly, I know I said there are no right and wrongs in photography (you knew this was coming), but at the very least, please avoid using Snoots or Honeycombs (Grids) as a single hard key-light on your subject. You can use them as hair lights, but never as a key due to their awful light quality.


Closing Comments

I’d put good money on you, dear reader, being a proficient photographer, after all, if you’re still reading this, you’re someone who’s looking beyond the typical photography articles and videos. At this stage you’re not looking for the ‘5 Life Changing Lighting Setups’, you’re looking for those rare morsels of knowledge to help refine an already firm understanding of lighting and this refinement of hard light outlined above, is absolutely one of those morsels.

The longer you’re a photographer, the more you realise that every photo is just about a lot of little things adding up to make a big impact and this is very apparent to those of us who have to build our lighting from the ground up on set or in a studio. Paying attention to these little, seemingly unimportant aspects of your image like double-shadows, all add up and it’s this part of the process that many aspiring photographers struggle with. How do we take our images from good to great (subjectively of course)? Typically, it’s by paying attention to all of the little things many overlook in an image and double-shadows is one small, but important part of that…. for me.


JHP Livestreams…

I livestream every other Tuesday night via YouTube and there I answer your questions, critique your shots, take community images into Photoshop to work on them and discuss all manner of lighting tips and techniques. I look forward to seeing you and your work there real soon. Jake Hicks Photography - YouTube


All of my more advanced lighting classes are now available online!

||

All of my more advanced lighting classes are now available online! || All of my more advanced lighting classes are now available online! ||

LEARN MORE ABOUT MY ONLINE WORKSHOPS


Tuesday 09.10.24
Posted by Jake Hicks
Comments: 2
 

Is the Molus X60 RGB LED from ZHIYUN any good?

Donate & Support

I've always wanted my photography education on here to be free, so although there is no paywall to any of my -Technique Tuesdays-, any and all support is greatly appreciated. ❤️

PLUS: Donate any amount and I’ll send you a link to the hi-res print version of my studio lighting book.

||

PLUS: Donate any amount and I’ll send you a link to the hi-res print version of my studio lighting book. || PLUS: Donate any amount and I’ll send you a link to the hi-res print version of my studio lighting book. ||


For many of you, the title likely tells you everything you need to know. If a 60W LED isn’t the type of light you’d ordinarily use, I doubt you’ll find any surprises here. But, if you think a very compact, full-colour continuous light has a space in your workflow, let’s see what it can do.

Disclaimer: As always, let’s clear the air here; I was contacted by ZHIYUN whereupon they offered to send over some of their lights. I don’t make a living or any direct money from reviewing products, so I’m typically pretty hesitant to accept them. Sure, ‘free-stuff’ sounds cool, but the cost of a light is very marginal compared to the cost of my time to test, retouch images and write a review! That said, ZHIYUN was relatively new to the lighting space and I’d recently heard of a few products they’d been putting out, plus I’ve been looking at single-point (S-fit) LEDs to compliment my LED panels so I agreed to take a look. TL;DR ZHIYUN have not and are not paying me to share my thoughts on these lights.

Who are ZHIYUN?

I wouldn’t ordinarily include the backstory and update you on the lore of a lighting company, but many of you won’t have heard of ZHIYUN and to be fair, neither had I 6 months ago. Established in 2015, ZHIYUN made its name with many award-winning image stabilisers and gimbals and in 2023 they announced their first line of LED lights. As I said, ZHIYUN is very new to the lighting world.

What immediately struck me about ZHIYUN, is their pride in being a Chinese brand. There are countless Chinese lighting brands out there, but nearly all of them aren’t keen to promote it. Nanlite, Aperture and of course, Godox are just a couple of the more famous lighting companies on the market today, but their Chinese origins aren't common knowledge among many of their customers.

As a child of the 80s myself, I’m aware of the stigma that many Chinese brands do their best to avoid, but these are different times today and China clearly produces many excellent products so it was refreshing to see ZHIYUN not have a Western brand name or be shy about their heritage. And rightly so, as the one thing that immediately struck me when I received these lights, was just how well made and robust they felt.

The ZHIYUN Lights

I mentioned at the top that ZHIYUN kindly offered to send several lights from their range so I could get a broader understanding of their lineup. I requested 3 of their more unique lights to take a look at, firstly we have the X60 which is the little RGB light I will be reviewing today, but I also requested some of their bigger, more powerful lights to test too. One of them was the Molus G300 and this was the one I was most intrigued about, not only due to its excellent looking design, but also its unique ‘Boost Mode’. Lastly, I got one of their most powerful lights in the form of the Molus B500. This is clearly an extremely bright LED and it's a more traditional approach to lighting in the classic monoblock strobe you attach to the top of the light stand without the now common trappings of extra cables, control boxes and transformers or many other powerful LEDs.

First impressions are great though and I aim to review all of these lights in the coming weeks, starting of course with the little X60.


What is the Molus X60 RGB light?

You may not be familiar with the X60 and I’ll share images of this little LED light below, but this is a palm-sized full-colour LED light that’s capable of the ‘full’ RGB spectrum and I’ve put that ‘full’ in quotations for now as we’ll come back to it.

You can see how small the light is in relation to the lightstand in shot, but it’s roughly the size on a small micro 4/3s camera and without the battery it measures 100 x 71 x 56 mm. As you’d expect, the weight matches its size and it weights in at around 320g (or just over 11 ounces for those still living in old England).

The little 60W light provides white light in a Kelvin range from 2700K up to 6500K and like all of these LED lights today, it also has a range of onboard lighting effects like candle, paparazzi, ambulance, as well as a host of others, you get it. Those effects are nice to have, but typically not very useful for many of us photographers. There is one other feature on the light, and that's simply called ‘Music’.

It’s unlikely that it’s of use to many of my more esteemed readers here, but I’ll explain it anyway. Set this light to ‘Music’ mode and a small microphone will listen out for noises and flash/pulse the light in a user-assigned flourish of colours. Granted, as a middle-aged white guy, I personally can’t imagine a use for this feature outside of my old disco-biscuit fuelled evenings at the local rave of yesteryear, but music videos and dance parties would arguably benefit from it I’m sure. Ironically though, the ‘Music’ feature actually has surprisingly deep functionality. You can assign up to 7 pulses and each of those 7 pulses can be individually coloured via a hue from 000 all the way up to 360. I spent faaaaarrrrr longer than I care to admit playing with this feature as, like said, it’s very customisable. Maybe I could program a way to pulse colours in a long-exposure image!!!

Click to enlarge

Those are the core features of this light and as you’d expect, these are all available at the top level of menus as soon as you switch it on. Navigation through the menus is all done via the 2 big knobs you see here. Clicking the left one in moves you forward in the menus and clicking in the right one adds extra functionality in many of the menus. For example, whilst in the CCT mode, clicking the right dial in brightens the light in 25% increments. As you’d expect, both of these dials also spin to adjust the highlighted values.


Design

Let’s be honest, in today's market it feels like there’s a new LED lighting company being announced every week. For them to stand out, they really need to offer something utterly unique, or at the very least, look super-cool! Although the X60 seems a very capable light, its look, along with the other lights in ZHIYUNs line-up, is very cool!

As with many other lights like this, size and the lack thereof, is vital. The ZHIYUN aesthetic is extremely pared back, so much so in fact that many of the typically internal parts are now presented as a design choice on the outside of the light. Elements like the fan, its grill and even cooling fins are used in a very effective way as the actual housing of the light. Couple that with some semi-transparent covers and retro knobs and you have a very distinctive-looking light in today's over-crowded market. This may seem gimmicky, but they pull it off in my opinion, not to mention that the design is actually very conducive to running the light as it now has tons of airflow. Again, this is personal preference, but I really like the distinctive look, plus this isn’t just designed with TikTok BTS videos in mind either and this same aesthetic is carried over onto their far more powerful and professional lights too.


What’s Included in the X60 RGB Combo Pack

  • Molus X60 RGB Light

  • Mini Reflector+Diffusion Dome

  • Power Adapter

  • Adapter Organizer Bag

  • Grip Battery

  • 60W PD Charging Cable

  • Cool Bag

Price: £329 - Price from official ZHIYUN website - August 2024


Core Functionality

Unless you’re looking at this light for specific use cases, you’ll most likely be spending your time in the core modes of CCT and either HSI or RGB.

CCT Mode

This is the white-light mode and this is simply the brightness via the DIM option from 0% to 100% in single-percent increments. The CCT option or the ‘Correlated Colour Temperature’ in case you were curious, is the option we adjust to get a variation in colour temperature. The Kelvin range on the X60 goes from 2700K up to 6500K. Not the hugest range, but typically more than enough for most people to either add a little personality to the colour of their light or for normies to colour correct their light to match the surrounding tone.

No Tint Adjustment

One feature (although I don’t really consider tint to be a ‘feature’ in today's lights) that wasn’t present to my knowledge, was a ‘tint’ adjustment.

Click to enlarge

Above you can see images taken at each of the major Kelvin steps and I simultaneously matched the Kelvin of the light to the Kelvin in the camera for each image. To be clear, this is far from a definitive test as there are often variances in white balances from camera to camera and manufacturer to manufacturer, but it does illustrate a deviation in the tints (green/magenta) at both the top and bottom end of the Kelvin ranges. For example, in the image included here, you can clearly see the 6500K sitting above the 3500K and the former is arguably more green than the latter. Note that these tests were done at full power to allow for the LEDs to achieve their best possible colour.

Typically, this isn’t a major issue due to you being able to white balance it out in post, but with multiple lights on set and often from multiple brands, this becomes harder to do. This isn’t a unique problem to ZHIYUN however and many lights have this issue with the extremes of the Kelvin range, but many RGB lights also include the ability to ‘tint’ the light. I was surprised to not see the option here and I even tried various button combinations to see if it was hidden somewhere. It is a full RGB light so technically it should be able to add tint to these Kelvins and we may even see an update to include this function in the future.

Brightness across the Kelvin range

If you’re unaware, LED lights typically create a Kelvin range by utilising two sets of LEDs. One warmer and one cooler. It’s due to this that nearly all LEDs are brighter when they’re sitting around the middle of their Kelvin range as this is when both the warm and cool LEDs are both on. For this little light, I found it to be brightest at the coolest or 6500K setting, but it was very negligible and overall extremely consistent across the range.

Measured at full power 1m from the light meter:

  • 2700K - ISO 100 1/60th f4 + 8 tenths of a stop

  • 4600K - ISO 100 1/60th f5.6

  • 6500K - ISO 100 1/60th f5.6 + 2 tenths of a stop

Of course that brings us to the one question every photographer has ever asked me about any LED light ever, “How bright is it?”

Image taken at f5.6 / ISO100 / 1/60th / 6500K - Light 1m away from wall

Brightness

As I mentioned at the start, the title tells you what you need to know, it’s a 60w light. This is not a bright light for photographers and it won’t be bright compared to what you’re used to as a speedlight or strobe user. I gave you a real-world example of brightness above and with camera settings of ISO 100, 1/60sec at f5.6 at 1m away. No, you won't be overpowering the sun in any situation, but if you shoot a lot of video or you comfortably work indoors in a light-controlled room or studio, this won’t be a problem. I’ve seen several videographers state that this is a “bright light” and they aren’t lying, for videographers and film-makers, this is bright enough for a lot of their work where a continuous light in videos is needed.

Brightness Range

I will mention one last aspect regarding the brightness of this light and that’s the range of brightness. What I mean by that, is the brightness at 1% power compared to 100% power.

What you may notice, is what you don’t notice. By that I mean there’s very little difference in brightness at 1% power versus 100% power. Of course, lower-powered lights typically have less range, but this light only having a little over 1 and a half stops of range is very limited. Chances are you’ll always have this light cranked to 100% anyway, but it is noticeable how little it changes when you turn it down and is still noticeably bright at 1%. The silver lining here is that you can significantly extend the battery life by turning it down to 50% and you’ve only lost half a stop of light.

Colour

I’m sure it’s of no surprise to anyone that I’m a very harsh critic when it comes to colour in my lights, so just be aware that I’m approaching colour in these lights from a borderline neurotic point of view.

LED lights, specifically RGB LED lights have made my life considerably easier since their introduction. As many of you know, I use LED panels with 16 million+ colours at my fingertips. Compare that to my 20 or so physical sheets of gel colours that I typically use and that’s an awful lot of colours to play with. Now, I don't think this little ZHIYUN light has 16 million colours, but it certainly has an awful lot and certainly a lot more than 20.

HSI or RGB?

One interesting aspect of this little light, is the ability to adjust your coloured light via either the HSI or the RGB mode.

HSI

HSI or Hue, Saturation, Intensity is actually represented on the light via the DIM control instead of Intensity. The DIM is adjusted in single percents up to 100% and the HUE is adjustable via 361 degrees from 0 to 360. and lastly, the SAT(uration) is adjusted in single percents from 0 to 100.

This HSI mode is likely to be the more intuitive one for adjusting colour for many, as you simply select a HUE and then adjust the brightness and saturation, quickly and easily from there.

RGB

The feature of a full RGB mode is a nice one though as it offers a lot of very fine control over the colour you’re after. As you’d imagine, you have all the RED, GREEN, and BLUE adjustments from 0 to 100 percent. In this mode, you also have the DIM from 0 to 100 as well and it’s with these 3 colours and DIM adjustment that you’re seemingly able to access more nuance in colours than the HSI mode, but it is less intuitive and you need to know your colour theory to get the most from this.

It’s worth noting that this RGB mode is not done via a typical 256 value, as, like I mentioned above, it uses percentages instead. Again, not a huge issue, you just won't be able to copy across an RGB value from artwork in Photoshop to match it like-for-like on set for example.

My thoughts on the Colour from this LED

At the start of this article, I put ‘full’ RGB spectrum in quotations and promised to come back to it. I also want to remind you that I’ve dedicated the best part of my career to fully understanding colour and as a result, I can be pretty critical of it in my lights. With all that said, I will state that I found both the HSI and RGB modes to have several colours that ‘stepped’ aggressively, specifically in the pink/red/orange range as well as the green/blue range. By ‘stepping’ I mean that there was a noticeable jump between several colours, even though I was only adjusting its colour by a single increment. In contrast to this, many of the other colours were extremely smooth with also no visible notch in colour as I scrolled through the spectrum. This is not a dealbreaker in any way, but it was noticeable.

FX

I’m not sure if people actually use these FX, but they are on all LED lights today and I’m sure they’re a nice feature for some. With that in mind, I’ll quickly outline what’s included with the X60.

Included are all the usual suspects:

SOS - PAPARAZZI - CANDLE - BAD BULB - TV - LIGHTENING - CCT FLASH - CCT PULSE - CCT LOOP - POLICE CAR - DISCO - FIREWORKS - HUE LOOP - HUE FLASH - HUE PULSE

- ok I didn’t realise there were so many options. I regret starting to type them all out now!!!!

All of these filters have a DIM value from 0-100 as well as a SPD (speed) option with varying values. Plus, many of them either have CCT adjustments or further options like variants and even colour spectrum inputs.

Music

I’ve spoken about this mode above, including some of its functionality, but if your year of birth starts with a 2, you probably already know all about this mode anyway.


Results

I get it, I’m more of a lighting-nerd than most, but stats only paint so much of the picture. How does the light actually perform? I was able to test the light in various lighting setups and although I tested the light on its own, I also used it in conjunction with the other ZHIYUN lights too. I will state which light was used where and I aim to review those other lights in the coming weeks.

Set 1 - ZHIYUN X60 + Molus G300 - Kelvin Key & Fill

Click to enlarge

Click to enlarge

Cut Out and Keep

Here we see the Molus G300 with Parabolic Softbox set to 6500K

X60 set to 2700K

Here you can see the warm light from the front and the cool light behind

Long-time followers will no doubt have seen me use this setup countless times in the past, but essentially it’s just a key-and-fill setup. Here the key-light is the X60 and that is set to the warmest value it has of 2700K. Note that the X60 also has the included diffusion dome attached too. The fill-light is the Molus G300 with the ZHIYUN Parabolic Softbox and grid attached (links to both of these are included at the end of the article). The Molus is set to the coolest temp it has of 6500K. We set the camera to a low/warm Kelvin value of around 2000K-3000K to neutralise the warm light from the X60 and that’s about it.

Camera Settings

  • Camera - Nikon D850

  • Lens - DC-Nikkor 105mm f2

  • Shutter Speed - 1/250th

  • Aperture - f2

  • ISO - 100

  • Kelvin - 3000K

  • Focal Length - 105mm

Comments:

It’s worth repeating those camera settings, 1/250th, ISO 100, f2. Yes, I am using a fill-light behind the key, but those settings require a decent amount of light and remember, my key-light here is a little 60w LED and it’s set to the very lowest Kelvin which we know produces a little less light and it has the diffusion dome attached. Even at 60w and brought in close-ish, it produces a healthy amount of light.


Set 2 - ZHIYUN X60 - Solo Set

Click to enlarge

As you can see here, just a single X60 up high and angled down - it's also worth noting that the X60 has the diffusion dome attached too.

Lastly, this was a quick shot I wanted to grab of just the X60's light alone and because of this, the X60 was still set to 2700K. I quickly switched my cameras Kelvin to match it and got a shot that was correctly white-balanced. The colouring you see in my final shot is purely aesthetic as I colour-graded it in post.

Cut Out and Keep

Camera Settings

  • Camera - Nikon D850

  • Lens - DC-Nikkor 105mm f2

  • Shutter Speed - 1/250th

  • Aperture - f2

  • ISO - 100

  • Kelvin - 2700K

  • Focal Length - 105mm

Comments:

It’s rare that any of us only use a single light in a studio, but I did want to grab a few shots with all other lights off, just to see the quality of light from this unit alone. This shot had the diffusion dome on and I doubt I’d even use this light alone without it attached. The results were clean and no odd double shadows or fringing were visible on the shadow transitions.


Set 3 - ZHIYUN X60 - RGB Set

Cut Out & Keep

Camera Settings

  • Camera - Nikon D850

  • Lens - DC-Nikkor 105mm f2

  • Shutter Speed - 1/125th

  • Aperture - f2

  • ISO - 30

  • Kelvin - 4000K

  • Focal Length - 105mm


Comments:

There’s a slight chance that my star-pupils are questioning the above images. I clearly state that I only used 2 lights, one of which was the X60, a full RGB LED and the other was a ZHIYUN MOLUS G300….. which isn’t an RGB light.

Can you see why you might be questioning the above images now? I’m only using the X60 RGB light to create that beautiful red colour, the second, blue colour is coming from a Kelvin shift trick. With very bold colours like reds, you can push the Kelvin around quite dramatically and it has little effect on the bold, red colour. So here I’m doing just that as I have my G300 set to 6500K which is producing the subtle blue shadow-light when I set my camera to 4000K.

Nerd-talk aside, the RGB mode works as you’d expect aside for the aforementioned RGB spectrum and the red used here was very rich and clean.

Many thanks as always to my patient-ish model: Jaye Hicks


Usability

Attachment

The X60 comes with a single 1/4-20 attachment at the base for all manner of tripods and light stands. It is flat to the base though so you can’t angle the light in any without additional ball-heads etc.

Battery

The battery sits on the side via a very stable and snug clip. The battery can easily be popped off and on with a single hand too. The battery itself is touted as lasting for around one hour at full power. I was using it constantly at varying powers during my shoot and mine lasted two hours. It took around 3-4 hours to fully charge.

One nice feature of this light is the ability to run it via the power cable it comes with and you don’t need the battery to be attached to do this.

One slight annoyance is that the battery can only be charged via the USB-C cable. Not a big deal, but I had to charge my battery via my Playstation 5 as it doesn’t come with a standard plug out of the box.

Modifiers

There are a handful of standard modifiers available for the X60, but if want something specific you may need to use third-party light-shapers. Also, the ZHIYUN website clearly states that the X60 is compatible with Bowens modifiers and sadly that is not the case. The X60 has a proprietary ZY-Mount that you first need an adapter for before you can use this light with Bowens modifiers. There are a couple of different adapters, so be sure to use the one that works on either X60 or X100.

Connectivity

I personally don’t tend to faff around with all the different lighting apps when I’m shooting, but I know many of you have asked me to include these options in my reviews, so I did download the ZHIYUN app to test it.

The app is called the ZY Vega and once downloaded you get prompted to sign your life away via a trillion page privacy policy (can you see how small the scroll icon is on that picture above!). I did sign it for you guys (you’re welcome!), but once inside, it's extremely smooth. I turned the light on and the app found it immediately. In fact, I even closed the app and turned off the light, reopened and switched the light back on and it found the same light again straight away.

The options in the light are clear and easy to use. You have your CCT (white light) mode and here you choose to manually adjust the colour or opt for the CCT Gel presets page. Furthermore, you can even scan the environmental lighting in your room with your phone via the CCT PAIR and it will translate that tone to your light. Simple and very quick and easy to use, even for an idiot like me.

The colour options are just as robust and inside the COLOUR tab (typo in the app), you can adjust the light via the HSI or RGB mode. Remember how I said earlier that you couldn’t dial in an exact 256 RGB value? Well, here you can and you can see in the image above that it translates it to percentages on the light. Odd that the light doesn’t support the 256, but at least it’s in the app if you need it.

Lastly, there’s a colour picker mode. You point your phone camera at a colour and it will translate that colour to RGB values on your light instantly. Plus, you can then save these as presets for later if you'd like to.

Overall, I was very impressed. I ordinarily NEVER use the LED apps as they’re notoriously bad at initially connecting (some lights have very awkward pairing procedures) and even then they often don’t stay connected and the whole process of re-pairing starts again. This seemed solid though and I will likely test it on a shoot next time.

The only downside was the vast amount of T&Cs you need to sign, but that said, it didn’t require you to register the lights, nor set up an account or even sign-in in any way. All of which is a plus!


Final Thoughts on the X60

Let’s be honest, that review was waaayyyyyy more detailed than it needed to be. After I finished writing this I checked some other reviews and they pretty much said, ‘its a really nice light that is small enough to put in my bag wth my sandwiches, you should definitely get it’. You gotta love YouTube.

Hopefully, there are some other super-nerds out there like me who found some of his useful as I know I find this extra detail valuable when there are so many options out there right now.

So to sum up:

PROS:

  • Very small and lightweight

  • Looks very cool

  • Bright for its size

  • A (nearly) full RGB light in this small form factor is actually pretty impressive

  • The app was surprisingly robust - I’m glad some of you moaned about me not including this last time!

  • Can be powered directly without the need for the battery to be attached

CONS:

  • Not a huge range of brightness control

  • Not directly Bowens mount compatible

  • No tint control in CCT (white-light) mode - I’d be amazed if this doesn’t get patched in


Who is this light designed for and should you get it?

I’d argue that this light is more suited to video people. The 60W is bright for video but is limiting for stills shooters, especially those not working in a studio. That said, I could absolutely see myself using this light as a hair light to add some strong specularity from behind and most definitely as a background light as it’s so small, that it’d be perfect for hiding behind the subject.

I also think this light is decently priced too. I see a lot of small LED lights emerging right now and some are far more expensive than this and offer far less.


Closing Comments

Hopefully, you found this review helpful and although it’s highly doubtful that I’ve forgotten anything in this compendium if you do STILL have questions about the light that you somehow think I may have missed…. Google is available. I’m joking of course and I will gladly answer any questions you have….for a small fee.


Products Used

ZHIYUN

As I mentioned at the top, ZHIYUN sent me these lights to review, but I am not being paid to share my thoughts. Below is a link to the lights and modifiers I used, supposedly if you use them, I will earn a very small amount of commission from them. It is minimal though and beer money at best so if you find a better deal elsewhere, please feel free to take it. All that said, they have provided me with a discount code for you to use on their official site. Use code ‘JakeHicks’ to earn 10% off anything on their site.

Use Code: 'JakeHicks' for 10% Discount on the ZHIYUN website

||

Use Code: 'JakeHicks' for 10% Discount on the ZHIYUN website || Use Code: 'JakeHicks' for 10% Discount on the ZHIYUN website ||

ZHIYUN X60

This link is for the COMBO RGB Kit I had. That includes the battery, power cable, diffusion dome, carry case etc.

ZHIYUN X60 Website Link


ZHIYUN MOLUS G300

I did use this light in nearly all of the setup above, but I am still in the process of reviewing it. Spoiler alert, it is an excellent light so I have included a link to it here in case you wanted to learn more before my review was out.

ZHIYUN MOLUS G300 Website Link


ZHIYUN 90cm Parabolic Softbox

An excellent, generously sized softbox that is very well made and seems robust - most importantly, it’s very easy to put up!

ZHIYUN 90cm Parabolic Softbox Website Link


JHP Livestreams…

I livestream every other Tuesday night via YouTube and there I answer your questions, critique your shots, take community images into Photoshop to work on them and discuss all manner of lighting tips and techniques. I look forward to seeing you and your work there real soon. Jake Hicks Photography - YouTube


All of my more advanced lighting classes are now available online!

||

All of my more advanced lighting classes are now available online! || All of my more advanced lighting classes are now available online! ||

LEARN MORE ABOUT MY ONLINE WORKSHOPS

 
Tuesday 08.20.24
Posted by Jake Hicks
 

Why You Should Link Your IG to Pinterest

Donate & Support

I've always wanted my photography education on here to be free, so although there is no paywall to any of my -Technique Tuesdays-, any and all support is greatly appreciated. ❤️

PLUS: Donate any amount and I’ll send you a link to the hi-res print version of my studio lighting book.

||

PLUS: Donate any amount and I’ll send you a link to the hi-res print version of my studio lighting book. || PLUS: Donate any amount and I’ll send you a link to the hi-res print version of my studio lighting book. ||


I’ve spoken about the merits of Pinterest several times over the years, but there are still very few photographers who actually use this powerful site to benefit their business. I get it, it’s yet another platform for you to keep updated, but in reality, you need to do very little to maintain your work on Pinterest, but you have everything to gain from doing so. Here’s how.

I’m sure I’ve mentioned this before, but Pinterest is actually the reason I got my ‘big break’ all those years ago. TL;DR my images were heavily featured in a moodboard at a client meeting and at the time my specific gelled lighting style was fairly unique (hard to believe now I know). It was from that moodboard that the client reached out and larger projects ensued and snowballed from there. Sure, you could argue that times have changed since then, and although you are right, the same reasons Pinterest worked back then are the same reasons it still works today.

The issue with Instagram today

I don’t think it’s a particularly ‘hot-take’ to say that modern IG is not the same photography-centric platform it once was all those years ago. Be honest, IG is now predominantly just micro-clips for Gen-Zs gnat-like attention span and young ladies who ‘forget’ to get dressed sharing their ‘hustle’ to the middle. I get it, I’m old, sure, but think about who IG is designed for today, is it your clients? Why are you posting on there? Are you posting on there because you were already on there anyway checking out the latest pics from fellow togs and thought, “I should really post something too” or are you logging in to maintain your rigorous marketing schedule? Think about who actually likes and comments on your posts. Are they your clients?

I’m certainly not saying IG can’t work for you and yes I’m being cheeky and somewhat cynical, but I do want you to take a moment and remember why you use IG and do you use it for business or pleasure.

Good News: Keep using Instagram and Pinterest like you always have

I’m sure this article sounded like I was about to say stop using IG as it’s a waste of time, but ironically that’s the opposite of what I’m saying. The point of this article is to convince the Pinterest cynics among you to take 2 minutes to link your IG account to Pinterest …..and then go back to completely ignoring Pinterest.

Let me be very clear, I SPEND ZERO HOURS ON PINTEREST EACH MONTH

That’s right, like you, I don’t use Pinterest at all either as it does all the work for me and I do quite literally nothing. This is in stark contrast to my main social platform, my Facebook Page. There I post 5 times a week whereupon I spend (far) more time than I should writing about the images I share there. I’ve done that consistently every week for close to a decade now. Instagram is a different story as I only post there a couple of times a month at best. The reason for that is a topic for another day, but IG is not suited to communicate and engage with others. It wants the user to ‘like’ something and then very quickly move on to the next image/video via 9 ads of junk that I tell myself I don’t need. Facebook is certainly dated now, but it does allow for a discussion in the comments and even the ability to share ideas, links and other images directly within that same comments section. I personally prefer that dialogue over simply farming engagement, but that’s just me. The point I’m making here is that I’m about to show you engagement numbers for these platforms and the IG ones are almost irrelevant because of my lack of uploads.

Engagement Splits

Yeah, this is where you really thought about clicking away, right? Engagement talk is as about as exciting as kissing a porcupine's bottom, so I will keep it extremely brief I promise.

Below are the engagement/impression numbers from the last 90 days for both Facebook and Instagram.

Below are the engagement/impression numbers for Pinterest from the last 90 days

For clarity, engagement/impression definitions can vary, but for the most part, it means that when someone was shown my image, that counts as 1 engagement/impression.


Return on your Investment

As you can see, I have nearly 4 times the engagement on my Pinterest versus my Facebook Page. This alone is fantastic of course, but you have to remember that I spend many, many hours a week nurturing my Facebook Page and, I’ll say it again, I SPEND ZERO HOURS ON PINTEREST EACH MONTH

How & Why is This Happening?

There’s no secret-sauce here, I really do spend zero time on Pinterest each month and the biggest factor that sets Pinterest apart from all the other platforms is its ‘evergreen’ content. I’m sure you all know by now, but your shiny new photo has a lifespan on IG and FB of a couple of hours at best. You post a shot, if the handful of people that shot is shown to like and engage with it, that same shot will then get shown to a slightly larger new group of people and the cycle perpetuates until the image stops being popular to the groups of people it’s shown to. This typically all happens during the first couple of hours of sharing the image and you’ll see drastic diminishing returns for any time after that. And by ‘drastic’ diminishing returns, I mean that after that initial share, almost nobody will ever see that image ever again on your platform.

Pinterest is the total opposite of that. Almost nobody will see your Pinterest image at first, but that image only grows in value the longer it's on the platform. I have some images on there from when my work took off in the early 2010’s and some of those images from 10 years ago have many hundreds of thousands of impressions. I say that although it’s hard to track separate images beyond 6 months, an image of mine from April 2024 is already at 5000 impressions as an example.

Stop Seeing Your Photos as Old & New

The key here is to stop thinking of your photos as old and new. A client, customer or viewer doesn’t know if you took that photo of yours this week or 5 years ago. It’s simply not important as it’s ‘new’ to them. Pinterest capitalises on that and specifically shows the viewer images similar to what they are looking at based on the look of the photo, not the age of the photo like all other platforms do.

Convinced to Do Almost Nothing Yet?

So how can you capitalise on this now, and then simply forget about it forever?

I’ve personally done a couple of things, firstly, I allow Pinterest ‘pins’ to be pinned directly from my website and secondly, I’ve linked my Instagram to my Pinterest.

Enabling Pinterest ‘Pins’ on your Website

First off, let's look at my website and enabling Pinterest on there. This won't be as relevant to some of you as I know fewer and fewer people today have a website, but here’s what I did on my Squarespace site in case it’s relevant to you too.

First off, head to the Settings > Website > Pinterest Save Buttons

Here, just enable the Pinterest Save Buttons, how you want them to look and where they’ll appear on your site.

That’s it!

Now, all of the images not on your main portfolio can be pinned by anyone clicking on that Pinterest button and anybody clicking on that image on Pinterest will track back to your site.

I won’t get into it here today, but I know many photographers have mixed feelings about mood boards and whether they are theft or infringe on copyrights. I know for a fact that many of my images get placed on mood boards and brought to other photographers for them to ‘copy’, but it’s almost impossible to stop that happening. Sure, that will happen, but like me, maybe that client loves the shots so much that it leads to something else in the future. Again, I know everybody has their love/hate relationship with mood boards, none more than uber-famous portrait photographer, Jill Greenberg who certainly doesn’t hide her disdain for mood boards.

Image from Jill Greenberg's site and her thoughts on mood boards. You have been warned!!!!

As always, huge respect for Jill for always speaking her mind!


Linking your Instagram to Pinterest

We finally got there, here’s how to link your Instagram to Pinterest.

  1. First off you’ll clearly need a Pinterest account - it’s free to get one.

  2. Log into your account

  3. Click on the down arrow in the top right next to your profile picture

  4. From here choose ‘Settings’

  5. In the next window, click on ‘Claimed Accounts’ on the left-hand side

  6. New options will appear including your website and below that, ‘Instagram’

  7. Click on the ‘Claim’ button

  8. Allow Pinterest access to your Instagram account via the following pop-up

  9. Lastly, choose where the IG images will go, your Profile is fine. Click Allow

  10. Plus, if you want the last 90 days’ worth of IG shots to be uploaded, check the box below too.

That really is it. Yes, I turned a 30-second article into 10 minutes, but what’s a Jake Hicks article without a little unwarranted backstory, history and lore? You want 30 seconds? You know where you can go ;)

Once you’ve linked your accounts, you’re done and you really do ‘set-it and forget-it’. Your IG images will slowly be added to Pinterest for others to come across as you post them to your Instagram like you normally would.


Closing Comments

As I mentioned at the start, I have a special love for Pinterest as it really did get me my first big break all those years ago thanks to, you guessed it, someone including my images in their Pinterest moodboard to a client. Some photographers hate it and I certainly get that after all It’s unbelievably annoying hearing that clients have taken your images to another photographer for them to ‘copy’ for cheaper. But if it works out in your favour once in a while, it’s still better than never. Plus, it takes like 2 minutes to set up and then you can go back to screaming into the void that is Instagram!


JHP Livestreams…

I livestream every other Tuesday night via YouTube and there I answer your questions, critique your shots, take community images into Photoshop to work on them and discuss all manner of lighting tips and techniques. I look forward to seeing you and your work there real soon. Jake Hicks Photography - YouTube


All of my more advanced lighting classes are now available online!

||

All of my more advanced lighting classes are now available online! || All of my more advanced lighting classes are now available online! ||

LEARN MORE ABOUT MY ONLINE WORKSHOPS

 
Tuesday 08.06.24
Posted by Jake Hicks
Comments: 4
 

Lighting Setup: Beautifully Soft DIY LED Top Light

Donate & Support

I've always wanted my photography education on here to be free, so although there is no paywall to any of my -Technique Tuesdays-, any and all support is greatly appreciated. ❤️

PLUS: Donate any amount and I’ll send you a link to the hi-res print version of my studio lighting book.

||

PLUS: Donate any amount and I’ll send you a link to the hi-res print version of my studio lighting book. || PLUS: Donate any amount and I’ll send you a link to the hi-res print version of my studio lighting book. ||


Many of you already know I’ve predominantly switched all of my lighting to LEDs in the last year or so. But why? Was it the incredibly easy-to-use ambient light that shows you in real-time what you’re going to get? The millions of instantly accessible colours? The quick Kelvin adjustments? Sure, these are all ‘nice’ to have, but they’re really only offering me incredibly convenient options for what I could already do. The main reason I switched, is light quality.

The biggest difference for me switching over to LED from flash aside from the incredible ease-of-use that almost makes me feel guilty of cheating whenever I use them, is that unique and beautiful light quality. I’ve already spoken about this at great length in the past so I won’t go into it in detail again here. If you’re curious then I’ll link some previous articles below that explain it further.

The main differing factor to remember when compared to flash, is the shape of the light itself. Flashes push a lot of very bright light out from a single point aka the small flash tube. LEDs and I’m talking about LED panels specifically here, spread that power out across hundreds of small bulbs and each of these individual bulbs pushes out a little bit of light.

This is a page from my new Colour 2.0 course workbook, but it simply demonstrates how light from flashes and LED panels starts out very differently.

So what?

I’ve gone into detail in the past covering why collimated or light rays travelling parallel to one another produce more beautiful looking light on our subjects, so for today, I’m going assume you’re up to speed on that, but please check my previous articles for more details and I’ll link and relevant ones below.

My thoughts on why LED offers something unique vs flash

A look at what causes ‘hot-spots’ and how we can prevent them

We know that evenly distributed light that comes from modifiers like Fresnels and parabolic reflectors produce cleaner-looking light and we know that large LED panels replicate that look by also evenly distributing their light over a larger area compared to pushing it out from a single point, but how does that distribution affect the exposure?

LED Panels and Light Drop-Off

If you’ve switched to LED panels from flash like I have, you’ll know that your muscle memory for lighting is a little off. I’ve been using flash for over 25 years so my experience allowed me to move my lights around a set almost instinctively knowing how much power I’d lose by moving X light 2 feet back etc. When switching to LED panels I very quickly noticed that the light drop-off rules I was so familiar with, were no longer applying. The more experienced among you will be aware of the ‘inverse square law’ and how it guides us on how light will diminish evenly over certain distances. The catch is that ‘law’ applies to single points of light and LED panels are not single points of light and thus their light falls off differently.

This is not a bad thing however and there are a lot of ways in which we can use this knowledge to our advantage with LEDs and I’ll explain that in a bit.

This is a crude illustration of what I mean by singular points of light spreading light very differently when compared to larger panels of LEDs

If you’re reading this after switching to LEDs and you’re thinking, ‘I’ve not noticed anything’, that could be totally understandable as these panels are not truly ‘collimating’ the light and it only appears to do so when you use the panels very close to you subject like I do. Why do I do that? I place my lights very close to my subjects to maintain control of that light. If I pull it further away, I need to turn the power up and now I lose control of all that light bouncing around. You can get away with working like this if you’re using multiple white lights, but when you’re using lots of coloured lights, you absolutely cannot allow those lights to fall on top of one another. Keeping lights close to the subject keeps you in control of that light and allows you to maintain strong colours that are uncontaminated by other lights.

In the above example, I’m using an LED tube and not a panel, but the principle of spreading power evenly over a large area still applies. See how the pink light spreads down the body very smoothly and evenly on the final image on the left? Also, see how the pink light loses its power almost immediately on the body? Look at the far left (her right shoulder), and see how the pink barely reaches that side of the body, even though the light is only mere inches away from it. This is only possible thanks to the hundreds of small lights all throwing a little bit of light compared to the right hand example where we have one big light in real-close that would easily over-expose the face and then also not spread down the body.

TL;DR If we have larger light sources like LED panels and tubes made up of lots of small lights, they put out an even wall of light. Compare this to the singular point of light like a flash which produces an explosion of light from a central point.

One produces soft and even light and the other produces hot-spots of light.

The nerd-talk is nearly over, but I wanted to highlight how LED panels and tubes spread light as this entire setup takes that knowledge and puts it into practice to produce some of the most beautifully soft and even light I’ve ever crafted. Now when I show you the setup and explain the process, the resulting light should make a lot more sense to you…… and maybe it’ll make even more sense why it’ll look terrible if you were to swap out my suggestions and throw a softbox on the floor instead.


The Setup

Below is the setup I used to create the following final images. I will also include diagrams of alternatives for flash users and of course, for those of you who don’t want to suspend that mess above your model.

Cut out and keep

Both the top light and red tubes on

Top light off and only red tubes on

Top light close up of the ‘contraption’ its encased in

Close up of LED tubes surrounding stool

Early test image before I switched to the blue top-light - Here you can clearly see the incredibly smooth and quick drop-off of light down the body.

The above raw test image of the model before I switched the top-light to blue illustrates the beautiful drop-off of light I was referring to earlier. See how the face is bathed in super-soft light, but also see how there is almost no light falling down the body. Look at her left wrist in this shot and see how it has almost no white light falling on it.


TL;DR/ADHD/Artist Setup Explanation

  • Setup white background behind subject

  • Place subject about 3ft/1m in front of that

  • Suspend AEOS 2 Pro LED light above the subject

  • Attach the DIY scrim and skirt to top-light

  • Assemble 3x 4ft tubes around the model (one in front and one either side)


Kit Used

  • 1x Rotolight AEOS 2 Pro

  • 3x Rainbow Series 320-Degree RGB LED Neon Light Tube

  • White Scrim/Diffusion Material

  • 10m Paracord

  • Large Silk Painting Frame 100cm x 100cm

  • Black Velvet

  • C-Stand

  • White Backdrop


Camera Settings

  • Camera - Nikon D850

  • Lens - DC-Nikkor 105mm f2

  • Shutter Speed - 1/125th

  • Aperture - f2.8

  • ISO - 200

  • Kelvin - 4500K

  • Focal Length - 105mm


The DIY Top Light Modifier / AKA The Monstrosity

Below I’ll list out the parts and then you can see the DIY top-lights final-form.

Parts Required

Large Silk Painting Frame

White Scrim/Diffusion Material

10m Paracord

Black Velvet

I got all of my items from either eBay or Amazon. Ordinarily, I try to get things from anywhere but Amazon, but sometimes it’s just inevitable. Have a look around, but that scrim/diffusion material I use all the time so I definitely recommend getting that, even if you don’t use it on this shoot.

Step-by-Step Assembly

1. Suspend silk frame from C-stand via paracord

3. Suspend your light (AEOS 2 PRO) from C-Stand via Super Clamp

5. This should now be good to use, but check for light-spill first

2. Clip your diffusion material across the silk frame

4. Cover light with black velvet to prevent light spill

6. If done correctly, you should have a very clean and even light from below


Okay, so hear me out!

I get it, you probably looked at that mess of wood and string above and think I’ve lost my mind. That’s fair, but the main purpose of this monstrosity was to test a theory and yes, there is still clearly a ton of room for improvement.

The main aspect I wanted to test here, was to include a mini-wall of light aka an LED panel that has a very even spread of light and a very fast drop-off of light down the body. Then I wanted to use that light very close to the top of the subject and soften and control that light in a small space.

The test was extremely successful in my mind and I absolutely adore the final results which I’ll share below now.


The Results

Click to enlarge any of the shots below.

Model: Saida


Breaking it Down

I’ve spent a lot of time talking about that top-light and not much about the LED tubes acting as fill-lights below. The main reason for this is simply that I’ve spoken a lot about the qualities of LED tubes in the past and I’ve used them a lot in many recent articles. That said, I will cover why I’m using them here as a fill light.

Here you can see the model touching the LED tube, but see how that exposure isn’t blown out on the fingers and is still even on the face.

LED Tubes

We’ve already established earlier in the article that lights that distribute their power over a large surface have a quicker brightness drop-off. This allows us to use these lights very close to the subject, sometimes even in-shot, and know that they will not overpower the subject. Instead, they offer us a very clean and even light over a large area of the body and this is what’s making them so popular right now. It’s no surprise that every brand is now bringing out LED tubes as they are extremely easy to use and unbelievably forgiving with that aforementioned even drop-off of light. As I said, you’ve seen me use those tubes, literally touching the model in-shot and not blowing out anywhere. Why? Because of the evenly distributed light. I know I’m really drilling this home, but it’s a very new concept to many strobe shooters and I see so many of them continuing to overlook this.

In my featured setup above I’m using 3 tubes surrounding the model. One in the front and one either side of her. These LED tubes are quite literally just out of frame and in some shots they were clipping the bottom of the image. They are extremely close to her and this is to force that very quick drop-off of light again. I’ve spread the light as much as possible and thus as evenly as possible. This is akin to if she was standing on one of those coloured LED floors you see in every Korean dance video. It’s a lot of light, but it’s spread evenly and thus it drops off very evenly too.

LED Tube Positioning

You may or may not have seen how I attached the LED tubes in the BTS above, but essentially I’m using Munsen clips and light stands. I’ve covered this in previous articles, so if you’re interested in more info, take a look here: Lighting Setup: Affordable LED Tubes

Model Posing

You may be wondering why the model was always sat down and why I didn’t get any standing images. Sadly, it was simply logistical limitations. The space was limited and the ceiling was low hence once the top-light was in position, we simply didn’t have room for her to be standing. As it turned out, the model was phenomenal and actually thrived on the restrictions of being sat down. This resulted in some shots where she’s leaning forward or over the lights below which cast some truly gorgeous light across her body. Images that I simply wouldn't have gotten had she been stood the whole time. As usual, you have to capitalise on your limitations, not use them as an excuse.

Tips on Setting up

The top light needs to be just out of frame to maximise that drop-off. I was shooting on a 105mm lens which allowed me to bring that top-light even lower in the frame than if I’d been on a wider lens. The same applies to the LED tubes below. Make sure they are as close as you can get them without them actually being in-frame. Start by exposing your weakest lights at max power first. For me, it was the tubes. I set them to max output and then adjusted my camera around that. Next, I switched on my top-light and adjusted that power accordingly.

Lastly, we don’t have a background light so you’ll have to manage the colour and exposure back there by simply moving your setup closer or further away from the white backdrop behind. I opted for around 3ft/1m to allow for a little bit of spill and if you move too far away, you’ll notice that it gets very dark back there very quickly.


Alternate Setup for Sane People

Where possible, I do try and offer up an alternative setup for those either not able to acquire specialist modifiers, or those simply still using flash instead of LEDs. As we’ve discussed, the light will look different, but if you’re just looking to play with a new idea and don’t want all the hassle of the extra steps, this is a nice substitute.

Cut out & keep

Pretty simple, right? Large softbox above and a small softbox below. Done. If you just skipped all the way down here, then you just saved yourself 10 minutes! But I will leave you with one final diagram as to why I would urge you to test out some panels when you get a chance.

As I’m illustrating above. Do be prepared for the softbox light to be harder to manage than the panel light. It will appear brighter in the middle when used closely like this, so just be prepared for that.

If you take nothing else from this article then at least remember this; try to spread your light as evenly as possible, as quickly as possible. In this instance, I’m using a large LED panel to do so. Then I want to bring that evenly distributed light as close to my subject as possible to ensure a very fast drop off of light. With these two principles in mind, you should see a dramatic difference in your portrait lighting, especially if you use coloured light.

As always, I wish you luck with the shoot and let me know how you get on.


Products Used

Rotolight

Although I am sharing my own personal thoughts and findings about the lights mentioned in this article, many of you will want to know that I am now a ‘Master of Light’ for Rotolight. As such, I have been given a discount code to share with you when purchasing any of their products via the Rotolight website. Use my code ‘JAKEHICKS10’ when purchasing and you’ll save a bunch of money. I’ve never earned a penny of commission on this though, so if you find a better deal elsewhere, go for it.

Rotolight AEOS 2 PRO

With the AEOS 2 PRO, the world is your studio. Combining the shoot what you see benefits of powerful continuous light with a High Speed RGBWW strobe, AEOS 2 PRO offers unmatched versatility for photographers and filmmakers. Uniquely lightweight with an ultra-thin design, it’s never been easier to achieve beautiful soft light on the move.

AEOS 2 PRO Website Link


Please note that I’ve included affiliate links below for PixaPro and I will benefit (albeit minimally) from the sales of any of these products should you purchase them. To that end, please feel free to use my discount code ‘HICK5-OFF’ at https://www.essentialphoto.co.uk/JAKEHICKSPHOTO to receive a 10% discount on any purchase via their site.

Use Code: HICK5-OFF for 10% Discount on all Essential Photo Products

||

Use Code: HICK5-OFF for 10% Discount on all Essential Photo Products || Use Code: HICK5-OFF for 10% Discount on all Essential Photo Products ||

Rainbow Series RGB LED NEON Light Tube

I was using the 120cm long tubes, but be aware that 90cm length tubes are also available. More information on these tubes can be found via the link provided.

Rainbow Series 320-Degree RGB LED Neon Light Tube


JHP Livestreams…

I livestream every other Tuesday night via YouTube and there I answer your questions, critique your shots, take community images into Photoshop to work on them and discuss all manner of lighting tips and techniques. I look forward to seeing you and your work there real soon. Jake Hicks Photography - YouTube


All of my more advanced lighting classes are now available online!

||

All of my more advanced lighting classes are now available online! || All of my more advanced lighting classes are now available online! ||

LEARN MORE ABOUT MY ONLINE WORKSHOPS

 
Tuesday 07.23.24
Posted by Jake Hicks
 
Newer / Older