• Technique
    • Latest Techniques
    • FREE TIPS
    • Quick Tips
    • Video
    • Site Search
    • Blog
    • Archives
  • Mentoring
  • >Online Workshops<
  • Workshops
  • Studio Lighting Books
  • Contact
    • Newsletter
    • Contact
    • Statement
Jake Hicks Photography
  • Technique
    • Latest Techniques
    • FREE TIPS
    • Quick Tips
    • Video
    • Site Search
    • Blog
    • Archives
  • Mentoring
  • >Online Workshops<
  • Workshops
  • Studio Lighting Books
  • Contact
    • Newsletter
    • Contact
    • Statement

How to Eliminate Softbox Hot-Spots

I’m not known for being shy about my hatred of softboxes. Sure, softboxes are often cheap and extremely easy to use, but they rarely produce beautiful light when compared to many other modifiers.

Why the hate?

Softboxes were originally designed to emulate window light. Yes, they often come in the same shape and size as a window, but that is where the similarities end and I defy anyone to show me a window that produces light like a softbox does. The reason for this is simply due to how the light actually arrives at the subject. One light is emanating from millions of miles away and the other is originating from a source mere inches away. It’s this very important factor that can dramatically change how light ultimately looks on its subject and unless we take steps to address this final look, we may simply be ‘making do’ with illuminating our subject rather than actually properly lighting them.

The sun produces beautiful light on us as it collimates the light. Essentially this means that light rays are travelling side by side and straight to us thanks to the sun being so massive and so far away. A softbox on the other hand is very close to us and this sadly throws light out in all directions. As we can see here, the light from those two identical size and shape squares is very, very different.

What’s a Hot-Spot?

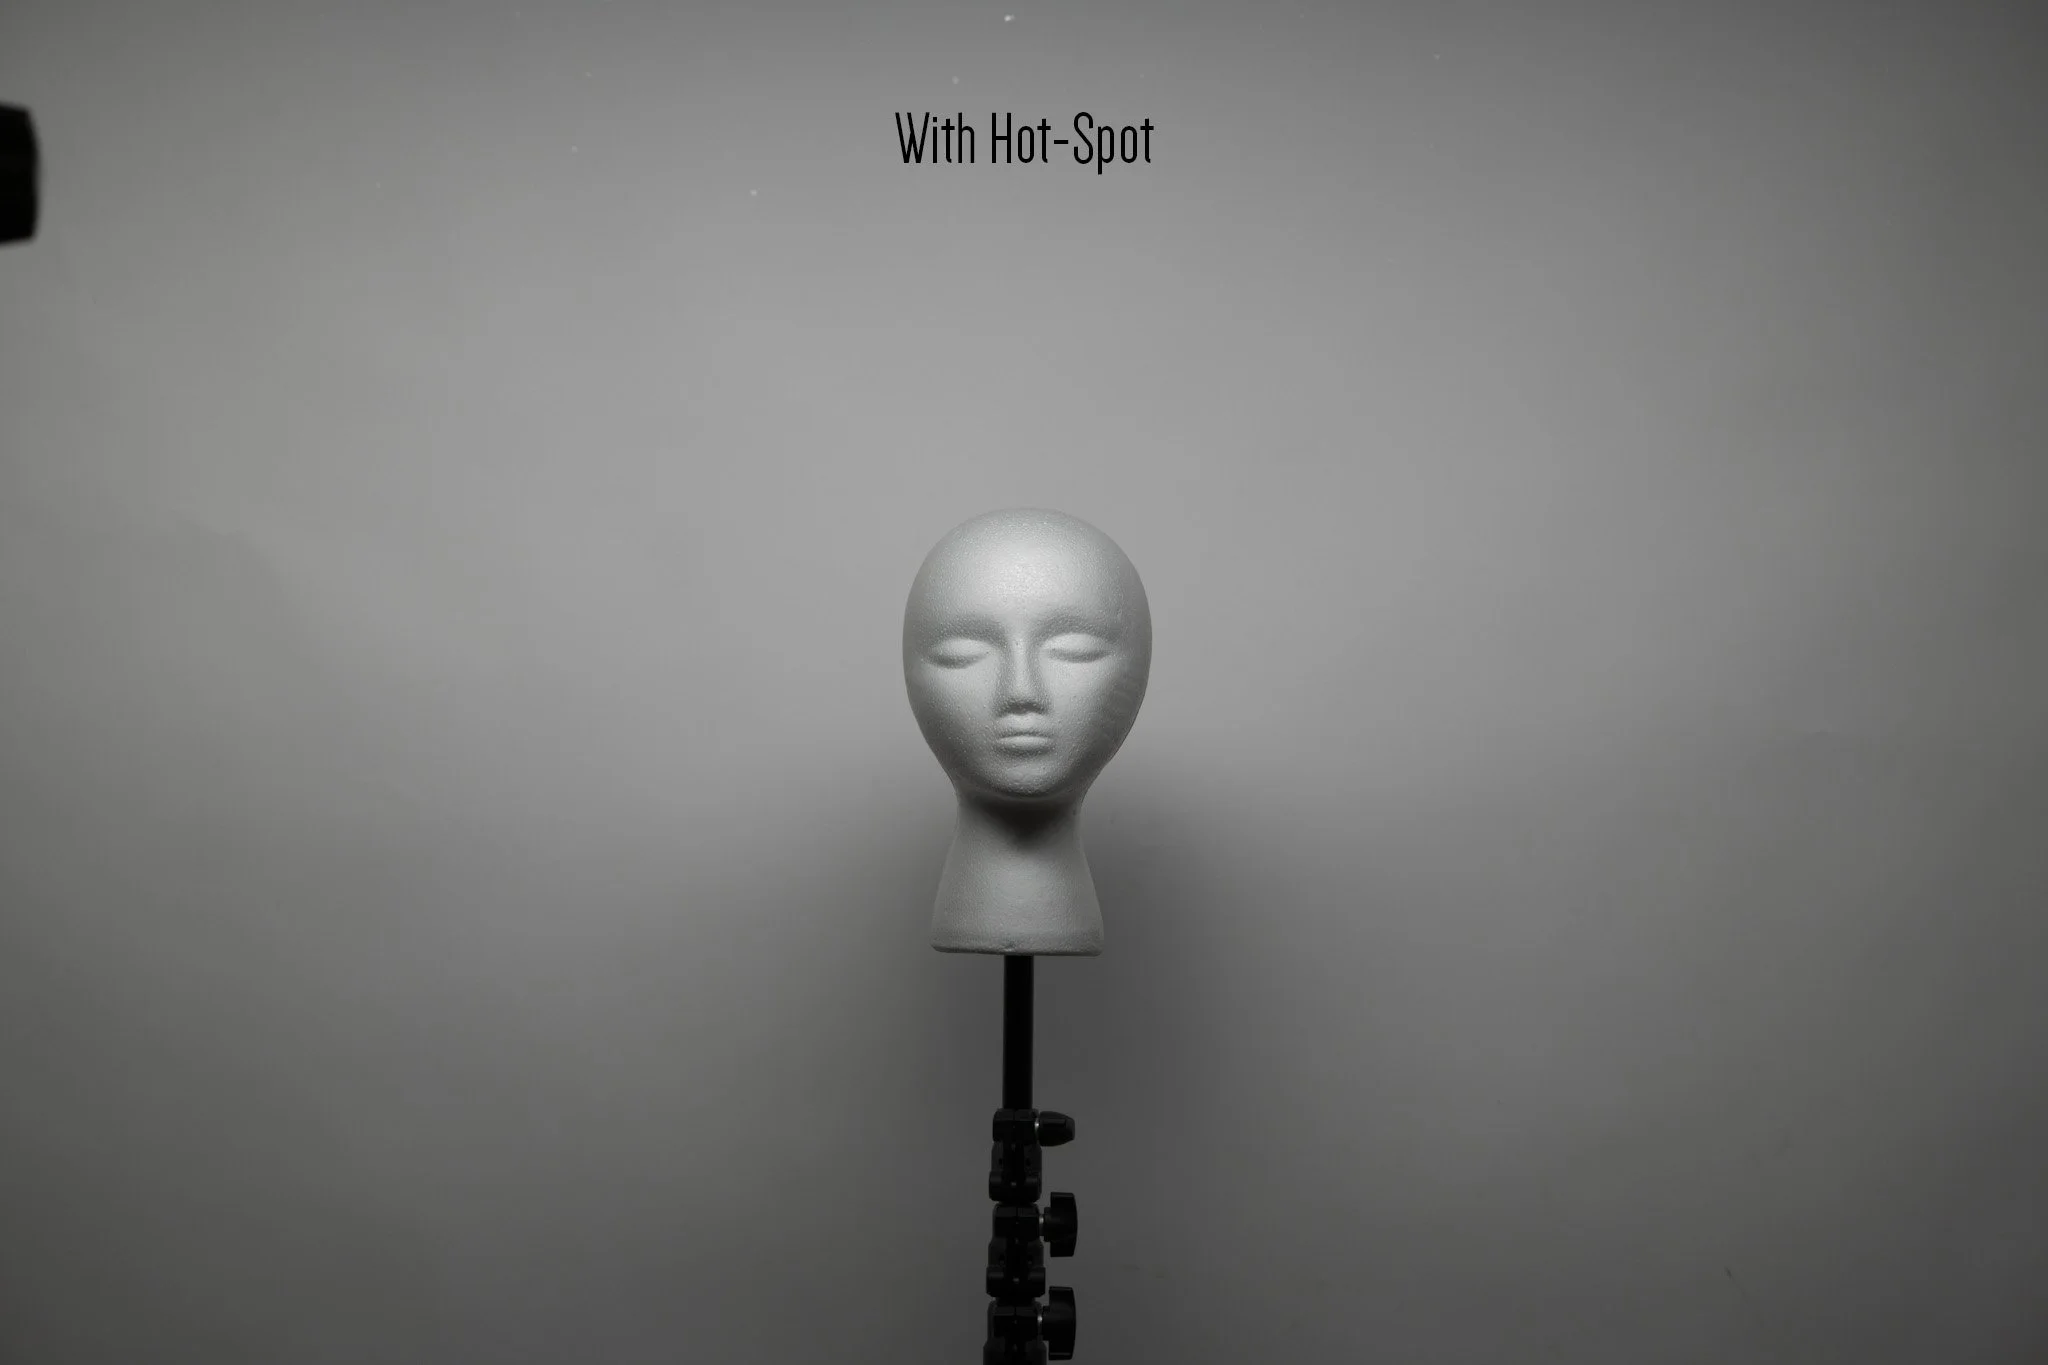
Because the light source is often quite close to the subject when shooting portraits (and especially close when managing coloured light properly), this can result in hot-spots appearing in the shot. These hot-spots are simply brighter areas in an image and in studio lighting, they are often caused by the lighting modifiers used.

Softboxes are the biggest offenders of hot-spots as they have a centralised light that spills light out in all directions. If the subject is close to the softbox, then they in turn are closer to the bulb. The closer to the bulb or light source that part of the body is, the brighter it will appear in the frame. Failing to manage these hot-spots effectively can result in unprofessional-looking light and sadly it is very common in a lot of studio portraits today.

To make the most of a softbox, we often bring it in close to the subject. This results in a big, beautifully soft light, but if we’re not careful it can also result in hot-spots being present in our image, especially if we are capturing an image that encompasses more of the body. The centre of the softbox is where the light source is and this is where the brightest part of the subject will be.


Further Reading

Hot-spots are an incredibly annoying aspect of modern lighting as they are very apparent in lighting that is used close to the subject. You’ve just heard me hating on softboxes even though you yourself could probably name a dozen professional photographers that solely use softboxes. Are they really that bad? You have to remember that the hot-spots become more apparent the closer they are to the subject. If you’re a photographer who uses their softboxes 15 - 20 feet away from the subject in the studio, you’re unlikely to ever notice the effect, but as they get closer, the effect worsens. If you’re interested in learning more about this, take a look at my article on how different flashes produce light here: Why you should Upgrade your Speedlight to a Studio Strobe


What’s the Alternative?

Fresnel lights have been used on film sets since the 40s for their beautiful-looking light.

Now that you know what hot-spots are and how softboxes cause them, what are the alternative lighting modifiers to reduce this issue? Thankfully there are many modifiers out there that significantly reduce this effect. Modifiers that collimate the light (send the light in parallel lines to the subject) produce a very beautiful and far cleaner-looking light. Ironically, these modifiers are not new and the fresnel lights have been used on film sets since the 1940s for this reason. Fresnels do require a lot of space though and are great for bigger studios, plus they can be pretty expensive too. There are plenty of other modifiers that do the same and you’ll find my site littered with alternatives as I strive to avoid ever using the dreaded softbox wherever possible. My favourite non-hot-spotting modifier though has to be the beauty dish as this is very easy to use, can be used very close to the subject and even the good ones aren’t prohibitively expensive.

Beauty Dishes

Beauty dishes have a unique property in that they have a diffusion cone placed inside the modifier right in front of the bulb. This diffusion cone takes the brunt of the hot-spot and then proceeds to bounce all of that light back into and around the modifier. This now bounced and diffused light will then exit the modifier before ultimately reaching the subject in a far more even spread of light. Whereas many modifiers that evenly spread the light require some distance to the subject to do so, beauty dishes excel at being close to the subject and this is why a beauty dish is always my number one choice as a key light on set.

Beauty dishes produce some truly beautiful light and that is largely in part due to their lack of localised hot-spots. Here we can see the diffusion cone in the centre of a beauty dish and this is what reduces that hot-spot and allows us to use this modifier very close to the subject without the fear of an uneven spread of light.

As I said, I would use this beauty dish as my key-light at every opportunity as it excels at producing very distributed lighting even in small spaces. To further demonstrate my point, take a look at the example image below as it shows just how prominent the hot-spot on softbox is compared to a beauty dish when used close to the subject.

Click to enlarge: This image shows both a softbox and a beauty dish being fired at a white wall. On the left, we can see a softbox and the type of light spread it produces. As I explained earlier, you can clearly see how the centre of the light is bright and then immediately starts to drop off to shadow pretty aggressively. Compare that to the beauty dish on the right which is clearly doing a far better job at evenly distributing the light and almost entirely eliminating the hot-spot.


Umbrellas vs Stripboxes

Hopefully, I’ve adequately demonstrated above how soft-boxes are convenient, but far from the best choice for portrait lighting. I’ve personally not used a softbox on set (apart from as a fill-light) for over a decade and I have zero intention of doing so any time soon.

The issue with softboxes is not a new one and I’ve been recommending against them for a long time now. Many of you more mature readers will be aware of my early work with gelled lighting and you may even remember that I released a fairly popular video many years ago on how to use gelled lighting in portraits. In said video, I use umbrellas as my edge lights because umbrellas eliminate hot-spots by pointing the light away from the subject and bouncing it back. Umbrellas are a great and very cheap way to produce even lighting, yet I still see people emulating the light I teach in that video not with my recommended umbrellas….. but with the dreaded stripboxes!

I get it, umbrellas are cheap, so they obviously can’t be very good, right? Ironically, this is one of the rare occasions where the cheap alternative is actually pretty good and if we disregard the hilarious £300+ umbrellas from Profoto - please don’t let anyone tell you their umbrellas are worth the ridiculous 10x price!!! - umbrellas are a solid and very affordable lighting modifier. As I said, they point the light away from the subject and the bounced-back returning light is fairly evenly distributed if you can avoid the strobe casting a shadow. But even with that strobe shadow issue in mind, umbrellas are still infinitely better than stripboxes for all of the hot-spotting reasons we’ve outlined above.

Still insist on ruining your photos?

This article has done nothing but tell you ‘you’re doing it wrong’ and although I highly recommend you try alternative modifiers like beauty dishes and umbrellas, what if you still want to try and make softboxes and stripboxes work?

Initial ND Solution

This was an interesting idea when I first decided to tackle this for the article. Can we really target the hot-spot problem and try to fix or alleviate it? My first idea was to reduce the brightness of the centre of the softbox. This should obviously work, right? Reduce the centre brightness, reduce the hot-spot. Initially I opted to try ND or Neutral Density gels in the centre of my softbox.

I initially started out by using layers of ND gel to reduce the hot-spot effect from stripboxes.

The tests involved the softboxes being brought in close and were about 200cm away from the subject.

I would attach the ND gels to the central diffusion panel that is inside nearly every softbox. This diffusion panel is perfectly placed to attach these gels and I was convinced this would be an easy solution to the hot-spot problem.

I tried all manner of combinations of layers and amounts of ND gels, but ultimately none of them had any significant impact on the hot-spot produced. The light was still brighter in the middle and was just darker overall.

After nearly giving up, it dawned on me that the proper solution had literally been staring me in the face this whole time.

How do beauty dishes solve the hot-spot problem?

The Softbox Beauty Dish combo….. The Beauty-Box?

That’s right, the beauty dish uses a diffusion cone in its centre. This dish stops the hot-spot and then bounces that stopped light back out and this is what the ND gels weren’t doing. Sure, they were reducing the light, but the NDs weren’t bouncing it back out in any meaningful way.

The solution?

Ironically, the solution was just regular old tinfoil. That’s right, the soft malleable metal you wrap your chicken in was the key.

Instead of the ND gels, I now attached the tinfoil to the centre diffusion panel of my softbox and made sure that the shiner side of the tinfoil was the side facing the light.

By placing tinfoil in the centre of my stripbox, I was able to significantly reduce the hot-spot produced.

No, this doesn’t look pretty and I’m not saying this will solve all your lighting problems, but I was still surprised at how effective this was. More surprisingly though, was how much of the centre of the softbox I had to cover to make a meaningful difference to the hot-spot. This was a big 35cm x 165cm stripbox and the sheet of foil in there that I ultimately ended up using for the best results was around 70cm long!

JakeHicksPhotography_A (2 of 3)withhs.jpg
JakeHicksPhotography_A (3 of 3)without hs.jpg
JakeHicksPhotography_B (1 of 2)with hs.jpg
JakeHicksPhotography_B (2 of 2) without.jpg

I get it, this is starting to look like an ‘emperors new clothes’ situation here as it doesn’t look vastly different on screen and without saying ‘trust me bro’, you really are going to have to trust me that this DIY tinfoil inner diffusion sheet is doing something.

Is it a solution that I recommend you all go out and cram yards of tinfoil into all of your softboxes? No, certainly not, but it was an interesting demonstration to me just how much of a hot-spot is present in our softboxes and that hot-spot is only magnified when that softbox gets closer to the subject.

Results from tinfoil placed over the inner baffle of a 60cm x 60cm softbox.

I also tested the same theory on a smaller 60cmx60cm softbox. Although the results above are less pronounced, you can still see that placing a small sheet of tinfoil over the centre of the inner diffusion panel still has a noticeable effect on the hot-spot.


I opt to never use stripboxes for my gel work. Instead, I always use umbrellas.

Closing Comments

Although I did finally arrive at a passable fix to the hot-spot problem of softboxes, it was far harder to eliminate than I first thought. My initial idea was to buy a sheet of Neutral Density gel, throw it in my softbox and a couple of hours later I’d have a working article to share. That was yesterday and that was absolutely not the case as the ND gels were quickly abandoned in favour of raiding the kitchen cabinet for alternatives.

Again, I was amazed at how hard it was to reduce the hot-spot effect and larger and larger sheets of tinfoil were needed to further reduce the bright centre. In fact, to evenly distribute the light around my large stripbox, such a large sheet of tinfoil was needed that it ultimately reduced the light output by nearly 1.5 stops! Sure we have powerful strobes and it’s not too much of an issue, but that may be why we don’t see softbox manufacturers opting for this internal diffusion cone in their softboxes. Surely a little shiny square in the middle of the diffusion baffle would go a long way…. but at the cost of 1.5 stops of light?!

Beauty dishes get away with the diffusion cone due to them also having a parabolic curve to reflect the bounced light back out in an optimal way thereby negating a large amount of the lost light a softbox would.

So no, I don’t recommend you fill your softboxes with tinfoil just yet, but I still think this trick is a useful one to be aware of. You never know, you may be in a situation where you’re shooting in a tight space and you simply cannot get your softbox back away from the subject enough. With this predicament in mind, a sheet of tinfoil in your softbox may well be just the thing you need to spread that light more evenly in that tight spot.

I will wrap this all up with a final thought though as I hope that if nothing else, you’ve learned that softboxes produce unsightly hot-spots when used in close to the subject. As an alternative, I urge you to try a beauty dish instead as I swear you’ll be blown away by the difference. Yes, I know some beauty dishes can be expensive and at first glance, they may look the same, but if you can afford it, I recommend you look for a beauty dish with a more pronounced curve to get the best possible lighting with almost no hot-spot at all.

I’m loathed to include a link here as I know it just looks like I’m flogging my affiliate code, so please, if you find a better alternative, just use that instead. That said, my old Bownes beauty dish is a beautiful shape and I insist on using it. Sadly Bowens no longer exists, but of course, Godox has somehow managed to ‘adopt’ that original Bowens shape and now make an excellent dish instead.

22” White Beauty Dish

The 22”/55cm white beauty dish is what I always use on my key-light and I love this thing!

A silver one is also available, but that will add more contrast to the shot so choose accordingly - the white one is simply more versatile.

Godox White Beauty Dish

Please note that I’ve included affiliate links above for PixaPro and I will benefit (albeit minimally) from the sales of any of these products should you purchase them. To that end, please feel free to use my discount code ‘HICK5-OFF’ at essentialphoto.co.uk/JAKEHICKSPHOTO to receive a 10% discount on any purchase via their site.

I wish you luck with your future shoots and I hope you’re now a little more aware of what to keep an eye on when using softboxes. But again, here is your weekly reminder to burn all of your softboxes.


JHP Livestreams…

I livestream every other Tuesday night via YouTube and there I answer your questions, critique your shots, take community images into Photoshop to work on them and discuss all manner of lighting tips and techniques. I look forward to seeing you and your work there real soon. Jake Hicks Photography - YouTube


ONLINE WORKSHOPS - LEARN MORE

 
Tuesday 07.02.24
Posted by Jake Hicks
 

Lighting Setup: Studio Lighting with Lasers!

I was struggling with the title for this one and although it sounds like ridiculous click-bait, this lighting setup really is about using lasers alongside our more traditional studio lights.

I’m someone who gets bored extremely quickly and although there’s probably a modern medical term for that ‘personality trait’ today, I choose to lean into this quality as it typically forces me to keep playing with new ideas AKA ‘be creative’.

With this creative itch always niggling at the back of my brain, I’m always on the lookout for new ways to keep things interesting in the studio. Sure, there is a time and place for tried and true lighting setups, but it’s always fun to break the rules and try something completely different once in a while. With this in mind, I’m continually searching for new ways to illuminate my subjects. Sure, there are thousands of purpose-built lighting modifiers for us to try, but there are also tons of other, far more ‘creative’ ways to illuminate our subjects too.

My wife can attest to this but I have boxes of ‘nerd-shit’ as she calls it, which contain vast numbers of items that emit light. Some of them don’t even emit light at all and an abstract silver fruit bowl and silver-painted satellite dish all patiently await their moment to ‘shine’ in the studio.

I’m not exaggerating either, I really do have boxes of this stuff that I purchase and think ‘I’ll use that one day’ and today was the turn of an old laser pen I’d bought many years ago.


Laser Pen

You’ll be pleased to hear that this week’s setup involves a very affordable light as the light in question is actually just a simple laser pen which can be purchased for around £10 - £15. There’s nothing particularly fancy about these laser pens, although if you want to get some interesting shots with a little variety, I recommend getting one that comes with some additional filters and features. For example, the most common colour these lasers come in is green. I’m not a huge fan of green on the skin for portraits so I’d recommend getting one with either a red or blue variant. The other important thing to look for is the filters that come with them. As we know, all lasers are emitted from a single point and as cool as this is, the single red dot is not very exciting to look at when used in conjunction with studio portraits unless you’re going for the assassin cosplay look. With this in mind, I recommend you find a laser that comes with a bunch of filters to spread, separate, scatter and otherwise modify that single beam.

As I mentioned, there are a multitude of options, none of them are particularly expensive and I’ll speak about what I went with later in the article.


You’ve Been Warned: I know you’re not an idiot but if I don’t say this I know I’ll get messages about it, but please be careful when using lasers. Don’t point them in your eye and don’t point them directly into your camera as lenses can magnify them to the point that they could damage the sensor. Most of these commercially available lasers are fine as long as you’re not staring into to them for prolonged periods, but it’s better to be safe than sorry. Plus, always pass this warning along to the models and team on set too.


The Setup

Now that you know what we’re dealing with in regards to the specialist light included in this setup, I’ll go over the setup in full and then break down any pertinent sections afterwards.

Cut out and keep

Rotolight NEO 3 Pro as a background light set to blue

2 of the Godox TL30’s joined together and used as a fill light set to red

The laser pen is clamped up high next to the key light (AEOS 2 Pro set to white light ~4500K)


TL;DR/ADHD/Artist Setup Explanation

  • Position small light set to a blue colour/attach blue gel against white backdrop

  • Place white key-light up high and angled down towards model

  • Have a large soft-light set to red/red gel attached behind you pointed towards backdrop

  • Position smaller light just out of shot as fill-light set to red/red gel attached

  • Lastly, place laser pen up high next to key-light and angle towards model


Kit Used

  • 2x Rotolight AEOS 2 Pro

  • 1x NEO 3 Pro

  • 1x R120 Parabolic attached to the AEOS

  • 2x (joined) Godox TL30

  • Laser Pen

  • White Backdrop


Camera Settings

  • Camera - Nikon D850

  • Lens - 24-70mm f2.8

  • Shutter Speed - 1/125th

  • Aperture - f2.8

  • ISO - 200

  • Kelvin - 4300K

  • Focal Length - ~58mm


The Results

Click to enlarge any of the shots below.

Model: Little B


Breaking it Down

I’m sure a lot of this is fairly straightforward to many of you and the core underlying setup of this shot is essentially your standard key-light, fill-light and background light. But let’s go over a couple of the details in case there’s anything that doesn’t make sense.

Background Light

I have my background light as a Rotolight NEO 3 Pro and the reason for that is because it’s small and very easy to hide behind the model. If you’re using a light back here, I’d advise the same and place it close enough to the backdrop to manage the vignette of colour accordingly. For example, place the light close enough, maybe 12 inches away (30cm) from the white background so that you get a small spot of colour. I have mine set to a bold blue colour that harmonises well with the vibrant red. For example, a deep navy-blue colour goes well alongside a bold blood-red colour.

Fill-Light

For this, I’m actually using 2 Godox TL30’s screwed together to make a 60cm tube light. I’ve only recently acquired this light, but it’s proving very useful as a fill light. Why? This tube works well when placed close as it spreads light along its length but the power of the light drops off very quickly. For example, it’ll be bright on the chest, but drop off to almost no power on the face making it very controllable. If you don’t have a tube here, then any typical fill-light like a small softbox or even a white umbrella can work well too. I have mine set to a bold red colour to match the red from the laser light.

Global Fill-Light

You’ve likely seen me use this technique a lot in my setups and it's a very effective way to add complimentary light and colours to the scene. If you’re not sure what light I’m referring to here, then it's the large softbox you can see in the diagram above. I have a Rotolight AEOS 2 Pro in my 120cm Softbox here, but again, any large softbox and light combo will work. I have mine set to the same bold red as my fill-light as well as the red laser. The one role of this light is to add a little illumination to the model's shadow areas, but primarily it illuminates the dark vignette left via the blue background light.

Key-Light

The key-lights are typically the easiest light in a set to place as they’re what I refer to as my ‘objective’ lights. There is no ambiguity in their role on set as they must correctly expose the model's skin. Other ‘subjective’ lights can be bright or dim based on personal taste, but the objective lights must be accurate. I’m using my favourite key with my Rotolight AEOS 2 Pro set to around 4500K, but you could also use a beauty dish here as an alternative.

Laser Pen

The fifth and final light here is the (tiny) star of the show, the laser pen. As you can see from the BTS shots above, I clamped it in place via a SuperClamp, but you can use whatever method you like to keep it where you want it. My advice for position; keep it as close to the key light as you can get. That way, neither the laser nor your key is casting conflicting shadows and again, you can see in the BTS above that it’s mounted right next to the AEOS.


Points to Keep in Mind

Laser Pen

I spoke about this at the top, but I’ll go into a little more detail here with regards to the laser pen. As I mentioned, try to get a red or blue one as the green (more popular) ones wont look good on the skin. By all means try it for yourself, but that’s just my recommendation. Alternatively, just get one that has all the 3 colours and play with what works best on the day. Edit: I’ve seen some lasers that also produce a violet-coloured laser - I could see that one being a cool colour to try too.

I bought my laser pen many years ago now, but this one here looks very similar.

The other factor is the creative options when it comes to the laser filters. If you just purchase a simple laser pen (the one you tease those poor cats with), you’ll simply get a single, tiny bright dot. We want a laser with some filters that actually refract that single beam of light into a bunch of different shapes and looks.

Many laser pens will have a variety of ways to refract the single-dot laser and I’d urge you to get one that comes with some options.

Once you have laser filters, it’s a good idea to test them all to see what will work.

Pictured above you can see some of the effects that come with the laser pen I tested. Not all of them are ideal for portraits, but the variety will help you find something that works. I personally preferred the dots and stars as they had a very noticeable effect on the skin.

Colours

I’m sure it's fairly obvious by now that I love to incorporate colours into nearly all of my shots. Here I was choosing my coloured lights based on the laser colour being red. Red is a very bold colour so I opted for another equally bold colour to compliment it. That said, reds bold and dominating colour is pretty tricky to work with, so if you see some other coloured lasers on offer, definitely consider getting them as I could see the blue or even violet lasers being a little more versatile to work with.

If you’re not particularly confident with coloured lights then there’s nothing wrong with just trying white light instead. I could see a very bold red laser standing out nicely against regular white-light on the skin.


Closing Comments

This is one of those setups that is fun to play with. Will it make it into your regular rotation of looks? Maybe not, but pulling a few ideas out of the lighting toolbox every now and then is a lot of fun, plus you never know what other ideas may be triggered by this. After all, trying something new and being creative is never time wasted. I wish you luck and if you give this one a go and let me know if you do as I’d love to see the results.


Products Used

Rotolight

Although I am sharing my own personal thoughts and findings about the lights mentioned in this article, many of you will want to know that I am now a ‘Master of Light’ for Rotolight. As such, I have been given a discount code to share with you when purchasing any of their products via the Rotolight website. Use my code ‘JAKEHICKS10’ when purchasing and you’ll save a bunch of money. I’ve never earned a penny of commission on this though, so if you find a better deal elsewhere, go for it.

Rotolight AEOS 2 PRO

With the AEOS 2 PRO, the world is your studio. Combining the shoot what you see benefits of powerful continuous light with a High Speed RGBWW strobe, AEOS 2 PRO offers unmatched versatility for photographers and filmmakers. Uniquely lightweight with an ultra-thin design, it’s never been easier to achieve beautiful soft light on the move.

AEOS 2 PRO Website Link


Rotolight R120 Sofbox

A softbox is pretty much a must-have piece of kit for any studio shooter, so if you own any AEOS 2/Pros, this is certainly worth taking a look at. It comes with internal baffles as well as the eggcrate grid on the front. Plus, it has 16 sides making this an incredibly round and clean light source.

R120 Softbox Website Link


Rotolight NEO 3 PRO

Small but mighty, NEO 3 PRO is the brightest LED on-camera light ever made. Experience unrivalled power and industry-first innovations in a compact form factor you can take anywhere.

NEO 3 PRO combines the shoot-what-you-see benefits of continuous light, with a High Speed Sync RGBWW flash for unlimited creative possibilities.

NEO 3 PRO Website Link


Please note that I’ve included affiliate links below for PixaPro and I will benefit (albeit minimally) from the sales of any of these products should you purchase them. To that end, please feel free to use my discount code ‘HICK5-OFF’ at Essential Photo to receive a discount on any purchase via their site.

TL30-K2 RGB LED Tube

A 2 light LED kit that includes 2x 30cm full RGB LED tubes plus a whole host of useful accessories including grids and mounting clamps.

TL30-K2 Two Light Kit Link


JHP Livestreams…

I livestream every other Tuesday night via YouTube and there I answer your questions, critique your shots, take community images into Photoshop to work on them and discuss all manner of lighting tips and techniques. I look forward to seeing you and your work there real soon. Jake Hicks Photography - YouTube


ONLINE WORKSHOPS - LEARN MORE

 
Tuesday 06.04.24
Posted by Jake Hicks
 

Flash Vs LED - Which is better?

If you’re reading one of my articles, then I think we both know you’re no fool. You also know I’m not going to give you a definitive answer to this flash vs LED debate, but what I will give you is some points to consider. After all, I happily shot with flash for over 20 years, what made me switch to LEDs?

To provide a little context for those not familiar with my work, I pretty much exclusively shoot indoors in the studio and even when I’m out of the studio, I’m turning my location into a studio. This information is relevant as we need to broach the mammoth-in-the-studio debate which is…. brightness.

No, LEDs are not currently as bright as flash. If you’re someone who regularly uses 1000w strobes and you’re often using them at full or close to full power, LEDs are likely not going to be suitable for your needs at the moment. That said, if you’re someone who works in a studio or any light-controlled space, you may find that the sheer volume of other benefits that LEDs can provide, may outweigh this initially concerning downside.


Lighting Characteristics

Let’s look at some of the characteristics of both flash and LED first and then we can discuss a few of the more important ones in more detail.

Characteristics of LED

  • Continuous

  • Adjustable Kelvin values

  • Brightness can struggle in certain situations

  • Easily used for both stills and video

  • Millions of coloured light options

  • Very stable exposure and colour

  • Models can struggle under constant bright light

  • Panel LEDs have almost no modifiers

  • Panel LEDs create beautiful even lighting

  • Anyone can use an LED light

Characteristics of Flash

  • Instant

  • One fixed Kelvin

  • Bright enough for almost any situation

  • Only used for stills

  • Only available as white light

  • Minor exposure and colour variances

  • Model friendly exposure

  • Extremely versatile for lighting modifiers

  • Flashes suffer from localised hot-spotting

  • Certain knowledge and skills required to use


The biggest argument against LEDs is always, power. No, LEDs aren’t as powerful as many big strobes, but I’ve still used my LED panels outside on a sunny day in conjunction with the daylight.

Convenient and Nice to Have Features

Let’s now break down some of those characteristics and put them into the context of my work as a fashion and portrait photographer. These benefits are all important, but for me, they are bonuses and nice-to-haves, kinda like your car having heated seats and electric windows. These features aren’t going to sell me the car, but they all add up to clearly making your life a little easier.

Flash is Instant - I don’t need to capture fast-moving objects

If you’re someone who is photographing dancers or sports where there is a lot of fast action and movement, the 4000th of a second flash duration (often flashes are even faster than that now) is going to be very useful to you. For regular portraits of regular people, LED can easily capture everything crisply with your regular shutter speeds applied.

Flashes Extra Brightness - I work in the studio, I don’t need super-bright lights

There is no denying flash is certainly brighter than LEDs. But how often am I utilising all of that power when I’m working in a dark studio and my f2 lens? For me, the LED brightness is enough, but I would need to be mindful of shooting with them outside in bright sunlight…. if I ever decided that I wanted to do that for some reason!

Flash can be Easier on Models - Most professional models can cope with both

Recently I’ve heard talk of models getting tired, fatigued and even uncomfortable under bright LED lights. You have to remember that LEDs are constantly bright whereas flash is just a split-second of brightness. It’s worth noting that all movie and theatre sets are using constant lights and the vast majority of those sets are using tungsten hot-lights. LEDs are nowhere near as oppressive as those lights so although LEDs may be different to what they’re used to, most professionals will be absolutely fine with this.

Flash Requires More Skill - Experienced shooters will already know how to use both

There is no denying that flash requires significantly more skill than LEDs to use, after all, LEDs show you in real-time exactly what the final image will look like. What you see is what you get. Flash is a little less forgiving and will often require more experience or at best, more trial and error to get the look you want. In short; experienced shooters will already know how to use both and new shooters will benefit greatly from the ease of use of LEDs.

LEDs Continuous Light - I don’t shoot video

Many photographers today are being asked to shoot video more and more. I personally don’t shoot any video at all, but if I did, the convenience of LEDs allowing you to simultaneously shoot video alongside stills is huge. If that’s you, then this alone is almost a deal-breaker.

LED Colour and Brightness Stability - Nice, but its minor for my work

Several disciplines within photography require multiple images in a set or series to be visually identical when it comes to colour and exposure. If you’re shooting a lot of e-commerce fashion, having rock-solid colour consistency throughout a very long shoot, is crucial. Many cheaper flashes will vary their Kelvin value significantly as the bulbs get warmer, cooler, older etc. Still-life is another discipline where constant exposure and colour are vital. If you’re doing a focus-stacked image of a watch containing 60+ photos, having the exposure and colour exactly the same in all of them saves you an incredible amount of time. I can’t speak to all LEDs, but I’ve shot many setups locked off on a tripod and the exposure and colour are so consistent, you can't even tell the image is changing. If you’re after consistency, high quality LEDs deliver.


Benefits with Everyday Use

Next, I want to look at the important features to me that I know I’ll use in nearly every single shoot I work on. To me, these are the features of a car that decide whether I buy it or not. Engine power, boot space, how many doors etc. These may not sound sexy, but like I said, they will all significantly impact how I use these lights day to day.

LEDs Adjustable Kelvin Values - I adjust Kelvin…. a lot!

For some, this won't be a deal-breaker, but for me this feature is huge! I don’t say this lightly, but I personally put my Kelvin adjustments up there with aperture, shutter speed and ISO in terms of importance. Not a shoot goes by where I don’t make an informed decision on what white balance to set my camera to in relation to my lights. Flashes have one single Kelvin colour and to change that, you have to use colour correction gels like CTO (Colour Temperature Orange) and CTBs (Colour Temperature Blues). Yes, you can adjust the Kelvin value of your flash with these gels, but it's a faff at best and at worst it's a time-consuming guestimation of 1/4, 1/2 and full colour temperature gels.

Click to enlarge - I’ve included a couple of screen grabs here from one of my studio lighting workshop PDFs and they should help provide some context. For example, here we can see the Kelvin range of flash vs LEDs.

LEDs Millions of Colours - I shoot a lot of colour

Unless you’re new to planet Earth, you should know by now that I use a lot of colour and for the last 20 years I’ve been using coloured gels to colour my lights. This is fine and there’s nothing wrong with that, but we all know how much of a time-consuming pain that can be. Have you ever tried to gel a softbox? But even if you’re a pro origami master at wrapping your lights in coloured gels, there are limits to how many colours you have immediate access to. Sure, there are thousands of coloured gels available, but most of us don't have a warehouse of different coloured gels at our fingertips. Full RGB LEDs completely revolutionised that by putting millions of colours in their lights all instantly accessible at the touch of a button. I can’t speak to all LED lights, but my Rotolight NEO 3 and AEOS 2 Pros have over 16 million colours all right there on the easy-to-use touchscreen. If you’re a fan of using coloured light in your work, using RGB LED lights is just inevitable at this point.

Click to enlarge - Again, here we can see the limitations of flash colour vs the incredibly comprehensive colour palette that is immediately available to RGB LED lights.

Click to enlarge - The first ever shot I took using the Rotolight AEOS 2 and NEO 3s - I was immediately struck by how incredibly clean and beautiful the light quality was, even without any modifiers on the lights.

LEDs Light Panel Quality - Panels produce beautifully even lighting

We’re about to get into the realm of subjectivity here, but when it comes to light quality, I can’t understate just how vital this ‘quality of light’ factor is. You’ve just heard me gushing over all the other benefits of LEDs above, namely the instant access to millions of colours at my fingertips, but none of these features swayed me to ditch my flashes and change to LED. The one feature that made me switch to LED was not that they’re incredibly lightweight and super simple to use. Nor was it the huge Kelvin range or their millions of instantly accessible colours. The one thing that immediately got my attention above all else, was the quality of light on portraits.

To illustrate my point here, let me tell you a story.

I’m not known for being at the forefront of tech. I still shoot with a Nikon and that Nikon still has a mirror. So when I happened to be in the same studio as an LED demonstration a couple of years ago, I was not particularly interested. My flashes work fine and I’ve been using them for decades without issue. If it ain’t broke, why fix it, right? So, during this LED demonstration, there was plenty of talk of all the typical things we all know LEDs can do. Kelvin adjustments, millions of colours etc etc. No, I’m not an early adopter when it comes to tech, but I still know what a lot of it does and I was already very familiar with the average LED bullet-point sales pitch. Instead, the eye-opening moment happened when I was asked to photograph the model there on the day as part of the demonstration. As soon as the first shot was taken, my eyes were engaged. What was going on here? Why did this portrait look so good? It was just a basic LED panel pointed at the model’s face with no modifiers attached, why did the lighting look so beautiful?

You can see the first shot I took with LED panels shown here and although the following information gets a little esoteric and borders on the ‘trust me, bro’ side of things, there are a couple of interesting aspects happening here when it comes to quality of light and none of which are present in a single flash unit on the market today.


NERD ALERT

||

NERD ALERT || NERD ALERT ||

NERD ALERT - Dissecting ‘Quality of Light’

The following gets into the ‘weeds’ a little and is arguably only going to be of interest to those with a little more experience and patience. The following isn’t going to be fundamental knowledge for the topic of this article and none of this information will be included in the test at the end.

Click to enlarge to fullscreen

In the image above, I’ve broken down the areas and elements that immediately stood out to me as soon as I looked at this photo on the back of my camera. For context, this image was taken with a Rotolight AEOS 2 as my key-light. That is a round LED panel, roughly 12-13inches in diameter. Behind the model on either side are two NEO 3 LED panels. Again, these are round panels, but these are only the size of the palm of your hand AKA, they’re small. -Details on these lights are included at the end of this article.

Image 1 above is the full shot.

Image 2 shows the beautiful highlights on the models face. These are very clean and even though the model isn’t wearing any specialist makeup, the large AEOS panel is providing a big specular highlight on the surface of the models skin very easily.

Image 3 is showing the NEO 3 edge light set to pink. What’s important about this, is the even lighting and very controlled exposure from the top of the head all the way down the shoulder and even the arm! Remember, this is a palm-sized LED panel! Stripbox users in shambles right about now!

Image 4 looks at the opposite side of the model, specifically the hair. The hair is being blown and is separated into smaller fly-away strands. The models hair is also fair coloured. The hair-light is also just out of frame as I was looking to create a little flare into the lens too. AKA this is a recipe for those tiny, light-coloured hairs to be blown-out and over exposed, but that is absolutely not happening at all.

If we look past the fact that this was the first shot straight out of the gate (remember, these are LED lights, what you see is what you get - photography has never been easier, especially if you’re also using a mirrorless electronic viewfinder that shows you the exact shot before ever pressing the shutter), this was pretty impressive to me. Yes, these elements may be minor to many of you, but to those of you with a little more experience under your belts, I’m sure you’re seeing what I’m seeing too.

This is tough though, right? LED brands can’t market the ‘trust me, bro’ approach that we’re looking at here. How do they put on the specs sheet ‘you’ll burn your stripboxes tomorrow the light looks so good!’

In the next section I’ll aim to look at what I think is causing these types of light qualities as more and more LED panels like these really are upsetting the meta within lighting. And don’t forget, movie sets have been using extremely expensive versions of these LED panels for years so it was only a matter of time before it became financially viable at a consumer level too.

NERD ALERT OVER

||

NERD ALERT OVER || NERD ALERT OVER ||


A Single Point of Light Vs Many Points of Light

Flashes have a single bulb from which all of their light is emitted. This single bulb is easily modifiable, but that lone point of light does result in the light being pushed outwards in all directions. Conversely, LED panels distribute their power over far larger areas thanks to lots of smaller bulbs rather than a single powerful one. The LEDs evenly distributed light results in some beautifully clean-looking light thanks to the beams reaching the subject more uniformly. This pattern of light is also similar to the collimated light you’d find with natural light and again, it's this even look to the light that makes the LED panels light so visually appealing.

Here’s another illustration from my PDF workbook that accompanies my latest lighting workshop, but it essentially demonstrates how having a mini-wall of light produces smoother, cleaner and ultimately more beautiful-looking light when compared to a focused single point of light.

I’ve spoken about trying to define the ‘quality of light’ several times in the past, so I won’t bore you with it yet again, but essentially, natural light is the most beautiful looking light there is. Why? It’s due to the very clean parallel lines of light that illuminate the subject and these parallel rays of light are often referred to as collimated light.

Click to enlarge - Even as a studio shooter, I have to admit that natural light is still the most beautiful-looking light. The reason for that is due to how the rays of light reach us. The sun is so far away and so massive, that the small group of rays that light us are striking us in parallel lines and these parallel lines are known as collimated light.

As I said, this is one of those characteristics that you’ll never see listed in any brochure. How do you quantify the ‘quality of light’? You can’t, but what I will say is, when it comes to using key-lights on my subjects, there is zero hesitation when it comes to always using my AEOS 2 Pro here, yes I use it with the diffusion dome attached, but that’s it. This is one of those occasions where I’d really encourage you to see it for yourself and I’m sure, like me, you’ll use an LED panel for a portrait and never look back.


Flash Modification - Thousands of options

Ironically, LED panels greatest strength, is simultaneously its greatest weakness. That’s right, the truly beautiful light produced by that panel, is also very tricky to modify. The single point of light found on strobes is clearly a very versatile shape to work with as you can now make that single point somewhat-soft as well as somewhat-hard. For example, we can use a snoot on that strobe or we can use a softbox. So yes, that single point of light is incredibly versatile, but in my opinion, it’s a jack of all trades and master of none.

I think it’s hard to understate just how modifiable modern strobes are today. If you want one tool that does the job of many pretty well, a strobe will serve you incredibly well and I’ve collected countless modifiers over the years that all fit onto the same light. From vast softboxes and umbrellas, to ring-lights and fresnels, the strobe is truly the most versatile light on the market, but is it the jack-of-all-trades-master-of-none?

So, yes you can use a softbox on that strobe to create a soft light, but you’re always fighting with that very prominent hot-spot you find when working with single-point lights. The same can also be found when using a hard-light modifier like an optical snoot. Yes, you can make the light hard, but again you’re also fighting with that hot-spot.

In the test shots from my PDF, you can see how a strobe struggles to spread the light evenly with a variety of modifiers. This won’t happen with all modifiers, so it’s good to know which one produce the best quality light.

As you can see in my test shots above, hot-spots are the bane of beautiful-looking light and sadly, as versatile as strobes are, many of them struggle to really spread the light evenly when they have such a powerful and centralised light source. Oh, and this is your weekly reminder to stop using stripboxes! You’re unlikely to simply take my word for it, so please, at the very least, do your own tests and see for yourself if my tests above are too in the realms of ‘surely, my modifiers can’t be that bad?!’ And woe betide you poor souls using recessed Profoto heads, as those hot-spots are far, far worse than these exposed flash-tube shots shown here.

So, what’s the solution?

Yes, the singular source of light can be tricky to manage and spread evenly, especially when used close to the subject. But there are modifiers that you can use that spread the light more evenly. Again, I spoke about this at length in the past, but beauty dishes, fresnels, spotlights and even umbrellas do a fantastic job of eliminating the hot-spots. If you don’t already use those, you should certainly give them a try.

Are there alternatives?

So what do you do if you love the flexibility and ease of use of LEDs, plus you love the ability to adjust your Kelvin values at will and you love having millions of colours so easily available? The simple answer is to get a single-point LED light.

Click to enlarge: My Godox SZ150R is the happy middle-ground between the convenience of millions of colours and Kelvin adjustments vs the annoying hotspots of single-point lights.

Pictured above you can see the single-point LED that I use and it’s the Godox SZ150R. The single-point light at the front is a very diffused white dome that simply hides a very large and powerful LED behind it. As big as this LED is, it’s still small enough to be housed inside of the S-fit (Bowens mount) attachment bracket. This now means I can use all of my old Bowens modifiers on this LED head. Yes, it will still suffer from the hot-spotting present on any single-point light (that said, this inbuilt diffusion dome reduces hotspots more than I thought it would), but it means I have all of the convenience of LED colours and Kelvins that I’ve now become accustomed to.


Click to enlarge - Can you tell if this is shot with LED or flash? Does it matter in the end? No, if you can’t tell then the process is irrelevant, but if that process also happened to be extremely easy to the other, does it matter more to you then?

Closing Thoughts

Shock-horror, once again there is no easy answer to the flash vs LED debate. That said, I know what personally works for me and if you’re a studio portrait shooter, you may well find the Goldilocks formula works for you as well. Yes, I am a Rotolight ‘Master of Light’ aka they pay me to provide training and workshops for them, so take the following as you will, but their AEOS 2 Pro panels are simply outstanding.

You have to remember that a couple of years ago, I thought LEDs were an absolute joke. I thought LEDs were lights for people who were too daft to know how to use strobes. Yes, LEDs are very easy to use and the what-you-see-is-what-you-get style of lighting can be argued as cheating today, but it’s that quality of light aspect that made me originally sit up and take notice.

Times change and new tech is always coming out. You have to remember that strobes were once the convenient, inferior lights compared to the old hot-lights with fresnels. Strobes were very adaptable and easy to use thanks to not getting third-degree burns every time you wanted to move them, but their quality of light was always a bone of contention and it’s why so many still swear by the old hot-light and Fresnel combo even to this day (remember I mentioned that Fresnels collimate the light? That’s why people love the look). The LED panel as a key-light produces a gorgeous-looking light and I could see that as soon as I took the first shot.

I currently use 4 Rotolight AEOSs (2 regular and 2 Pro) and I will always use them directly on the skin whenever possible. But of course, as a creative light shooter, there are times when I need a hard light, a sliver of light on the face or background for example and this is where the panels struggle and it’s for this reason that I use the single-point Godox LED SZ150R.

No, LEDs aren’t comparable to strobes in terms of raw brightness just yet, but they are getting brighter and brighter with each passing month. That said, how much brighter can they get before it literally becomes too uncomfortable to model underneath them for extended periods? Models are already mentioning the brightness is fatiguing so even if there was an affordable super-bright LED available, would I even be using it on my models?

For me, the millions of available colours, the Kelvin flexibility and just the gorgeous quality of light far outweigh the downsides of them being a little dimmer than strobes. Plus, as a Nikon shooter, I don’t get to say this very often, but you gotta quit being stuck in the past 😜


Products Used

Rotolight

Although I’m sharing my own personal thoughts and findings about the lights mentioned in this article, many of you will want to know that I am now a ‘Master of Light’ for Rotolight. As such, I have been given a discount code to share with you when purchasing any of their products via the Rotolight website. Use my code ‘JAKEHICKS10’ when purchasing and you’ll save a bunch of money. I’ve never earned a penny of commission on this though, so if you find a better deal elsewhere, go for it.

Rotolight AEOS 2 PRO

With the AEOS 2 PRO, the world is your studio. Combining the shoot what you see benefits of powerful continuous light with a High Speed RGBWW strobe, AEOS 2 PRO offers unmatched versatility for photographers and filmmakers. Uniquely lightweight with an ultra-thin design, it’s never been easier to achieve beautiful soft light on the move.

AEOS 2 PRO Website Link


Rotolight NEO 3 PRO

Small but mighty, NEO 3 PRO is the brightest LED on-camera light ever made. Experience unrivalled power and industry-first innovations in a compact form factor you can take anywhere.

NEO 3 PRO combines the shoot-what-you-see benefits of continuous light, with a High Speed Sync RGBWW flash for unlimited creative possibilities.

NEO 3 PRO Website Link


Essential Photo - PixaPro

Please note that I’ve included affiliate links below for PixaPro and I will benefit (albeit minimally) from the sales of any of these products should you purchase them. To that end, please feel free to use my discount code ‘HICK5-OFF’ at Essential Photo to receive a discount on any purchase via their site.

Godox SZ150R

Essentially this is an LED studio strobe. You can use it with any S-Fit modifiers like beauty dish and softbox you already own, plus you can also change this to any colour and any Kelvin you’d like. It’s only 150 watts though, so you will want to use this in a controlled studio environment.

Godox SZ150R Link


JHP Livestreams…

I livestream every other Tuesday night via YouTube and there I answer your questions, critique your shots, take community images into Photoshop to work on them and discuss all manner of lighting tips and techniques. I look forward to seeing you and your work there real soon. Jake Hicks Photography - YouTube


LEARN MORE ABOUT MY ONLINE WORKSHOPS

 
Tuesday 05.21.24
Posted by Jake Hicks
Comments: 2
 

Lighting Setup: Abstract Colour & Light

I’m often described as a ‘technical shooter’ or as a photographer who utilises ‘technical lighting’ and although I don’t mind the comparison, I think many people may be surprised at how often I like to simply improvise on set.

If you’re not sure what a technical shooter is, then it’s often used as a way to describe seemingly complex and purposefully accurate lighting. Think scores of lights on set all lighting a single headshot. This may seem overkill to some, but if done well, you shouldn’t even notice all the lights as they should all be complimenting each other, not fighting each other for attention.


Infamous Playboy photographer shares his 44-light setup and states, “I like to shoot with available light … or every light available.”

Technical Shooters

Arny Freytag

One technical shooter is the legendary Playboy photographer, Arny Freytag. Arny photographed hundreds of Playmates in the 70s and 80s and was famous for truly remarkable lighting setups that saw him using upwards of 50 lights to achieve his incredible looks. Many inexperienced photographers today argue that it was overkill to light like this, but you have to remember that photographers like Arny who were often shooting on large format film and at a time before Photoshop, had to get EVERYTHING right in-camera and Arny himself stated in an interview with Esquire magazine that

“It takes five days to shoot a centrefold. One crunched-up foot will ruin the picture.”

Jill Greenberg

Another slightly more modern example of a ‘technical shooter’, is Jill Greenberg. Many will recognise the very iconic ‘End Times’ images of the now infamous crying baby series. The technical lighting setup Jill used in these shots would subsequently go on to be one of the most copied and replicated lighting techniques in modern photography.

Jill continued to use this very successful lighting setup that consisted of upwards of 7+ lights, with animals, singers, athletes and a whole host of other celebrities and it served as her signature look for many, many years.

Side Note: Ironically, Jill herself adopted the nickname ‘The Manipulator’ in the early 2000s (if I recall, even her website was called, The Manipulator - somebody correct me if I’m wrong though) as at the time, she was seen as someone who heavily adopted post-production in her images. You have to remember that this was the early 2000s, a time when many pros were still working with film. Little did the critics know, this look would quickly become the norm. I find it funny that although Jill smartly leaned into the nickname, this supposed ‘heavy’ manipulation would ultimately not just be the norm, but expected. - it just took the rest of us a decade of ‘plastic skin’ before we got back to where Jill originally started it all. Regardless of the nickname though, Jill Greenberg’s foundational lighting from the early 2000s has always been outstanding and no matter the post-pro applied to them, the original shot was always exceptionally well crafted.

Jill Greenberg’s signature look for many, many years consisted of 7+ lights and is arguably still very technically challenging to achieve for many photographers today.


Jazz Lighting

Fast-forward to todays comparatively very post-pro heavy photography and nearly any photographer using more than 3 lights is deemed as ‘technical’. It’s a far-cry from the incredible lighting talents of the glamour photographers of the 80s, but some of my lighting setups that utilise 7 or 8 lights and a multitude of colours can certainly seem technical at first glance.

Yes, many of my shoots are meticulously planned well ahead of time and I’ll even get video and floor plans of properties to build the space in 3 dimensions to light it virtually before my arrival. This helps with kit-planning, crew allocation and most importantly time management on the day, but there are certainly many shoots where I love to be a little more organic and spontaneous with the look.

As I mentioned, planning is great, but just as talented jazz musicians don’t need or like to follow sheet music, many artists like to roll up their sleeves and simply start creating, especially when we’re working with other creatives like models on the day. Ultimately, it’s simply just fun to ‘play’ with your craft once in a while.


The Setup

So if this setup I’m sharing today isn’t what many would deem as overly contrived or ‘technical’, what do I mean when I say it’s “fun” to be freer and more creative with the lighting?

Of course, before we can have fun with this one, we need to have a foundational lighting setup in place first and from there I’m essentially trying various camera settings such as shutter speeds, various colours, holding things in front of the camera and mixing all of the above to get a far more unique and ultimately creative final image.

Bear with me on this one as it’s a very different approach to what I typically share, but I think you’ll learn an awful lot about your own photographic style if you give this somewhat creative setup a go for yourself.

The Foundation of the Look

Cut-Out & Keep


TL;DR/ADHD/Artist Setup Explanation

  • Have model stand against a white wall or backdrop

  • Place ‘Mirror-Tree’ off to one side

  • Position a hard light across from Mirror-Tree and point it back towards the mirrors

  • Place a large light source behind you and colour it to your liking

  • Finally, angle the mirrors to bounce spots of light back onto the model


Kit Used

  • 1x Rotolight AEOS 2 Pro

  • 1x R120 Parabolic attached to the AEOS

  • Godox SZ150R

  • Godox Spotlight

  • White Backdrop

  • 1x Mirror-Tree ( see below for details)

  • Multiple Gels

  • Multiple Lens Filters


Camera Settings

  • Camera - Nikon D850

  • Lens - AF DC-Nikkor 105mm

  • Shutter Speed - 1/15th to 1/50th

  • Aperture - f2

  • ISO - 30 to 64

  • Kelvin - 4300K to 4900K

  • Focal Length - 105mm


The Results

Click to enlarge any of the shots below.

Model: Irina Ludosanu


Breaking it Down

The Mirror-Tree

The core of this setup revolves around the ‘Mirror-Tree’ (patent pending) that I made for the shoot. I’m sure it’s fairly self-explanatory to many of you, but essentially it consists of 5 mirrors attached to ‘Magic-Arms’ (highly adjustable and articulated arms) which in turn are attached to a light stand via crab-clamps.

Click on any of the images below to fit them to your screen.


Items Used

I opted for the Magic-Arms so as to manipulate the attached mirrors in any way I wanted and hold them there. This may seem like overkill to some and yes, you can attach a mirror to anything or even get a couple of people to hold them instead.

At the time I paid around £50 for 5 of these, but you may have to hunt around for a deal or enquire about a bulk purchase offer like I did.

Next, I needed some mirrors to attach to the ends of the arms and thankfully these are very cheap. I opted for the acrylic ones as they were inexpensive, plus they are indistinguishable from glass ones these days and of course, they’re far lighter and less likely to break if dropped. I bought several in a multitude of sizes, but ultimately on the day I kept the smaller 75mmx75mm ones in both the square and round versions attached. These smaller mirrors proved not only easier to manipulate on the arms but their smaller size also meant they weren't getting in the way of each other's reflected light.

I opted for the smaller mirrors like these 75mm round and square ones.


Tip for attaching the mirrors

One final tip on the items I used, is of course how I actually attached the mirrors to the Magic-Arms. I simply used blu-tac (malleable sticky putty) to do so and one thing I was actively looking for when purchasing the Magic-Arms, was if they came with the hot-shoe mounts. If you’re not sure what they are, then they’re the flat plates that slot into the hot-shoe on top of your camera and it's these flat plates that I was looking for as they were a perfect surface to securely attach the blu-tac and ultimately the mirrors.

I’m sure there are plenty of alternative ways to secure the mirrors to the Magic-Arms and if you want a more solid attachment, hot-glue or even something like Araldite will give you a very secure bond. I just wanted to use the magic-arms for other purposes after this shoot so the blu-tac was a good enough solution in the short-term.


Getting Creative

At its core, this setup is super-simple right? 2 lights and a couple of fairly standard modifiers. Sure I’m using some fancy lights and modifiers here, but a cheap umbrella and snoot would also work too. Plus, this is a setup that can be done in a small space and even with speedlights. There is nothing technical going on here and the unique x-factor of this setup is simply a reliance on your ability to ‘play’ with the light. How can we take what we have here and add some depth, interest and visual magic to the shot?

Adding Colour

One of the easiest ways to get a bunch of unique looks really quickly is to play with the colours. In my setup, I opted to start with a simple light blue as my base light and this is the colour that was on my large light source. Yes, I was using a Rotolight AEOS 2 Pro which has millions of colours instantly available, but a gel on a large umbrella will also work.

The next part is to add more and varied colours to the scene and the easiest way to do this is by placing coloured gels over the mirrors on the Mirror-Tree.

Remember: We only have ONE key light, but each mirror is essentially reflecting its own separate and individual light back onto the model. It’s because of this that it appears as if we have 5 separate lights on the subject. We need to plan our set with this in mind and colour or adjust each mirror as such. - For example, we could put 5 separate coloured gels on each of the 5 separate mirrors if we really wanted.

In the above BTS image taken on the day, you can see that I have a variety of gels clipped and hanging from various mirrors. More importantly though, you can also see how those mirrors and gels are reflecting that light back onto the background. Note the Spotlight in the very top-left of frame too as it’s this light that is pointed at the Mirror-Tree and ultimately being reflected back onto the background.

You can see via the example images above that I used a variety of gels and coloured background light to get a whole host of variety very quickly. Don’t just stick to gels though and really anything translucent can create a cool effect. The fun part is playing with anything and everything on the day to see what works. Can you now start to see where the spontaneous aspect of this shoot is coming from.?

Pro-Tip: Be sure to experiment with not covering the mirrors entirely. You can see in the shots above that I have slices of gels covering some mirrors and some mirrors don’t even have anything covering them. This is to allow slivers of white light to be bounced back and this can help to add even more depth to the final image. Again though, feel free to experiment with this to get the results you want.

Lastly, I appreciate I’m in a fortunate position with my gels. I’ve been shooting for a very long time and I have tons of off-cuts and old gels covered in crappy tape dotted about the studio. These scraps of gels are perfect for this shoot as I only want parts of them covering certain mirrors anyway. If you don’t fancy cutting up your precious gels just yet, consider getting some cheaper alternatives.

A quick search online via the typical evil mega-corps will yield the results you’re after and for just a few quid you can get a ton of varied faux-coloured gels. Just try searching, ‘coloured cellophane’ and you’ll get what you’re after. And no, before you ask, these aren’t good enough to use as actual gels on your lights. They’re simply too flimsy and thin, resulting in insipid colours when pumping a lot of light through them…. although I know I’ll receive messages from people saying “I’ve used these ‘sweet wrappers’ for years and they’re absolutely fine”. - You know we can see your photos, right?


Adding In-Camera Atmosphere

I’ve spoken about lens filters countless times over the years so it should come as no surprise that I used them on this shoot too. As I’m sure you’re all aware, there are scores of great lens filters available that will give you a variety of effects, but here are a few that I tried on the day.

Many filters tend to work best when they have bright points of light coming back to the camera. In the example above, you can see how the highlights from the jewellery are creating those glowing blooms of light thanks to the lens filter.

I predominantly used the Prism FX ‘Dream FX’ Filter. This doesn’t create a look that’s too dominating and tends to give a slight glow to the edges of bright highlights. If you’re after an alternative, then I’ve made a decent DIY version for a few quid too and that works very well if you just want to play with the idea. Other filters to try are something along the lines of a Bloom filter, Low Contrast filters like the Black Pro Mist or even more extreme filters like a Flare FX or Chromatic Flare FX. If you’re after some links to any of these, then I’ll provide a couple below. One of my reviews showcases a bunch of them, along with a link to my DIY Diffusion Filter.

A look at what a bunch of lens filters actually do via my review.

A very cheap DIY alternative to diffusion filters.


Incorporating Movement

The movement aspect of the images may be the most divisive one as it asks you to break the golden rule of photography by encouraging you to keep the blurry ones! I know crazy, right? What year is this? 1999?

For many of you with expensive cameras, this may be a creative step too far, but I would urge you to break a few rules here and allow for a little spontaneity to creep into the photoshoot just this once. I’m being overly cheeky and I apologise, but you’d be surprised at how hard this next bit is for some. I am of course referring to the shift to very slow shutter speeds that allow for not only your camera movement to be shown in the image, but the model’s movement too.

In the example images above you can see a couple of different shutter speeds being used. For the entirety of the shoot, I never went faster than 1/50th of a second as I found this is sharp enough, whilst still allowing the images to not be overly sharp. It’s also worth noting that these are all from a very sharp 105mm prime lens too.

The other main shutter speed I played with, was 1/15th of a second. For many, this is heresy, I get it, but I can’t deny I like the visual energy many of these shots have thanks to that slower shutter speed. It’s also worth noting how different the two 1/15th images above are. One is almost perfectly still and the other has a huge amount of movement. Remember that whatever the shutter speed you choose, it’s not only how much you’re moving that affects the image, but how much the model is moving too. If those two things are moving in opposite directions, you’ll quickly get a lot of motion in the image so just keep this in mind.


LED Vs. Flash

I’d be remiss if I didn’t also point out the obvious here, but remember, I’m using LED lighting in all of my shots. That means I’m able to adjust my shutter speeds to get various movement looks. Yes, I’m compensating for this shutter speed change by also dropping my ISO, but this movement look simply isn’t possible with flash as no matter what shutter speed you chose, the images will always be frozen by the flash. You shouldn’t let the fact that you only have flash deter you from playing with this setup though and you could even try to make it work with your modelling bulbs, I’ve just personally been enjoying playing with shutter speeds again since I started to use LEDs and it’s something for you to consider in the future.


Closing Comments

If you’re a long-time follower of mine, this lighting setup may seem even more abstract than normal. Yes, I absolutely love to nerd-out with lighting and I really do love nothing more than pulling off a very creative and technical lighting setup where everything slots into place and a shot practically jumps off of the page at you. But sometimes it’s just as much fun to empty out all the crayons and simply play with the light.

I appreciate I may be minimising what’s actually going on in these shots and calling it ‘playing’ may be a little overly simplistic. After all, I wouldn’t necessarily say a jazz musician is just 'playing around' when they’re riffing with a melody. That said, it really is a lot of fun to shoot like this and I’d encourage you to ‘play’ with it if you can.

Don’t worry about the ‘perfect’ shot. Don’t worry if the eyes aren’t perfectly sharp or the colours aren’t perfectly harmonised. Don’t worry if the model isn’t making the perfect expression or if the shot isn’t perfectly composed. Allow yourself to be led by the scene as it unfolds and never be afraid to try something out, even if it seems crazy and especially try it out if you’ve never done it before.

This is a great exercise in letting go of the rules for a moment and I think you’ll learn an absolute ton about your own style while you’re doing so. Plus, you never know what might catch your eye or what happy accident may come from working like this. Have fun and Good luck.


Products Used

Rotolight

Although I am sharing my own personal thoughts and findings about the lights mentioned in this article, many of you will want to know that I am now a ‘Master of Light’ for Rotolight. As such, I have been given a discount code to share with you when purchasing any of their products via the Rotolight website. Use my code ‘JAKEHICKS10’ when purchasing and you’ll save a bunch of money. I’ve never earned a penny of commission on this though, so if you find a better deal elsewhere, go for it.

Rotolight AEOS 2 PRO

With the AEOS 2 PRO, the world is your studio. Combining the shoot what you see benefits of powerful continuous light with a High Speed RGBWW strobe, AEOS 2 PRO offers unmatched versatility for photographers and filmmakers. Uniquely lightweight with an ultra-thin design, it’s never been easier to achieve beautiful soft light on the move.

AEOS 2 PRO Website Link


Rotolight R120 Sofbox

A softbox is pretty much a must-have piece of kit for any studio shooter, so if you own any AEOS 2/Pros, this is certainly worth taking a look at. It comes with internal baffles as well as the eggcrate grid on the front. Plus, it has 16 sides making this an incredibly round and clean light source.

R120 Softbox Website Link


PixaPro

Please note that I’ve included affiliate links below for PixaPro and I will benefit (albeit minimally) from the sales of any of these products should you purchase them. To that end, please feel free to use my discount code ‘HICK5-OFF’ at Essential Photo to receive a discount on any purchase via their site.

Godox Spotlight

S-fit spotlight that can be very finely controlled via inbuilt blades or via a range of Gobos. Due to the large lens at the front, this modifier can also produce some of the hardest-looking light available.

Godox Spotlight Link


Godox SZ150R

Essentially this is an LED studio strobe. You can use it with any S-Fit modifiers like beauty dish and softbox you already own, plus you can also change this to any colour and any Kelvin you’d like. It’s only 150 watts though, so you will want to use this in a controlled studio environment.

Godox SZ150R Link


I mentioned this earlier and although I’m using all the fancy kit here, this setup certainly doesn’t require it. One example of this is the Godox Spotlight and as much as I love this incredible modifier, I used the basic version of this, the optical snoot, for many years. If you’re interested in either of these then take a look at my reviews to see just what’s possible with them.

The Optical Snoot is very affordable and can offer a lot of very unique and creative possibilities.

If you’re keen to start taking studio photography seriously, I cannot recommend this modifier highly enough.


JHP Livestreams…

I livestream every other Tuesday night via YouTube and there I answer your questions, critique your shots, take community images into Photoshop to work on them and discuss all manner of lighting tips and techniques. I look forward to seeing you and your work there real soon. Jake Hicks Photography - YouTube


LEARN MORE ABOUT MY ONLINE WORKSHOPS

 
Tuesday 05.07.24
Posted by Jake Hicks
Comments: 4
 

Gear Hack: Floor-Stand Backdrop Holders

I am assuming you all know about this and just haven’t told me about it, as this seems so incredibly obvious as to be intentional. And no, I have no clue as to why I never noticed this, even after 20 years of using them!

Yes, believe it or not, your floor-stands seemingly double up as backdrop holders and this isn’t even another of my scuffed-DIY-hack-jobs that kinda works when everything else has failed. These floor-stands really do seem to be perfect at holding any sized backdrop in place.

Just to prove I’m not being dramatic, here is one of my ACTUAL scuffed-DIY-hack-jobs!

That’s right, straight out of art college in 2002 and doing expensive corporate headshots for large architectural firms on 35mm film, and we rock-up with this ingenious backdrop support! Arriving via public transport and taxi was awkward with long background supports, so my clever idea was to beat the ends of an old curtain rail flat and drill holes in it as a lightweight and travel-friendly alternative.

All joking aside, it worked pretty damn well and I won’t tell you how many years we worked like this.

Fast-forward a decade and we finally started to act like professionals and got some proper telescopic backdrop supports. But it wasn’t until very recently when I was on a shoot and needed even more background supports than the typical 2 we normally carry, that the idea dawned on me to use the floor-stands in a way that was similar to my original hack of 20+ years prior.

I’m sure you’re all familiar with what a floor-stand looks like, but if not, it’s a 3 legged support that can be closed to form a single arm to be easily folded and packed away. When open it provides a very sturdy support for floor lighting like background lights and fill-lights, but it’s when this stand is closed away that this seemingly hidden dual purpose comes to light.

You’re all smart people and you’re in the right place that proves that so this image should need little explanation. But yes, flipping the floor-stand upside down and mounting it on top of a light-stand does indeed produce a very sturdy and rigid background support. Yes, you will need two of these, one for the other end of the backdrop too, but I always travel with 2 or 3 floor-stands anyway so this isn’t an issue for me.

If you’ve used these floor-stands in the past, you’ll likely recall that the legs are slightly bent to keep the centre column off of the floor. This is oddly perfect in the reverse too as when mounted upside down and the background/Colorama is in place, this natural spring to the legs keeps the tube very steady. From here of course you can clamp the tube/roll in place as you normally would.


PRO-TIP: One final little trick to this that I’ll mention, is that the central column of the floor-stand can be rotated to either be out of the way on the outside of the stand, or it can be rotated inwards to be snug up against the backdrop roll. With it spun towards the roll, the thumb screw can now be rotated to be pressed against the roll to now act as a brake!


As I mentioned right at the start, this is such an obvious secondary purpose for the floor-stands that I’m sure many of you already knew about it, but more importantly…. shame on you all for not telling ME about it!

It is odd how perfectly this works though and if you are ever caught needing another background support, this floor-stand alternative is far more than just a hack-job in a pinch, this really is a very viable solution that I will undoubtedly use many more times in the future instead of dragging a background crossbar around. Give it a go yourself as I’m sure you’ll be pleasantly surprised.

P.S. I will be accepting all reasonable offers for those OG ‘JHP sawn-off curtain rail background supports™’. Truly a remarkable piece of photographic history right there for one judicious and minted soul.


JHP Livestreams…

I livestream every other Tuesday night via YouTube and there I answer your questions, critique your shots, take community images into Photoshop to work on them and discuss all manner of lighting tips and techniques. I look forward to seeing you and your work there real soon. Jake Hicks Photography - YouTube


LEARN MORE ABOUT MY ONLINE WORKSHOPS

 
Tuesday 04.23.24
Posted by Jake Hicks
 
Newer / Older