• >>>NEW Water Shoot Workshop<<<
  • Technique
    • Latest Techniques
    • FREE TIPS
    • Quick Tips
    • Video
    • Site Search
    • Blog
    • Archives
  • Mentoring
  • 2026 Workshops
  • >Online Workshops<
  • Studio Lighting Books
  • Contact
    • Newsletter
    • Contact
    • Statement
Jake Hicks Photography
  • >>>NEW Water Shoot Workshop<<<
  • Technique
    • Latest Techniques
    • FREE TIPS
    • Quick Tips
    • Video
    • Site Search
    • Blog
    • Archives
  • Mentoring
  • 2026 Workshops
  • >Online Workshops<
  • Studio Lighting Books
  • Contact
    • Newsletter
    • Contact
    • Statement

5 Ways to Avoid Lens Flare with Studio Lighting

Technique Tuesday Facebook Thumbnail flare.jpg

If you're unfamiliar with what lens flare is then it's the hazy washed out areas in an image that appear far brighter than they should do. You usually can't see flare with your own eyes but when you take a shot, there it is and often it's an undesired effect that can ruin several aspects of your photo including contrast.

Not all flare is bad. There are plenty of times where flare in portraits with the light behind the subject can create this misty dreamlike effect. But what about those times when don't want it, what can we do to avoid it?

Not all flare is bad. There are plenty of times where flare in portraits with the light behind the subject can create this misty dreamlike effect. But what about those times when don't want it, what can we do to avoid it?

Sometimes we want to use flare to add interest or drama to a shot but a lot of the times in the studio it is one thing we want to avoid as much as possible. Some backlit portraits can benefit from the dreamy effect that flare offers but still life and beauty shooters will go weak at the knees at the mere mention of flare. They spend all day crafting pin sharp focus along with crisp highlights and shadows so any flare present in a shot would ruin all of that hard work due to flares inherent ability to reduce overall contrast.

So whether you want to add flare or not, it's a really good idea to know what can cause flare in a studio environment. From a technical standpoint, flare is light that has bounced around inside your lens and camera in an undesired and unexpected way. This results in this scattered mist-like light effect we call flare. For this to happen light usually has to be pointed directly into the lens, that being said, there are times where the curvature of the front element of the lens can catch the light in such a way from the side that it will also cause flare. This is rare though as most lenses now have a slightly recessed front end that keeps the lens curve hidden and the addition of a lens hood will hide it even further.

In the studio we have control to move our lights so we can avoid pointing them into the lens as much as possible but there are still occasions where this is hard to avoid, like when using hair lights or even side lights. These lights are ordinarily pointed back towards the camera and so run the risk of creating flare unless we take alternative action to minimise the effect.

Below are five things you can do to limit the amount of flare into your lens.


Prime Lens Vs. Zoom Lens

A prime lens is any lens that has one single focal length, a 50mm lens for example. A zoom lens is any lens that allows you to adjust the focal length, for example a 24-70mm.

Most of the time a prime lens will have far fewer moving parts and a lot less glass housed within the lens itself. This results in a lot less glass for the light to be bounced around on and through so ultimately it results in a far crisper image. Conversely zoom lenses have a lot of extra optics inside them so the chance of flare being created is far higher.

What you're looking for is areas that should really be in shadow but are a milky grey colour instead, that is the result of flare. In the above shots you should see that the prime lens simply has more overall image contrast.

Again with this single hard light pointed straight into camera we see that although we're still getting flare on the prime, it's far less apparent than what we have with the zoom.


Long Lenses Vs. Wide Lenses

A lot of the time a longer lens will not only place you further away from the subject, thereby reducing the chance of the light entering the lens, but wider angle lenses by design will have to have a more curved front element. It's this curved front glass element that is far more likely to catch the light. As a general guide anything that is wider than 50mm is classed as a wide angle lens so for the best chance of avoiding flare with lights pointed towards camera, try to use a focal length of at least 85mm.

I have clearly used two extreme focal lengths here to illustrate my point but it should be clear to see just how much flare is present in the wider 38mm shot compared to the 105mm.

The very wide angle 38mm lens here is a great example of what happens when a wide angle lens has its curved front element exposed. That exposed front element catches the light at every available opportunity and it results in this extreme multi faceted flare effect. Great if you're JJ Abrams, but not so much for regular portraits.


Good Glass Vs. Bad Glass

Contrary to popular belief this is actually less of a problem than you might think. For those who aren't sure what I'm referring to, I'm essentially talking about cheap lenses Vs. expensive lenses. Glass quality has been exceptional for many, many years so the cheaper lenses aren't always as bad as the press and the marketing might have led you to believe. Don't get me wrong, there are of course other benefits that come with better quality lenses but I struggled to find a lens to prove this point. I ended up using a lens from the 1960's here to actually show two images with any real visual difference in them when it comes to flare. Bottom line; if you're buying a modern lens and you're not too bothered about very small amounts of practically indiscernible flare, you should be fine.

Although poor lens quality is often blamed for flare in lenses, you'll be pleased to know that this is actually the least of your worries. The image on the right above was taken with an old manual focus lens from the 1960's and it's still only displ…

Although poor lens quality is often blamed for flare in lenses, you'll be pleased to know that this is actually the least of your worries. The image on the right above was taken with an old manual focus lens from the 1960's and it's still only displaying minor amounts of flare compared to the modern prime lens on the left.

Again, only a small amount of flare is present in the 'vintage' lens compared to the modern day equivalent. Plus the vintage lens is a zoom compared to a modern day prime on the left.


Narrow Vs. Wide Aperture

Just to clarify from the start; narrow apertures are the f11s and f16s and wide apertures are the f2.8s and f1.8s. They are referred to as narrow and wide because in the lens itself, the aperture opening is a large hole letting in a lot of light and the narrow aperture is a tiny hole only letting in a small amount of light. It obviously stands to reason then that the aperture that allows light to pass through a bigger hole will bounce around far more and ultimately produce more flare. If you're really struggling with flare closing your aperture down to something like f11 will likely eliminate a lot of it.

You should be able to see that the f1.4 shot on the right has more detail in the shadow areas due to haze-like flare. Some may argue this is a good thing but unfortunately it isn't because that detail is lacking in any contrast due to the haze. Look at the light creeping around the models right arm in both shots to see how that lack of contrast is undesirable. *Side Note: I have no idea why even after double checking the Kelvin values, the image on the right is considerably warmer than the image on the left.

The f11 shot here is very crisp and with a lot of contrast, conversely the f1.4 shot has that extreme flare entering the image. The only difference between those two images is the f number illustrating just how much of an effect it can have.


Lens Filter Vs. No Lens Filter

I wont lie, I was looking forward to actually testing this theory but I was not prepared for the results. I am renowned for always preaching to people about removing their U.V. or Skylight filters from their lenses on my workshops. Yes I know they are there to 'protect' your lens but in reality they aren't going to protect your lens if you drop it. The 'up-sell' add-on of selling a lens filter to you at the time of you buying a lens was created by camera salesmen years ago and the myth has perpetuated (yes I was sold one by Jessops staff many years ago too ;) ). To this day there is a very small margin to be made on selling hardware like cameras and lenses so camera stores understandably do everything in their power to sell you add-ons like the lens filters and camera bags etc. It simply seems madness to put a £20 filter on a £2000 lens and if I still haven't convinced you then the images below surely will.

All lenses are made up of optics and those optics are there to focus and align the image correctly onto your camera chip. Optics are made of glass and for glass to do anything to light it has to be curved in some way as flat glass does absolutely nothing. Basically speaking there are zero flat pieces of glass in your lens....apart from the lens filter you slap on the front. It's this single piece of flat glass in the system that creates the problems especially when we are talking about flare.

Please take a good hard look at the images below and REMOVE your U.V. Skylight filter immediately.

I was looking forward to testing my flare theory with and without lens filters attached but I simply wasn't prepared for the results. I swear to you that both of these images are raw and that I am only using a single U.V. filter on that lens. The difference in my mind is incredible and if you're somebody who still has a lens filter attached, please consider removing it or at the very least doing a similar test yourself to see what I mean.

These shots need little explanation but I think it's a really good example of a mistake we've all made and gotten frustrated with when it simply wasn't our fault to begin with. I think it's incredible that camera salesmen sell us a £2000 lens, then told us to put this crappy £20 filter on the front to 'protect' it. I would not have been impressed with my lens purchase if this was the result I was shown.


So all I need is a really expensive 300mm prime lens and shoot at f64 with no lens filter and I'm all set?

So there you have it, the 5 things you need to be mindful of if you're looking to reducing flare in your studio lighting shots. Pretty simple right? All you have to do is shoot on a really expensive, 300mm prime lens at f64 with no lens filter right? Well sure you could do all that but no that's not necessary. Most of the times there will be things that you don't want to change about your shot, like if you want to shoot at f2.8 but your shot has flare in it. Rather than changing the aperture you could simply step back and zoom in a little and that would likely solve the problem. Although all of these 5 things play a part in creating flare, more often than not it's only one of them that's causing it so being aware of them all allows you to compensate accordingly.

So if I do all of these 5 things I'll never see lens flare ever again right?

Unfortunately, although I've outlined the 5 core reasons you might be getting lens flare and how to avoid them, there is one more fundamental reason that is by far and away the biggest contributor to flare in the lens, and that's exposure.

Poor exposure is by far and away the easiest way to get flare to appear in your shot. Most of the images I've seen with flare have had a light pointed back towards the camera that is too powerful. This overpowered back-light simply isn't needed in most cases and if you have a correctly exposed back light you can shoot into that light all day with whatever modern lens you want and you'll likely be fine. Experiment with what you think looks best but always turn that back light down lower than you think and turn it up if needed. It's always far easier to deal with slightly underexposed highlights than overexposed highlights.

Even an overexposed back light with as little as 1/2 stop of too much light can start to create flare. See how there is a milky haze in the shadow areas here? That is unwanted flare.

Regardless of what lens, focal length or aperture you use, if your backlight is overexposed it's going to create flare. Never be afraid to turn that backlight lower than you might think.


Closing Thoughts

So those are the five core reasons for flare appearing in the lens when shooting in the studio. But like I pointed out at the end, all of it is completely pointless unless you are correctly exposing that back light.

As always, thanks for taking the time to read this, I hope you've found it in some way useful :) If you have any questions then don't hesitate to ask away in the comments down below. If you're new here then feel free join our very active community of like minded lighting-nerds on my Facebook page, I'm always discussing lighting ideas and offering feedback on community images. If you'd like to stay up to date on more photography related tips and techniques then sign up to my mailing list where I'll send you a monthly roundup of all my articles (plus signing up gets you a free 10 page studio lighting pdf too :) ). Thanks again and I'll see you all in the next one.


:WARNING: EXTREMELY Tempting Adverts Await Below ;)


If you're interested in any of my work and would like to know more about how I created some of my shots then why not check out my workshops. Here you can find out everything there is to know about Gelled Lighting, Long Exposure Flash Photography and my entire Post-Pro Workflow. Jake Hicks Photography - Workshops

gel workshop trio.jpg

I've also just released a brand new 22 hour complete Gelled Lighting Tutorial video. I go over everything from studio lighting setups with gels to being on location with gels plus I also go through my complete retouching and post pro workflow. For more details and complete breakdown of everything that's include check out my Coloured Gel Portraits Tutorial

gel trio set video.jpg

I also offer comprehensive coloured gel packs. These collections of gels are what I use day to day to create some of the most highly saturated colours around. If you're looking at getting into gelled lighting or need to get stronger and richer colours in your coloured gel work why not check out my Jake Hicks Photography Gel Packs

gel trio set crop.jpg
Tuesday 02.13.18
Posted by Jake Hicks
Comments: 2
 

Lighting Setup - Pastel Wrap

Good news! This is actually a relatively easy JHP lighting setup to play with and it produces some pretty great looking results too. It's easy to set up as you only need a couple of softboxes and this can be put together and shot in a very small space indeed; no studio required. Plus it produces some great looking results because it uses coloured light. Now I know I may sound biased on that but hear me out as we go through the setup and it should start to make more sense as to why this looks extra cool with coloured gels compared to without.

View fullsize JakeHicksPhotography (1 of 3).jpg
View fullsize JakeHicksPhotography (2 of 3).jpg
View fullsize JakeHicksPhotography (3 of 3).jpg

Click to enlarge the images above


What you will need

Like I said this is super simple so the list is very short:

  • 2 Strobes or Speedlights

  • 2 large softboxes - By large I mean larger than shoulder width of your subject so 60cmx90cm should be fine.  I don't have two softboxes the exact same size but a similarly sized second one would be ideal.

  • Coloured Gels - If you don't have any then I've been told these ones are pretty good ;) Amazing Coloured Gels


The Setup

This look can be achieved in virtually any space so there's no need to worry about background or anything like that as we'll be using our softbox as a background.

The Backlight Softbox

Firstly setup one large softbox so that the centre of it is at shoulder blade height to your subject. This should leave a decent gap of light above the subjects head.

back sb1.jpg

The Front Light Softbox

Secondly we need to setup our other softbox and that should be placed about 2-3 metres/5-10 feet away facing towards the other softbox. This will create a sandwich of light with the model between them.

front sb2.jpg

Choosing the Colours

Next we need to choose the colour to add to our lights. We'll do this via coloured gels and although you can choose whichever colours you like, I'd recommend starting with something simple like orange or pink behind the subject and something cool in colour like blue in front of the subject. For my setup I used the 'Teal' and 'Pink' from my Definitive Coloured Gel Pack. If you're after an even softer look, try the Mint and Rose Pink from my Pastels Colour pack as that will create more of a subtle look. Gel Packs

You can use any coloured gel you want but stick to easy colour combos to begin with like blue and pink for example.

You can use any coloured gel you want but stick to easy colour combos to begin with like blue and pink for example.


Attaching the Gels

Once you've chosen your colours it's time to get our softboxes gelled. Thankfully we dont need humungous sheets of gels to do this. Simply open the back (or front) of your softbox and tape the gel sheet you have over the flash tube. If you have a tungsten modelling bulb, either turn it off or better still remove it. Failure to do so will result in melted gels for sure. If your lights have LED modelling bulbs you don't need to worry about the gel melting on those. Do this to both softboxes and you're done.

Attaching the gel to the inside of a softbox is fairly easy. If your flash has tungsten modelling bulbs, be sure to remove them to avoid melting the gel.

Attaching the gel to the inside of a softbox is fairly easy. If your flash has tungsten modelling bulbs, be sure to remove them to avoid melting the gel.


Don't Block the Light

Lastly we need to get in a position ourselves whilst being mindful to not block the light that is directly behind us. I'm a relatively small guy so it's not too much of a worry for me but if you feel you're blocking too much light, it's fine to bring the softbox out to one side a little whilst being sure to always keep it angled towards the subject.

If you find yourself covering too much of the light then don't be afraid to move it a little to one side, just be sure to always keep it pointed at the model.

If you find yourself covering too much of the light then don't be afraid to move it a little to one side, just be sure to always keep it pointed at the model.


Ready to Shoot

Once everything is finally in place it's time to start shooting.

final setup5.jpg
 

Shooting

There are a few considerations to look out for when adjusting this setup and shooting with it:

JakeHicksPhotography cam shot.jpg

1. Camera set up

Choose your aperture, ISO and shutter speed as you would do normally for a studio shot. It'll likely be 1/125th second at ISO 100 and if you're after a nice drop off in focus choose an aperture like f2.8. Once we've done that we can now adjust the lighting around our camera, not the camera around the lighting.

2. Light power behind the model

With only the light behind the model turned on, take a shot. We're looking for just enough power in the light so that the background behind the model goes white. Keep raising the power of that light bit by bit until it goes to white with no softbox detail present in the shot.

The perfect power for the black light is to increase it right up to the point where it goes to pure white and no more.

The perfect power for the black light is to increase it right up to the point where it goes to pure white and no more.

3. Light Power in front of the model

Once we're happy with that background light, do not touch it again. Now we can adjust the other light safe in the knowledge that whatever happens now it's because of the front light not the background light. Again start off at a low power and keep taking images whilst increasing the power incrementally of that light behind you. What we're looking for is the highlight on the front of the face but also the drop off to shadow towards the back of the face. Too much power and the shot will just look completely flat and boring so experiment with different amounts of light from that light behind you until you're happy.

The perfect power for the front light is a little more arbitrary based on the colour you're using but essentially you want just enough to light the face but not so much that it looses the shadow details.

The perfect power for the front light is a little more arbitrary based on the colour you're using but essentially you want just enough to light the face but not so much that it looses the shadow details.

4. Gels for the win

Once you have your lights set correctly, it should become apparent why there's a benefit to using gels here and that's the separation between the overexposed 'white' behind our model that falls off to shadow 'colour' on the face. With only white light it would still be the same white light behind the model but there would also only be white light on the models face too. This is a clever trick that with a little care can be utilised in a lot of ways when using gels.


Important Considerations

It's not you, it's me.

Be very mindful of your movement whilst shooting this setup. It's rare that the photographer moving 6 inches from one side to another in a shot will affect the lighting but it will here. That key-light is directly behind you so moving even slightly too much in front of it will block the light and reduce the light power output considerably. If you're not keen on this and you have the extra space then by all means switch it up and try the softbox off to one side or raise it up out of the way of you getting in front of it so much.

Bigger is better though right?

The softbox size behind the subject in this setup is this size for a reason. If you start using a huge softbox behind the subject the light will start to completely envelop the subject. Eventually the light will even start to creep around the subject and begin to light the front of our models face which we definitely don't want as we're adding another colour to the front of the face and that white light would ruin it.

Alas bigger is not always better. Here you can see that if our softbox is too big, it starts to light the front of the face which is what we definitely don't want.

Alas bigger is not always better. Here you can see that if our softbox is too big, it starts to light the front of the face which is what we definitely don't want.

Flare Despair

Shooting directly into any light source can cause flare into the lens which results in a hazy, milky looking image. You may like this look but if you're after a way to limit this effect then heres a few points to consider.

Remove your lens filters - Click to enlarge

  • Shooting on prime lenses (a prime lens is any lens that has a fixed focal length like 50mm for example). These lenses tend to have less glass in them that will result in less light bouncing around in the elements which means less flare.

  • Shoot on a longer lens. Flare is notoriously bad on wider lenses like 50mm or more. Even bringing the lens up to 58-60mm can make a big difference.

  • Shoot with good glass. One of the reasons modern lenses are so expensive is because they are so sharp and visually clear. Pricey lenses tend to produce far less flare than inferior, cheaper models.

  • Stop down. Sometimes shooting at wide open apertures like f2.8 will allow your lenses to gobble up masses of light but that also means its more likely that your lens will create flare. Stop down to f5.6, f8 or even f11 to minimise the flare effect.

  • This is last time I'm going to tell you this but please, please, pleeeeassse remove those UV filters on your nice lenses. If you're a natural light shooter then I get it but in the studio please take those lens filters off. The skylight is the worst, so if you're using them, please consider removing them as these are often the biggest culprits of flare due them being the only flat piece of glass in the lens system.

You don't have to use gels for this setup but the beauty of using gels is that you get far more separation between subject and background.

You don't have to use gels for this setup but the beauty of using gels is that you get far more separation between subject and background.

I don't have to use gels though right?

Sure you can play with this setup with no gels attached but the beauty of this setup is that you're using the 'over-exposed' background to create separation between the model. For example if we just shot with white behind the subject the model can get lost in the brightness, whereas with colour we're using white that falls off into colour. It's one of the beauties of using gels with human skin as we can create specularity on the oils of skin that drop off into colour like we're doing in this setup.

"Uhhh Jake I have a question, what should the lighting ratio be between the two lights and where should I place my light meter to get a correct reading?"

You may have noticed that I told you what to look for when I was advising on light power earlier in the article. You having the ability to read the light is fundamental to you improving as a photographer and I'm very skeptical of shooters that mindlessly believe what a light meter tells them over what looks good or not to their own eye. It is honestly like a chef using a 'taste-meter' in the kitchen to see if food tastes good or not. That chef is always going to trust what tastes good based on preference and experience over what the little machine says (although I wont lie, I would now love a taste-meter please :D ).

Light meters were from a time when we couldn't see the result immediately but now with digital cameras we can. Don't get me wrong, light meters have their place and I always have one in my bag for emergencies but this situation is not the place for them.

Also in this particular situation you can't use a light meter when shooting with gels. The reason for this is that the light meter only sees in grey. It's going to tell you what power the light should be to get a good grey! We don't want good grey, we want a good COLOUR.

The ratios is another can of worms because it's based on the power of grey light once again. Colours have certain visual dominance over other colours, meaning that some colours will visually appear brighter in relation to others based on their tone even though the light meter may tell us it's actually darker. The dominant and recessive colour relationship is a story for another day but suffice to say that ratios in colour lighting are ambiguous if not redundant at best so thankfully that's one less thing to worry about.

The details of dominant and recessive colours is a story for another day but I think this diagram above explains how hard it is to light meter grey appropriately when dealing with coloured light. The black and white image on the right is simply a de…

The details of dominant and recessive colours is a story for another day but I think this diagram above explains how hard it is to light meter grey appropriately when dealing with coloured light. The black and white image on the right is simply a desaturated version of the image on the left. Colour exposure looks very, very different indeed in black and white making it nearly impossible to light meter correctly with a machine that only sees grey.


Closing Comments

So I know I mentioned at the start of this article it was a simple setup ....but you didn't expect me to write a short article did you?! I know it might seem like a lot to consider but this really is a simple setup that will likely take you less time to setup than it did to read this article. It went a little long as I was just trying to troubleshoot as many of the conceivable problems you might encounter along the way. Hopefully I thought of them all and you get some killer shots first try :D

I hope you give it a go and let me know if you do. If you do have any questions then of course feel free to fire away in the comments below. I very much look forward to seeing what you come up with, good luck :)


:WARNING: Yet more opportunities to buy gels below!


If you're interested in any of my work and would like to know more about how I created some of my shots then why not check out my workshops. Here you can find out everything there is to know about Gelled Lighting, Long Exposure Flash Photography and my entire Post-Pro Workflow. Jake Hicks Photography - Workshops

gel workshop trio.jpg

I've also just released a brand new 22 hour complete Gelled Lighting Tutorial video. I go over everything from studio lighting setups with gels to being on location with gels plus I also go through my complete retouching and post pro workflow. For more details and complete breakdown of everything that's include check out my Coloured Gel Portraits Tutorial

gel trio set video.jpg

I also offer comprehensive coloured gel packs. These collections of gels are what I use day to day to create some of the most highly saturated colours around. If you're looking at getting into gelled lighting or need to get stronger and richer colours in your coloured gel work why not check out my Jake Hicks Photography Gel Packs

gel trio set crop.jpg
Tuesday 02.06.18
Posted by Jake Hicks
Comments: 12
 

10 Print Magazines You Should be Buying and Why

Technique Tuesday Facebook Thumbnail 10 print mags.jpg

When was the last time you watched a bad film? I mean, like all the way through. I'm guessing the answer is a very long time ago, unless you're counting coming back late on a Saturday night and watching the intro to Sharknado (I swear I'm not making that up - Check it Sharknado) and passing out only to be woken up by the credits song, as actually 'watching' a bad film.

The reason we no longer watch bad films is that we all now have 'on-damand' TV and movies. There used to be a time back at the turn of the century where we would watch whatever the Sci-Fi (now Sy-Fy [don't ask]) channel movie at 9 was. A lot of these were terrible but occasionally there would be an absolute gem of a movie playing that we'd never heard of. But we don't get that now, we get to choose what we 'think' we like based on the marketing we've received up until that point hence the questionable meteoric rise of the superhero genre. We are all busy people, we're not about to start risking the waste of time a bad two hour movie might take. On-demand TV and movies is amazing don't get me wrong but there is a cost to this convenience.

 
Big, bold magazines like V are renowned for their love of colour and is a constant source of inspiration myself and many others.

Big, bold magazines like V are renowned for their love of colour and is a constant source of inspiration myself and many others.

Is the JHP style really the love-child of 90's Japanese Anime and late night Sci-Fi Channel?!

Back in the 90's when we used to watch what was scheduled for us, we would be far more experimental and open to TV and movies because we had no choice. In fact it may have been the Sci-Fi channel that introduced me to anime back in the 90's, anime as a genre that can easily be argued as playing a huge and fundamental role in the colouring of my entire photographic style to do this day. Would I really have watched a 'cartoon' at 9pm on Saturday if I and another choice?

Video and Spotify Killed the Radio Star

The same thing is strangling the music industry of new talent too. A very good friend, and the guy that helps out on most of my shoots is also a 20 year music industry veteran and music producer. Dan le sac explains how he got his first break with his first big hit in the music industry all those years ago.

"We only got traction and noticed thanks to radio. If the radio hadn't played our track we'd have never gotten our music into the ears of so many listeners, it's how young talent was found back then. But nobody listens to the radio anymore."

Dan goes on to explain how the rise of 'on-damand' music like Spotify is obscuring new talent,

"Everybody listens to their 'favourite' tracks on Spotify as much as they like, we no longer get to hear new music that radio DJ's have curated for us."
 

Curated Content

Magazines like Hunger magazine are often curated by well established industry professionals. Hunger magazine for example is the latest in a long line of successful style magazines from renowned fashion and portrait photographer Rankin.

Magazines like Hunger magazine are often curated by well established industry professionals. Hunger magazine for example is the latest in a long line of successful style magazines from renowned fashion and portrait photographer Rankin.

The internet is amazing, please don't misunderstand my love for the internet and what it's done for the photographic industry but there are consequences to the choices it has afforded us. There are in fact too many choices, there's all the music and cinema in the world out there already and everybody in the modern world has complete access to it immediately... like right now.

It's crazy to think that you are still reading this when you could be reading 'The Catcher in the Rye' or binge watching the latest series of Game of Thrones but that's literally the quality of content that I'm competing against for your incredibly valuable time.

But you've chosen to read this because you've probably read one of my previous posts or articles before, as a result there's an element of trust being shared here. You trust me, based on my previous work, that I'm going to share something worthwhile with you in exchange for your time. You my friend are reading curated content.


The Magazine Industry

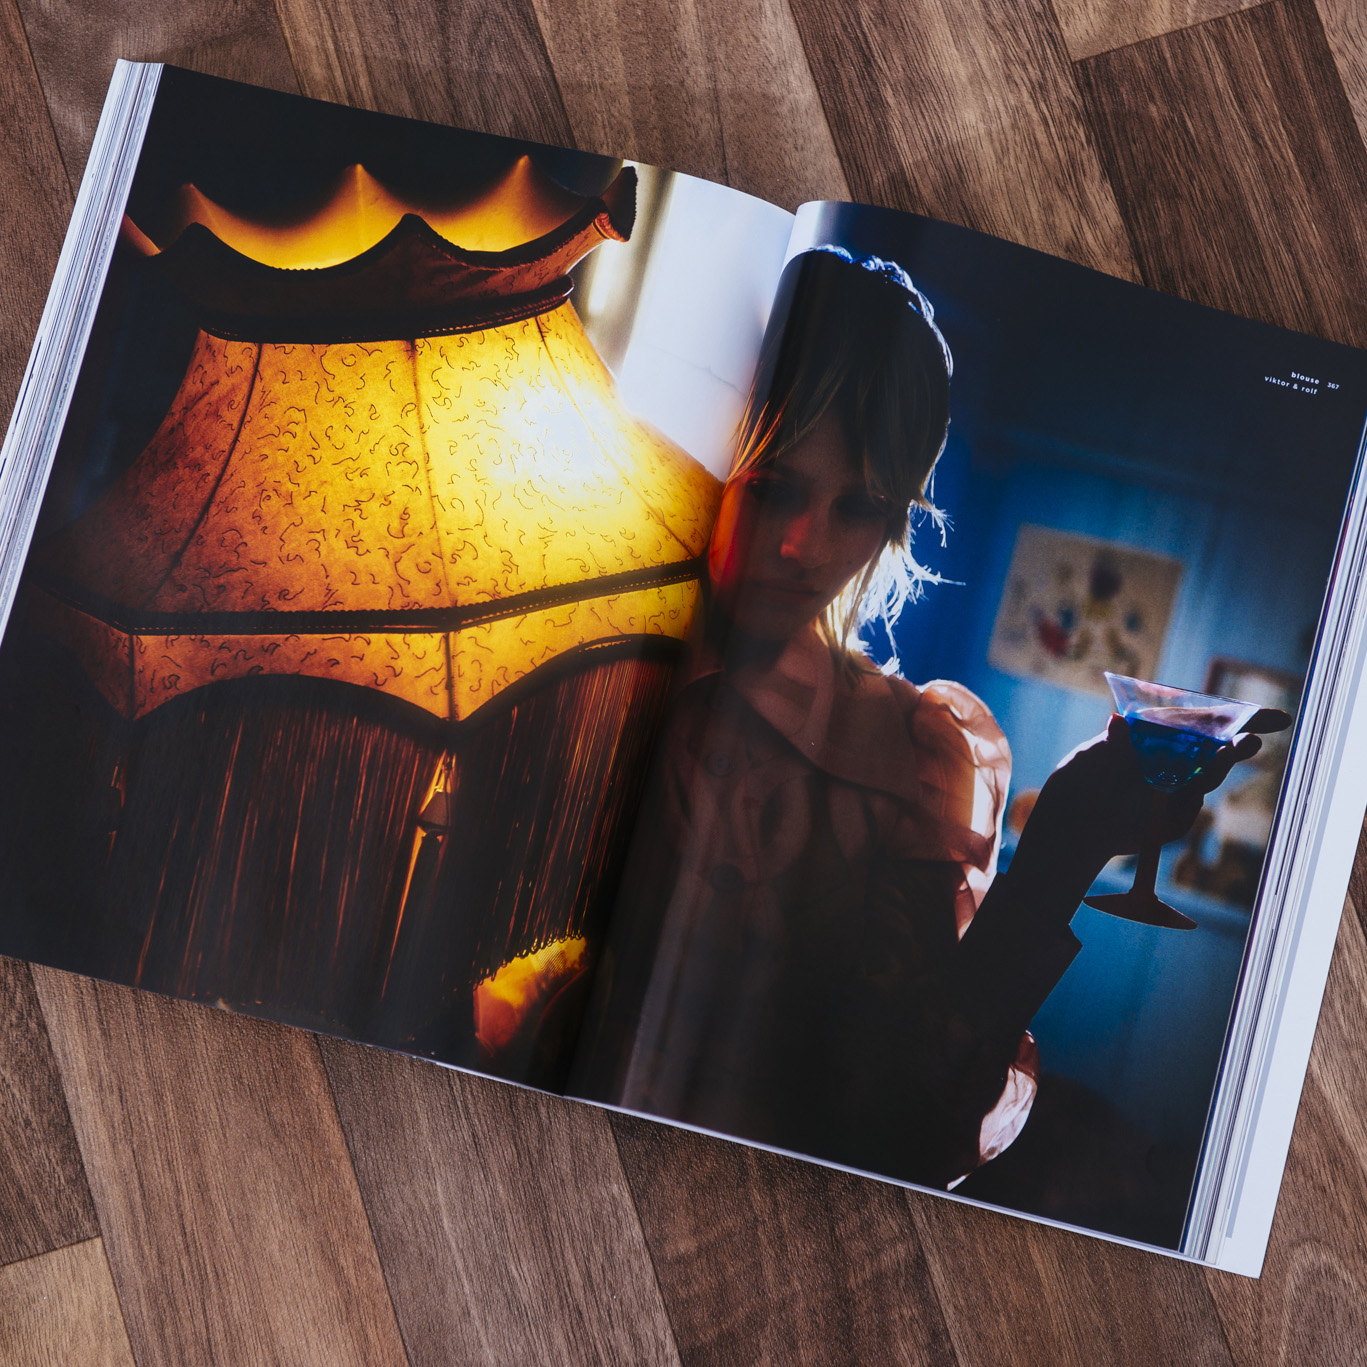
Magazines like Wylde magazine not only pride themselves on great content but also on great image delivery. Their magazines are huge and beautifully printed so picking up and viewing some of the industries best fashion images in this detail is an exp…

Magazines like Wylde magazine not only pride themselves on great content but also on great image delivery. Their magazines are huge and beautifully printed so picking up and viewing some of the industries best fashion images in this detail is an experience often missed from simple online image consumption.

The magazine and publishing industry is famously on its knees with its eyes slowly glazing over, surely nobody is still buying dead trees in 2018 right? Well you'd be almost right but here's why I think you should still be collecting carbon copies not downloading digital digests.

I mentioned what curated content meant previously, the fact that it is a collection of content that comes from a trusted source, and here's where the magazine industry has it's final card to play and the sole reason it's still hanging on in there long after the final bell has been rung.

The print mags that are still left in the 21st century know their sh*t! If there's a print mag on the shelves today then they must be doing something right to stay there and that is simply down to their quality of content.

There's a new digital mag jumping up every day online but it's very hard for these new magazines to curate great content without a reputation or a readership, it simply takes time to amass the right contacts. As their audience grows so will the quality of their content that they can put between their digital covers. But what about the tried and tested print mags, if they've been around for decades with huge faithful audiences, what's their content like?

Well thankfully as you'd expect, their content is pretty solid and therein lies why you should be paying attention to them.


Not En Vogue

This article is not talking about the Vogue's and Harper's Bazaar's of this world as we'll leave them for the socialites. Don't get me wrong, they house the photographic greats like Patrick Demarchelier, Steven Meisel and Peter Lindbergh but we're after trying to see some new, fresh and experimental talent that may be viewing the world in a slightly different way to the same black and white 'fashion' images we see month in, month out.


10 Magazines that deserve your money and trust

It can be hard to find the new photographers in the modern world of the internet as we'll only see the work of the latest bronzed bottomed lady with fairy light bokeh in her glasses that Instagram shows us. There's nothing wrong with this type of work but if you're after more of an engaging fashion vibe you'll need to look elsewhere and a fashion magazine that has stood the test of time is the perfect place to start. A fashion mag that has proven it can weather the storm and has industry professionals curating the outstanding, current, relevant and influential work of tomorrow between its sheets.

Here's 10 print mags that I like to look for when I'm actually outside the house and not glued to the internet. These are all without question well worth your money but more importantly, your time.

V Magazine

Big, bold and beautiful. Large pages, well printed and great colours. V Magazine is the de facto American fashion magazine that has somehow managed to straddle the impossible line between hip and trendy whilst still keeping one toe in the socialite world. This is one of the more mainstream magazines and should be available in most half decent stores.  So if you're after a breath of fresh air away from all the quaint European fashion brands, look no further as V is dripping in brash style. Oh, and did I mention it was big.

Find them here - V Magazine


Document Journal

This is a seasonal magazine that is a little more conscientious to the larger, more important issues of our world. Their pieces are nearly always incredibly well researched and backed up by thorough and excellent journalism. Don't let their highbrow content put you off though as their imagery is nothing short of breathtaking. Document is certainly one of the few outliers in the industry right now and a lot of their work is very raw and untouched so if you're after a fashion journal that is keeping it real, this is for you. 

Find them here - Document


Interview

Interview magazine was originally founded back in the 60's by Andy Warhol and John Wilcock and although it has some big shoes to fill today, it's still going strong. It's gone through multiple iterations since the early years and although I find the issues a bit 'hit and miss' Interview still holds a lot of weight in the industry. The content is more current affairs and although the images are nice and big the paper quality is very poor so this is really one to browse before you buy.

Find them here - Interview


LOVE

LOVE is a bi-annual British style magazine (see how they don't call themselves a fashion magazine - thats how you know it's good) and although they only launched in 2009 it has seen tremendous success not only because it's a Condé Nast publication but because the editor in chief is Katie Grand. Grand has been a very well respected fashion journalist for many years and with her background as a stylist on seventeen Louis Vuitton shows among many others it's no wonder she's on the pulse of what works. LOVE magazine is unreservedly big, brash and beautiful. If you'd like a raw look at the other side of the fashion world then this is definitely worth a look twice a year.

Find them here - LOVE


VICE

Vice magazine should need little introduction by now as it's been going strong in one form or another for over 20 years. Although not a fashion magazine in any way, Vice is very much worth your time if you're looking for the art on the outside of our popular culture. In fact Vice prides itself on this very notion and although the content seems to be aimed at a younger, more carefree audience it's remarks like this that I feel sum up their ethos.

In an interview with The Guardian co-founder Shane Smith had this to say on Vice's political stand point:

"We're not trying to say anything politically in a paradigmatic left/right way ... We don't do that because we don't believe in either side. Are my politics Democrat or Republican? I think both are horrific. And it doesn't matter anyway. Money runs America; money runs everywhere."

If you're after a young look at what's coming down the pipe of future artists, this could be worth a look.

Find them here - VICE


CR Fashion Book

In 2010 the editor of Vogue Paris resigned. That editor was Carine Roitfeld and after being the lead at Vogue Paris for ten years Roitfeld decided to produce her own publication that we know as CR Fashion Book (Not exactly the most imaginative name but I guess we now know why it's called CR Fashion). This is a counter publication to a lot of the big brand fashion mags so if you're after a slightly younger approach to the Vogue's of this world then this might be worth your time. I'll warn you though, this magazine is still very much the result of big brand advertising and with the first SIXTY pages being dedicated solely to fashion adverts, there's a lot of Vogue still in here.

Find them here - CR Fashion


Treats!

Treats! magazine is best described as fine-art erotica. If that's not the type of 'fashion' magazine that interests you then I understand but I feel it deserves a significant mention here as it houses some of the best collections of photography I've seen in a very long time, and consistently too. It is available at only a few locations but your best bet is a subscription. I have probably found more influential photographers in this magazine than any other in recent years and if anybody is familiar with and loves the work of Kesler Tran, you'll love this (some issues should really just be called the Kesler Tran Magazine). If you're after great imagery coming out of the golden light of L.A. then I can't recommend this enough. Treats is supposed to be quarterly but it's closer to biannually so I guess it just comes out when it's good and ready and not before.

Find them here - Treats!


Hunger Magazine

Hunger Magazine is Rankin's latest magazine. After launching the incredibly successful Dazed & Confused in 1992 and then RANK in 2000 (I absolutely love RANK magazine, it's very rare so I haven't featured it here - definitely grab a copy if you ever get the chance), then he published 'Another' Magazine in 2001 and then 'Another Man' Magazine after that. It's fair to say that world renowned fashion and portrait photographer Rankin loves magazines. But it wasn't until 2012 that his latest publication Hunger was beset upon us. Hunger is biannual and is one of the absolute best places to check out the young, up and coming artists, creatives, stylists and designers of our time. It usually weighs in at around 500+ pages so it's like 6 months worth of magazines being released all at once but all for the price of one. If haven't seen this already, you must check it out.

Find them here - Hunger TV

hunger.jpg

Wylde Magazine

I'll be honest, I know very little about this magazines history or even when it started, all I know is that it produces a magazine with stunning content that is brilliantly and beautifully huge. The Wylde website quotes the size as 'super-size, high-gloss' and I'd have to agree. If you're after stunning fashion imagery printed on high quality paper and the bigger better, then look no further. This is the wild card on the list (no pun intended) as there's very little info out there on their background beyond the stunning images of the 'artier' side of fashion. If you see it, it's definitely worth a look.

Find them here - Wylde Magazine


Dazed (formally known as Dazed & Confused)

I actually no longer buy Dazed magazine in favour of some of the others I've mentioned here but it's because I took a look at their recent issue featuring the work of photographer Gareth McConnell that I even decided to write this article. Gareth McConnell's work is best described as artistic and he uses a camera like a painter uses a brush, it's a tool but also a fundamental player in the end result. It was McConnell's work that made me realise that I'd have never seen this type of work online whilst perusing my regular visual channels like Instagram. I needed magazines like Dazed & Confused to show me new work and whether I liked it or not, I was being shown work that I wouldn't have normally chosen to look at.

dior special 1.jpg
dior special 2.jpg

Above is the work of Gareth McConnell for his Christian Dior special in Dazed & Confused Magazine. More of his work can be found here at his site Gareth McConnell

Dazed & Confused along with The Face Magazine were staples of my pre-internet 90's photography influence, so if you're after magazine heritage it doesn't come much more established than this. Dazed & Confused was started in 1992 by photographer Rankin and editor Jefferson Hack and although it's changed and grown over the years, the fundamentals of it being a magazine that uses creativity to empower a younger generation by redefining the populous mindset are certainly still there. That might sound like lofty goals but you'll see what I mean as soon as you open it up. This is definitely worth a browse at the very least.

Find them here - DAZED


Print Vs. Digital

So that's my top ten list of magazines I urge you to check if you ever get the chance. I still believe print is important and I will continue to buy my favourite magazines to enjoy them but what's more important than the medium is the content. Fantastic magazines like Treats are very hard to come by in the U.K. and without spending $25 for each one to be posted from the U.S. I opt for the digital copy. It's far from the same but at least I get to enjoy these magazines in some form rather than not at all. I've included the links of all the magazines so why not meet them halfway and purchase their digital copies at the very least.


In Conclusion

I mentioned at the top that curated content comes from a trusted source, a source that has proven its worth and has earned the right of your time by default. A lot of the magazines that I've mentioned here have done this tenfold, the magazines and their editors have proven this by not only their content but by weathering the horrific downfall of print in recent years with tried and tested content that ultimately maintains the trust of its readers. Even some of the younger magazines that have only been around for a few years so far, their fresh faces and young age is in name only. Magazines like CR Fashion book may have only released issue one in 2012 but the editor at the helm Carine Roitfeld, had a successful decade leading the incredible Vogue Paris prior to that, plus decades of industry experience as well. These are curators to be trusted.

In fact a lot of the older magazines like Dazed & Confused that were crushing it in the early 90's are the inspiration for a lot of great photographers you likely already follow today. If it was good enough for them, its likely good enough for us too.

What's important to a take from all of this is making a little extra effort to expose yourself to new and sometimes confusing content. No, you're not going to love absolutely everything that these magazines publish, no you're not going to understand why they published that out of focus blurry mess, but that's okay, remember they thought Andy Warhol was mad once too.

We as creatives have to keep exposing ourselves to new and original content if we ever hope to grow not only as individuals but as a collective. Instagram is not curated content, we have to experience the rough with the smooth to get perspective and to feed the creative beast. Imagine how many great songs would be missing in the world if there was no heartache.


Thanks as always for reading all of that guys, I appreciate your time more than you'll ever know.

Now go check out Sharknado :D

Any questions, pop them down below and although I've waffled on for long enough, I still missed so many great mags. Let me know your favourites as I'd love to discover more great magazines like these :)


:WARNING: Sponsored by JHP below :D


If you're interested in any of my work and would like to know more about how I created some of my shots then why not check out my workshops. Here you can find out everything there is to know about Gelled Lighting, Long Exposure Flash Photography and my entire Post-Pro Workflow. Jake Hicks Photography - Workshops

gel workshop trio.jpg

I've also just released a brand new 22 hour complete Gelled Lighting Tutorial video. I go over everything from studio lighting setups with gels to being on location with gels plus I also go through my complete retouching and post pro workflow. For more details and complete breakdown of everything that's include check out my Coloured Gel Portraits Tutorial

gel trio set video.jpg

I also offer comprehensive coloured gel packs. These collections of gels are what I use day to day to create some of the most highly saturated colours around. If you're looking at getting into gelled lighting or need to get stronger and richer colours in your coloured gel work why not check out my Jake Hicks Photography Gel Packs

gel trio set crop.jpg
Tuesday 01.30.18
Posted by Jake Hicks
 

First Impressions - Spekular Modular LED Lighting Video

I few weeks ago I mentioned that I had gotten my hands on some modular LED lighting to test. Well I finally had chance to have a quick play with them and this video shares my first impressions of my time with them :)

I go through what a modular LED light system is, plus I discuss some of the various uses there are for it.
I also share my images after using them with coloured gels, and talk about how I set the shots up and what ultimately makes these lightsunique in my opinion over any other lighting that is out there right now.

If nothing else, take a look at the shots as they are unlike any other lighting I've used in the past so the results are likewise pretty interesting looking.

If you're even remotely interested in LED lighting then take a look. But even if you know nothing about LED lights, these are definitely a creative option to look at from a portrait lighting point of view.
As always, I understand you might not want to listen to me waffling on so I have included handy time codes in the description plus links and discounts* etc if you're interested.
*As a side note this is not an ad, I don't get any kickbacks on these, I'm simply just sharing my thoughts on them :)

After you've checked the vid I'd be interested to hear what you guys make of them though. Do you think they look interesting enough to try? Do you think you could use these in your current portrait shoots? Or would you never ever use LED lighting to begin with? Let me know here or on the vid on YouTube.

Links Mentioned in the Video:

Spekular Website

Essential Photo Website - Discount code HICK5-OFF (The S in Hicks is a number 5/five).

Coloured Gels

Wednesday 01.24.18
Posted by Jake Hicks
 

DIY GoPro Ring Light for under £10

Technique Tuesday Facebook Thumbnail DIY gorpo ring light.jpg

We all love to save some money and never more so than after the financial onslaught of Christmas. In todays post I look at how I cobbled together a couple of tech-items to make my DIY GoPro ring light for less than £10/$15.

The original problem I had to solve was the fact that the GoPro cameras are tricky to use in conjunction with additional lighting on the go. Ordinarily you don't need additional light when you're windsurfing in seas of the Caribbean or hang-gliding over the cliffs of Yosemite, but for those off-days when you're not risking life limb for YouTube views, it's nice to put the GoPro to use in other areas too and that's where I encountered my problem. How to light a video portrait whilst on the move?

With your feet firmly planted on dry land, the GoPro is also an incredibly versatile video camera and in the newer models like the GoPro Hero 6, the manual functionality is pretty impressive too, so not why use it? It's not just for extreme sports after all.

I had to shoot some short filler video sequences of other people and also film some selfie-style pieces to camera as well. The issue comes with the lighting of the person in the shot, sure you can adjust and compensate the exposure a little in the camera settings but balancing the ambient light and the subject light was becoming tricky whilst on the move. This is where the ring light came in to save the day as it did a perfect job of seamlessly lighting the subject whilst still looking natural enough with the ambient light behind the subject whilst they moved through their environment.

We don't have the final footage to share here just yet but here's myself illustrating the results with the ring light turned on and the ring light off on the street via a couple of stills below.

Raw GoPro Hero6 shots taken without ring light attached.

Raw GoPro Hero6 shots taken WITH ring light attached.

It should be pretty clear to see that when the ring light isn't switched on, the subjects face is pretty dark compared to the surroundings (and pretty unflattering if I might add). But when the ring is turned on, the lighting on the subjects face is completely transformed. The light is a lot more 'forgiving' on the subjects complexion but it's also fairly similar to the surrounding environmental light, making this a very useful tool to have in your bag if the need arises, especially as it will only cost you a tenner.


What do you need?

GoPro

GoPro Hero 6

GoPro Hero 6

First up you'll obviously need your GoPro. I'm guessing that if you're checking out this article then you already have one but in fairness this little tech-combo will work on any mini-lensed camera like a phone for a example. I'll share images of the mobile phone alternative down below if you're interested.

The ring light I'm using here is actually specifically designed for the GoPro Hero 3+/4 and 5 Session cameras but it works fine on my GoPro Hero 6 as you can see here with a little help.


Your Ring Light

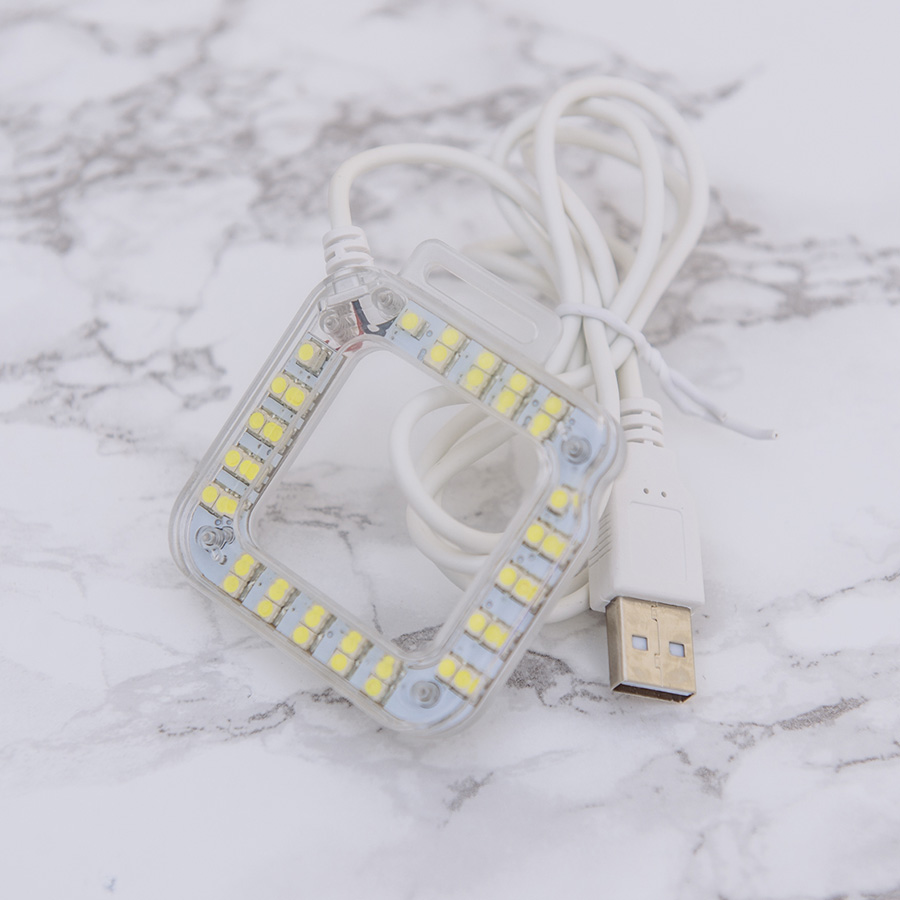
LED Ring Light

LED Ring Light

Obviously you'll need your ring light and here's the one I used with some links below. Like I mentioned above, this one is designed for the slightly larger lens housing in the older GoPro's but works absolutely fine on the newer Hero6 like you see me using here.

I've provided a link to the cheaper Chinese version here which is exactly the same product but will take a couple of weeks longer to arrive, or pay a couple of quid more and get it in a couple of days.

Cheap + Long arrival time (product posted from China)

Almost as Cheap + Get it in a couple of days (if you're UK based)


Your Power Pack

USB Power Bank

USB Power Bank

Once you have your ring light you'll soon realise it's completely useless without some power and oddly enough the ring light is USB powered. I say oddly as it's unlikely that you'll be using this ring light and GoPro combo with a laptop tucked under your arm. The next best thing is a mini USB power bank and thankfully, once again they can be obtained very cheaply.

The power packs actually provide a couple of benefits; firstly they don't require you to be plugged into anything leaving you to move around freely without hindrance and secondly, they're actually pretty lightweight. I think had this setup required AA's or AAA batteries the whole thing would be a lot heavier. Plus as a bonus point, the power bank acts as a mini-handle whilst attached so it makes the whole item a lot easier to hold and manoeuvre around.

Plus these power banks can be recharged as many times as you like so you only have to buy this one battery and you're done. Remember that this will also power and recharge any device that has a USB cable like smart phones and tablets etc so it's always going to be useful on or off the camera.

Here's a link to the one I used 2600 mAh USB Power Bank

Attachments

Elastic Bands

Elastic Bands

This is as basic as it comes really, just grab a bunch of elastic bands and you're done. Try to obviously get some that are going to hold the items together fairly firmly though. The ring light does actually come with a velcro strap that wraps around the camera and does a pretty good job of holding it on. The only down side is that it covers the screen on the back. If you're not bothered about seeing the screen then just use that instead.


Now What?

Once you have all the pieces, simply hang them off one another and you're done :D

Step 1

JakeHicksPhotography (7 of 17) step1.jpg

Attach the power bank to the side of the GoPro like you see here with a couple of sturdy elastic bands.

Step 2

JakeHicksPhotography (9 of 17) step 2.jpg

Attach the ring light to the front of the GoPro via the attachment points provided.

Step 3

JakeHicksPhotography (16 of 17) step 3.jpg

Lastly simply wrap the remaining cable around the 'handle' that is the power bank and put a final elastic band at the bottom to stop it from unravelling. Make sure to leave enough cable at the the end so that you can plug it into the power bank to turn it on.

You're Done

JakeHicksPhotography (11 of 17) step 4.jpg

It really is as simple as that. You now have your ring light attached alongside the power bank that doubles up as a handle too.

One last tip, in the settings of the camera of the Hero 6 (not sure on other models) you can adjust the exposure compensation. This is the best way in my experience to manage any brightness issues you might encounter and I had mine at between EV-1 and EV-2.

For those that are interested, the brightness of this LED lamp is measured at f2.8, 1/60th sec, ISO 400 when the camera is at arms length from the face (approx. two feet).


Bonus Tip

For those without a GoPro or if you just wanted to use the ring light with varying cameras, here's how I attached mine to my iPhone.

JakeHicksPhotography (13 of 17) iphone ring light.jpg
 

So there you have it, a perfect little ring light for your GoPro for under £10 which actually does a really good job of lighting the subject at arms length when you're on the move or on location with surrounding ambient light. I'm not sure how long the battery lasts as I haven't run mine out yet, but seeing as it's a just a handful of small LEDs I think the battery life will likely easily match that of the GoPro anyway.

As always if you have any questions or something doesn't make sense, let me know and I'll do my best to answer them when I can. Thanks for reading guys and enjoy.


:WARNING: Oh look, some amazing ways to spend that money I've just saved you await below :D


If you're interested in any of my work and would like to know more about how I created some of my shots then why not check out my workshops. Here you can find out everything there is to know about Gelled Lighting, Long Exposure Flash Photography and my entire Post-Pro Workflow. Jake Hicks Photography - Workshops

gel workshop trio.jpg

I've also just released a brand new 22 hour complete Gelled Lighting Tutorial video. I go over everything from studio lighting setups with gels to being on location with gels plus I also go through my complete retouching and post pro workflow. For more details and complete breakdown of everything that's include check out my Coloured Gel Portraits Tutorial

gel trio set video.jpg

I also offer comprehensive coloured gel packs. These collections of gels are what I use day to day to create some of the most highly saturated colours around. If you're looking at getting into gelled lighting or need to get stronger and richer colours in your coloured gel work why not check out my Jake Hicks Photography Gel Packs

gel trio set crop.jpg
Tuesday 01.16.18
Posted by Jake Hicks
Comments: 1
 
Newer / Older