Here is a scan of a reclaimed negative using the simple technique outlined below.
Although Polaroid as a company is no longer manufacturing their film, their ethos and idea behind instant imaging is still very much alive and kicking.
Companies like Impossible Project and Fuji Film are both making the instant film and in recent times the whole analogue market has seen a big resurgence.
The purpose for this article is to help explain some of the possibilities beyond just the instant print itself and in the following content I will go over the simple process involved in extracting a scannable or printable negative from Fuji's FP 100c peel apart instant film.

With peel apart instant film you normally just throw away the backing that is covered in chemicals. For this negative reclamation technique we will actually be keeping this part.
1. Firstly you will obviously need to take your shot as you normally would. After the allotted time has passed proceed to peel apart the film from its backing. Be sure to place your print somewhere safe as it's still wet from the processing chemicals. You should also place the piece that you would normally throw away somewhere safe as this section is what we extract the negative from. It is worth noting that this piece is extremely wet at this stage so be mindful not to place it chemical side down on anything porous, doing so may result in damaging the surface.

Here is the result of an Fuji 100c image negative being scanned but only after I had reclaimed the negative a year or so after it was originally shot. You can see here there are some major colour shifts but it can produce some cool results.
One question I have been asked several times is how long after the picture has been taken can you, or should you, extract the negative? As far as I am aware there is no minimum time and you can extract the negative straight after taking the picture if you so wish. If however you wanted to extract a negative from an older chemical sheet then expect there to be some slight degradation over time. I have gotten great negatives from them after a few weeks and i have even made negatives from the chemical sheets a year after taking the original shot. You may even find that you like the effect produced from leaving it for an extended period.

Peel apart the print from the backing ensuring you remove as much border as possible.
2. Now that we have our non-print section we should go about peeling apart all of the borders and additional materials. You should end up just a single piece of very dark material. For the process I use it is important to ensure all the borders are removed as I stick this to a piece of glass so a clean bond is essential.

Stick the backing to the glass with water and ensue there are no bubbles or air pockets.
3. Take a sheet of glass, any glass will do and anything from frame glass or even a mirror will be fine. The reason for this is to create a very clean bond to the chosen surface and glass ensures this. Place your future negative face down (the previously sticky side) with the black side facing up onto the glass. I usually wet the glass a little first to ensure a clean bond. Then I gently wash the whole thing in water to ensure the sheet is sealed all the way around.

In this image you can see the very dark black border all the way around. This is the result of the original not being properly sealed to the glass and the bleach has been able to get in and around the edges and destroy the image at its borders.
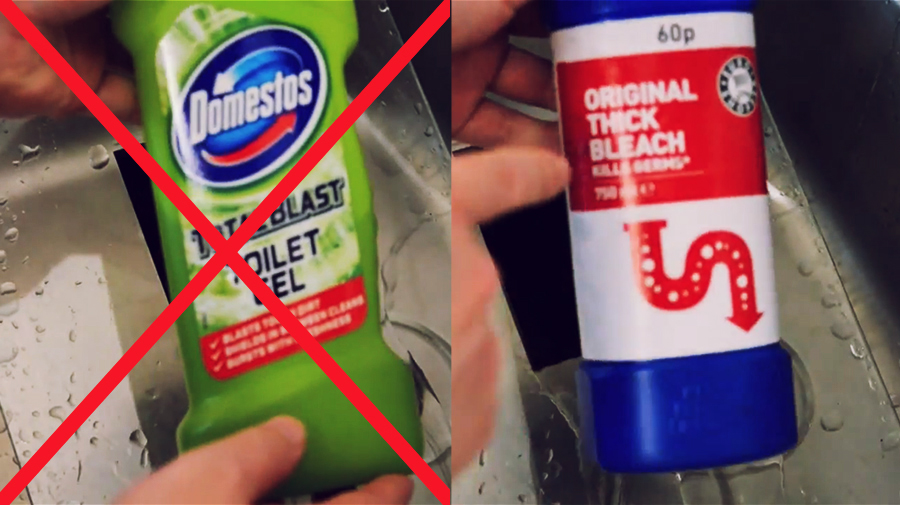
Ensure you are using neat bleach and not other cleaning gels as this process will only work with pure bleach.
4. Once thats sealed to the glass its time to add the active ingredient that actually removes the backing and exposes the negative. You'll be pleased to hear that ingredient is simply household bleach and is readily available anywhere. One thing to note is that it does need to be regular bleach, the cheap stuff. The similar gels and other potent cleaning products don't actually have the active ingredient of bleach so they will not work.

After you have coated the back of the sheet with bleach, leave it for around five minutes.
5. Liberally spread the bleach over the back of the sheet making sure it is entirely covered. Once it has been applied you just need to leave it for several minutes to do its thing. Depending on ambient temperature around five minutes should be about fine.

Whenever using strong thick bleach like this, care should always be taken and make sure you are wearing gloves if you have sensitive skin.
6. When you return you should now see that the bleach is doing its job and black gunk should now forming on top of the sheet. Carefully at first, proceed to remove this gunk from the negative. You can wear gloves for this part as bleach is a strong chemical that some people can find very irritating to their skin. Continue removing the gunk until you can feel that it has been entirely removed from the negative. Below the surface should be very smooth and any remaining black gunk should be easy to feel. Add a little water to wash away some of it to check and then continue until you are certain it has all been removed.

Sometimes the colours produced by this technique are a bit too far gone. This was an old shot that I reclaimed the negative from, as a result the colour degradation was too intense so I decided to convert it black and white in post production.

This negative reclamation can be a tricky technique to get right first time so don't be too disheartened if you don't get it perfect straight away. Hopefully though this article will help iron out a lot of the trial and error and produce results right from the start.

Once you have removed all the gunk from one side, flip it over but be sure to only use warm water on this more delicate side.
7. Once you're happy there is no more black emulsion on that side it is now time to remove the negative from the glass and flip it over. We now have to remove the gunk from this side as well. This is the side that the original print was attached to the chemicals are more exposed on this side, as result we do NOT need to use bleach on this side. Doing so would be extremely damaging and would strip the image from the negative. On this side all we need is warm water and some gentle rubbing. After a little bit you should feel that it has all been removed and any little pieces of border left over from before should also be removed.
8. That's it, you're done. I would recommend leaving this negative to dry naturally at room temperature and I would also recommend drying them standing up and leaning against something. If you lay them flat you will run the risk of the negative sticking to the surface but you will also create drying marks and streaks.
9. Once they are dried you can now scan them in and add additional effects or just go with some of the more natural effects this process produces. Have fun.

Here is the final result scanned in.
Included below is a video of the whole process from start to finish.

If you're looking for further reading on the type of camera that takes these instant shots then take a look at my article on how to mod your vintage polaroid land camera
Want instant images of today over the retro ones? Check out my article on tethering your camera without the tether.