I will be the first to admit that when it comes to photography, I certainly prefer the 'just get stuck in' approach and getting more of a feel for how the shot is looking over a shot list, lighting ratios and grey card. I am far more likely to set up my lights and fire off a few test shots to see how things are looking rather than planning exactly where and what power each and every light will be before I've even arrived on set.
On this shoot the client wanted to showcase his hairstyles with my distinctive coloured lighting. As usual there was a huge number of lights involved and due to the nature of the shots it would have been almost impossible to define how the final image would look when you have so many variables at work. There are of course a few constants that absolutely must be present in every professionals final images and that is the flawless and flattering look that only the highest quality of light can provide.
Photo courtesy of Jeff Tuliniemi.
This approach may seem reckless but I've earned that right. Not only does it come across as far more relaxed to everybody around you but most importantly it's because I know what I'm looking for. When I say I turn up and appear to effectively 'wing-it' I mean that I merely know what I want to achieve but how I get there may well differ based on the specific variables at play.
I can only afford to work like this because I know how each of my pieces of equipment will act. I know my large softbox will create a softer light than my smaller softbox and I know my silver beauty dish will give a cooler tone than my white one. These aren't just educated guesses or what somebody else has told me or even what I've read online, this knowledge is a product of my personal shooting experience.
A little while ago I was contacted by another photographer who wanted my opinion about some portraits they had taken. The shots looked fine, they were well exposed, the model looked posed in a flattering and comfortable way and all the shots were composed well. In fact all the boxes were ticked for this to be a lovely set of images but one thing stood out to me immediately as being off. The lighting in the shots was not soft but it was still flattering, the thing that stood out to me was the quality of the light on the models skin. The light was speckled with tiny variations of lights and darks and all across the models face you could see highlighted areas as well as shadowy areas. It was almost like a very subtle dappling effect but under the current circumstances it was very distracting and anything but flattering.
After further discussion and delving a little deeper into his setup I found out he was using a speedlight bounced into a silver umbrella, it was this incredibly hard light source being effectively fired into tinfoil that was creating this ugly effect. Why didn't he notice it? I'm sure he did but he might not necessarily know this is 'wrong' or bad until you are shown how good it 'can' look. The £20 bottle of wine tastes amazing until you try the £200 bottle of wine. We have to be shown how good it can look or how good it can taste before we can personally define what quality means to us.
So what defines the quality of light in photography? Firstly lets try to define what quality means. Quality is a fluid term and it can only be defined by comparison. For example the £20 bottle of wine tastes amazing compared to the £2 bottle but the £20 bottle of wine tastes pretty pedestrian once we've tasted the £200 bottle, it's a sliding scale. So although the photographers shots looked great to him they looked pretty scary to me. Why? Well because I know how good they could have looked had the quality of light been improved.
The image at the top was taken with a speedlight fired into a silver umbrella. The resulting reflection can be seen on this white wall. The distorted shadows and highlights circled above would not cast your model in a very flattering light……literally.
Now that we have tried to define quality lets try to define what quality of light means to us photographers by putting some comparisons onto our sliding scale.
The images displayed here go on to show the results of an experiment I did into how our lighting modifiers and our light sources effect the quality of our light. Firstly I recreated the effect the photographer had sent me; I fired a speedlight into a silver umbrella and then fired my Bowens 500w strobe into the umbrella and compared the two resulting shots. As we can all see, the shot at the top is producing those strange light and dark areas on the wall. This will not look good on a models skin. I say this because in my opinion the more even and clean the spread of light is the higher the quality of light. This speckled lighting effect created from the speedlight is not able to truly represent the blank wall, here it is adding shape through light and dark areas that is not actually there. It should be fairly obvious then that this same effect on skin will give the illusion of shape that is not in fact there resulting in uneven skin texture.
After this little experiment I went on and tried a few more tests with other lighting modifiers that I had. I was aware that a lot of shooters chose to 'upgrade' their speedlights by simply buying an attachment for the speedlight that accepted the s-fit lighting attachments Bowens make. I actually picked one up myself for about £10 for this very article. It's a simple piece of kit, it attaches to the top of a light stand or tripod, you then affix your speedlight and position it to fire through the hoop in front that holds your s-fit modifier. At first this seems like a great idea and for certain modifiers it works fine but for others it can produce some crazy results. Take a look at the resulting images in the test I did.
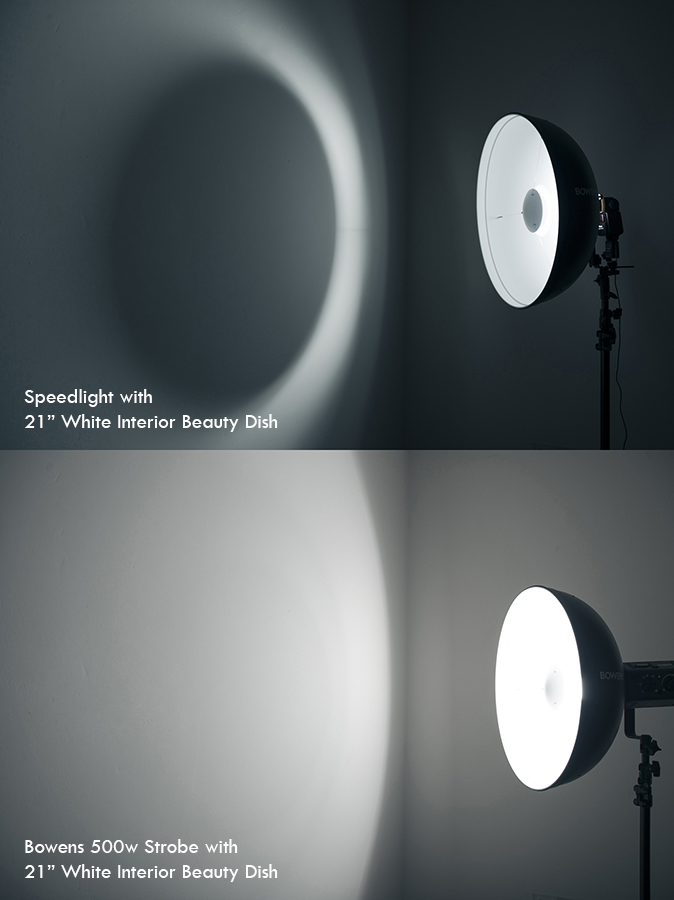
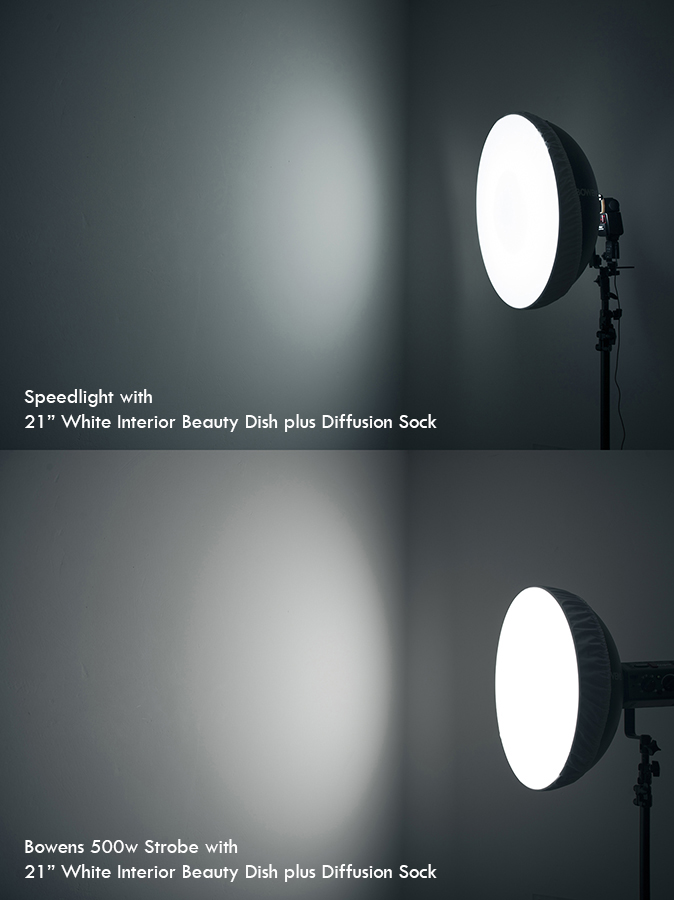
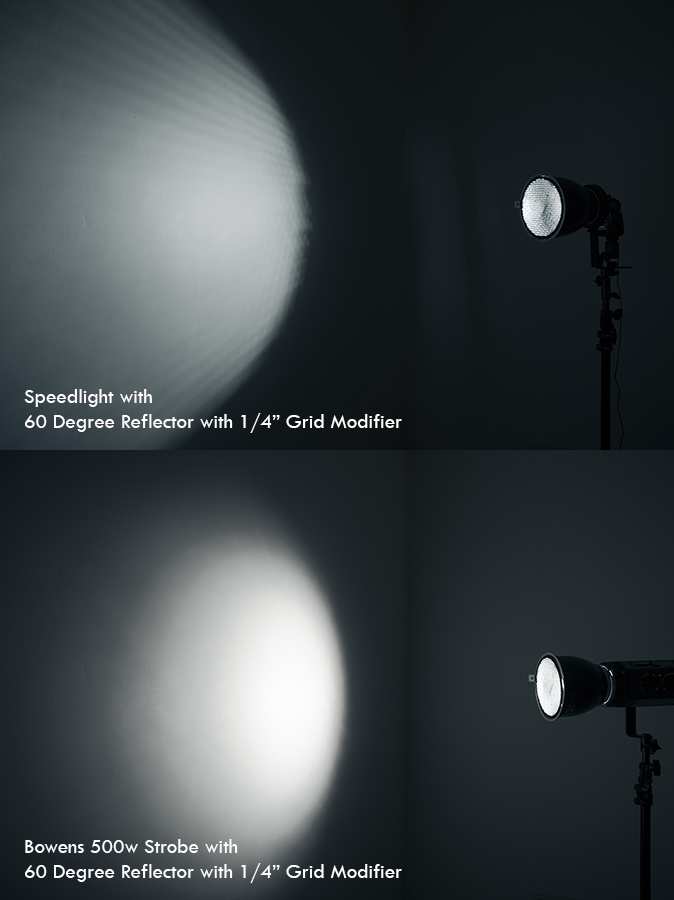
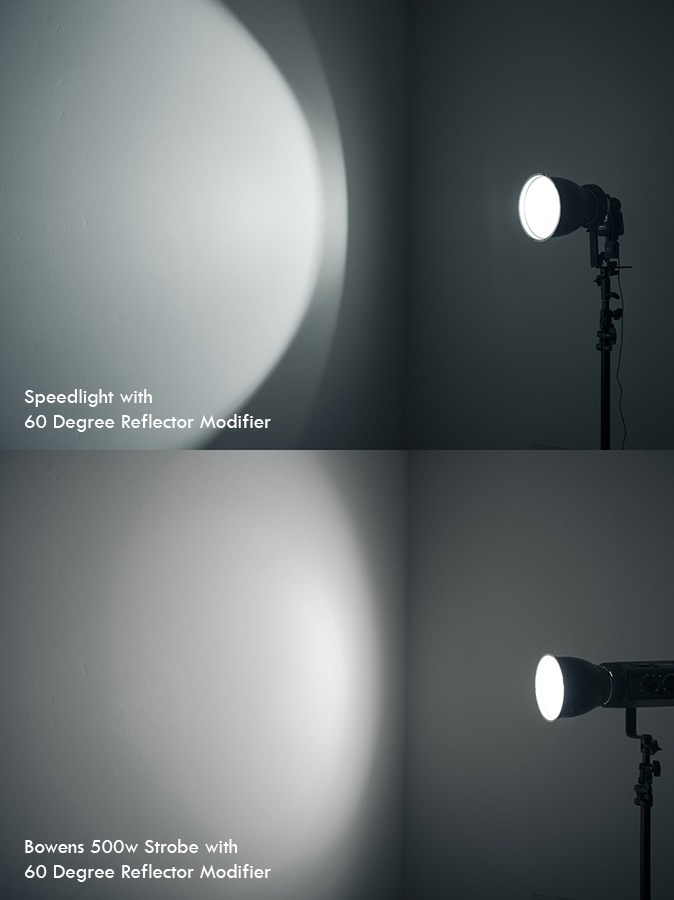
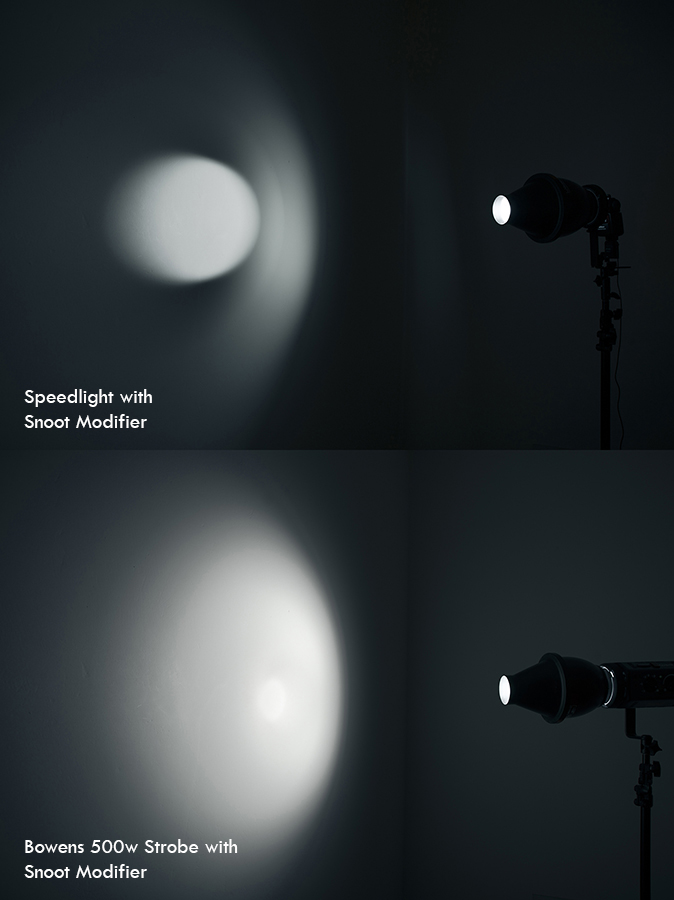
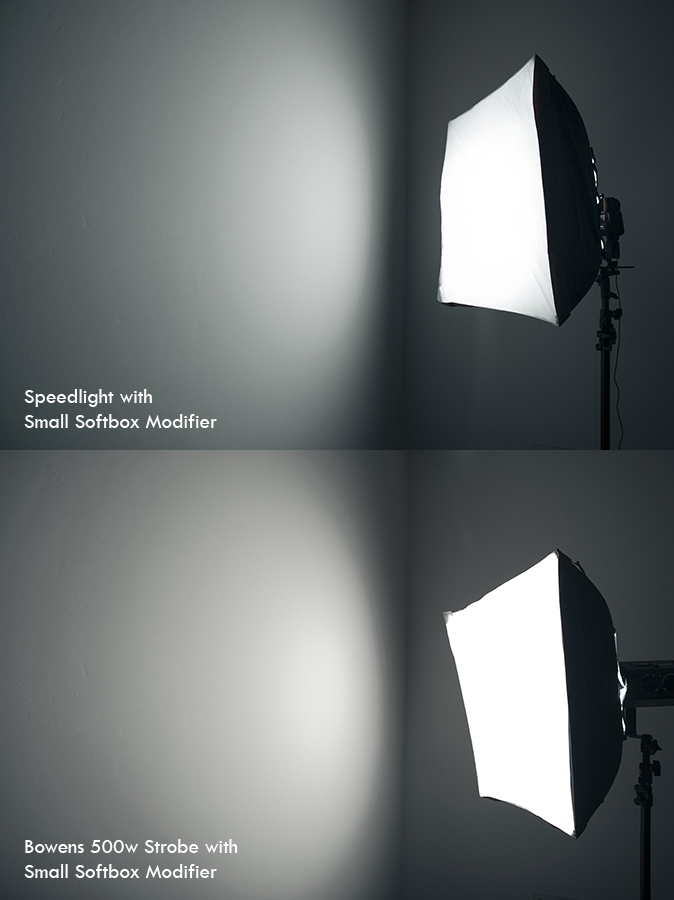
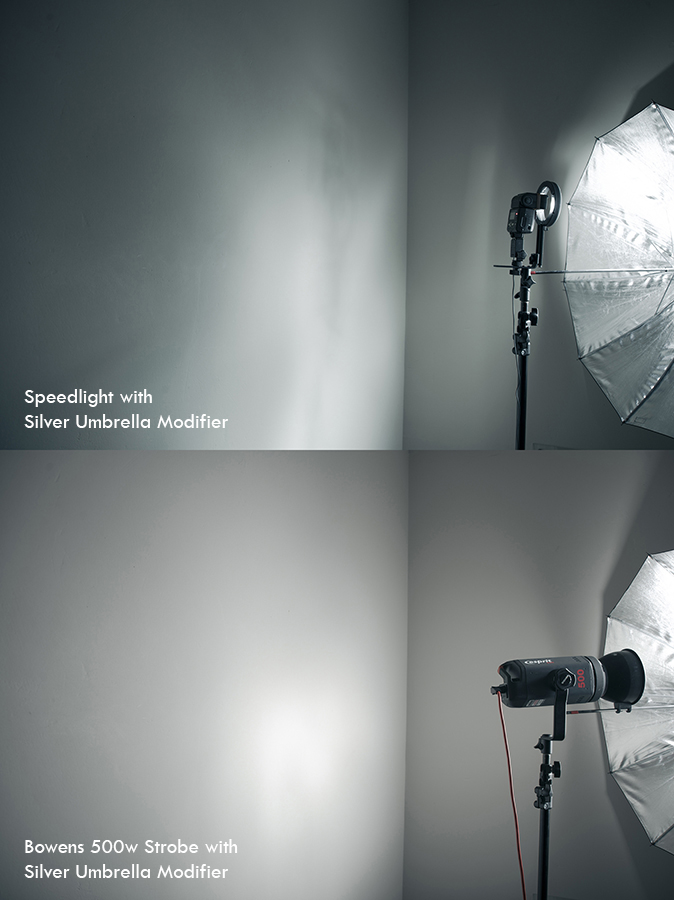
I think it's important to point out at this stage that I am not hating on the speedlight here and you can make up your own mind from the results shown. Speedlights have their role to play in photography and they are literally invaluable to wedding and paparazzi shooters. They need to be quick on their feet and they need to document whats unfolding in front of them as soon as they see it. They don't have the time to set up the shot and retake it if it doesn't look right. Speedlights are very light and incredibly portable and because of this I would absolutely use them all the time if they could produce the quality of light I require for my shots. Alas I think controlling the light accurately and evenly is outside of their job description. The light is just emanating from too smaller source and the laws of pesky physics is holding them back.
The little piece of inexpensive kit that allows your speedlights to use all the Bowens S-fit lighting modifiers.
So let's take a closer look at some of the results. To be fair, I was surprised by what I found, sure I knew exactly how the strobe test shots would look, I've been using them for ten years but the speedlight results were certainly not what I expected. Firstly they actually produce quite good results when their light is heavily diffused. The softbox shots look more than acceptable whereas I thought there would be far more of a hotspot present than is apparent from these results. Yes you can see the corners of the softbox going dark and a brighter middle but if you only wanted to use a small softbox like this then it would probably be fine. Secondly though, the speedlights performed worse than I expected with the harder light modifiers like the beauty dishes. In fact I would go as far as to say that the speedlights are literally unusable with them. The original light source of the speedlight is just too small and hard and it just cannot be distributed evenly enough throughout the modifier. The same principle applies to the snoot and honeycomb grids, the light just cannot be softened enough through bouncing the light alone, it really does need a diffusion panel of some kind.
So what does all that mean? It hardly seems fair to test speedlights on modifiers that have not been designed for them. I completely agree and the only reason I even did this test was to experiment with what a lot of photographers already use and try to explain why they are getting the results that they do.
I understand why they use this speedlight to s-fit attachment, you already have your speedlights so rather than go out and buy a whole new lighting system you try and augment what you already have by Frankensteining your current speedlights. We've all done something similar at some point and it's absolutely fine to do so, especially if you only plan to shoot softbox style shots you could probably get away with it. But for those who want to play with other modifiers it can be frustrating to try and achieve the impossible yet still blame yourself for bad and weird looking photos. The moral here is to be realistic with the expectations of your equipment. Do your own tests and experiments on your lights and see if you're happy with the quality of light displayed by your modifiers. If not then don't beat yourself up when you get weird looking lighting effects on your models skin as it really is one of the only times a workman can blame his tools :D
By all means if you've had similar experiences or have found ways to improve the quality of light with your speedlights then please feel free to share them below. It's always good to share your experiences and knowledge.
For further reading and more comparisons between speedlights and strobes take a look at my article on 'Which is better, Speedlights or Strobes?'
Also you may like to look at the results of some tests on my modifiers in this article on 'Testing your Lighting Attachments for Light Fall-Off'
If you'd like to look at getting started with studio lighting and your speedlights, take a look at this article on 'Start taking Studio Lighting Shots for Under £25'
:WARNING: Cool stuff that cost money below :D
Jake Hicks Photography Workshops
If you're interested in learning more about my professional workflow and lighting then why not check out some of my workshops. I run my very popular Gelled Lighting Workshops where I cover everything there is to know about gelled lighting plus I also run a little more advanced days training called my Colour & Exposure Workshop. This workshop is a little more advanced and covers long exposure imagery that mixes ambient lighting and flash photography. On top of that I also run a full days workshop that covers everything I do once I've taken the shots. My Post-Production Workflow Workshop covers everything from import to export in Lightroom and Photoshop. Plus everybody on the day of that course will walk away with an in-depth PDF of everything taught on the day PLUS over 15 of my Photoshop Actions and 30 of my Lightroom presets!
Jake Hicks Photography Video Tutorial
I have also just released a brand new 22 hour complete Gelled Lighting Tutorial video. I go over everything from studio lighting setups with gels to being on location with gels plus I also go through my complete retouching and post pro workflow. For more details and complete breakdown of everything that's include check out my Coloured Gel Portraits Tutorial
Jake Hicks Photography Gel Packs
I also offer comprehensive coloured gel packs. These collections of gels are what I use day to day to create some of the most highly saturated colours around. If you're looking at getting into gelled lighting or need to get stronger and richer colours in your coloured gel work why not check out my Jake Hicks Photography Gel Packs


