• >>>NEW Colour 2.0 Workshop<<<
  • Technique
    • Latest Techniques
    • FREE TIPS
    • Quick Tips
    • Video
    • Site Search
    • Blog
    • Archives
  • Mentoring
  • 2026 Workshops
  • >Online Workshops<
  • Studio Lighting Books
  • Contact
    • Newsletter
    • Contact
    • Statement
Jake Hicks Photography
  • >>>NEW Colour 2.0 Workshop<<<
  • Technique
    • Latest Techniques
    • FREE TIPS
    • Quick Tips
    • Video
    • Site Search
    • Blog
    • Archives
  • Mentoring
  • 2026 Workshops
  • >Online Workshops<
  • Studio Lighting Books
  • Contact
    • Newsletter
    • Contact
    • Statement

Defining Quality of Light in Photography

I will be the first to admit that when it comes to photography, I certainly prefer the 'just get stuck in' approach and getting more of a feel for how the shot is looking over a shot list, lighting ratios and grey card. I am far more likely to set up my lights and fire off a few test shots to see how things are looking rather than planning exactly where and what power each and every light will be before I've even arrived on set.

On this shoot the client wanted to showcase his hairstyles with my distinctive coloured lighting. As usual there was a huge number of lights involved and due to the nature of the shots it would have been almost impossible to define how the final ima…

On this shoot the client wanted to showcase his hairstyles with my distinctive coloured lighting. As usual there was a huge number of lights involved and due to the nature of the shots it would have been almost impossible to define how the final image would look when you have so many variables at work. There are of course a few constants that absolutely must be present in every professionals final images and that is the flawless and flattering look that only the highest quality of light can provide.

Photo courtesy of Jeff Tuliniemi.

This approach may seem reckless but I've earned that right. Not only does it come across as far more relaxed to everybody around you but most importantly it's because I know what I'm looking for. When I say I turn up and appear to effectively 'wing-it' I mean that I merely know what I want to achieve but how I get there may well differ based on the specific variables at play.

I can only afford to work like this because I know how each of my pieces of equipment will act. I know my large softbox will create a softer light than my smaller softbox and I know my silver beauty dish will give a cooler tone than my white one. These aren't just educated guesses or what somebody else has told me or even what I've read online, this knowledge is a product of my personal shooting experience.

A little while ago I was contacted by another photographer who wanted my opinion about some portraits they had taken. The shots looked fine, they were well exposed, the model looked posed in a flattering and comfortable way and all the shots were composed well. In fact all the boxes were ticked for this to be a lovely set of images but one thing stood out to me immediately as being off. The lighting in the shots was not soft but it was still flattering, the thing that stood out to me was the quality of the light on the models skin. The light was speckled with tiny variations of lights and darks and all across the models face you could see highlighted areas as well as shadowy areas. It was almost like a very subtle dappling effect but under the current circumstances it was very distracting and anything but flattering.

After further discussion and delving a little deeper into his setup I found out he was using a speedlight bounced into a silver umbrella, it was this incredibly hard light source being effectively fired into tinfoil that was creating this ugly effect. Why didn't he notice it? I'm sure he did but he might not necessarily know this is 'wrong' or bad until you are shown how good it 'can' look. The £20 bottle of wine tastes amazing until you try the £200 bottle of wine. We have to be shown how good it can look or how good it can taste before we can personally define what quality means to us.

So what defines the quality of light in photography? Firstly lets try to define what quality means. Quality is a fluid term and it can only be defined by comparison. For example the £20 bottle of wine tastes amazing compared to the £2 bottle but the £20 bottle of wine tastes pretty pedestrian once we've tasted the £200 bottle, it's a sliding scale. So although the photographers shots looked great to him they looked pretty scary to me. Why? Well because I know how good they could have looked had the quality of light been improved.

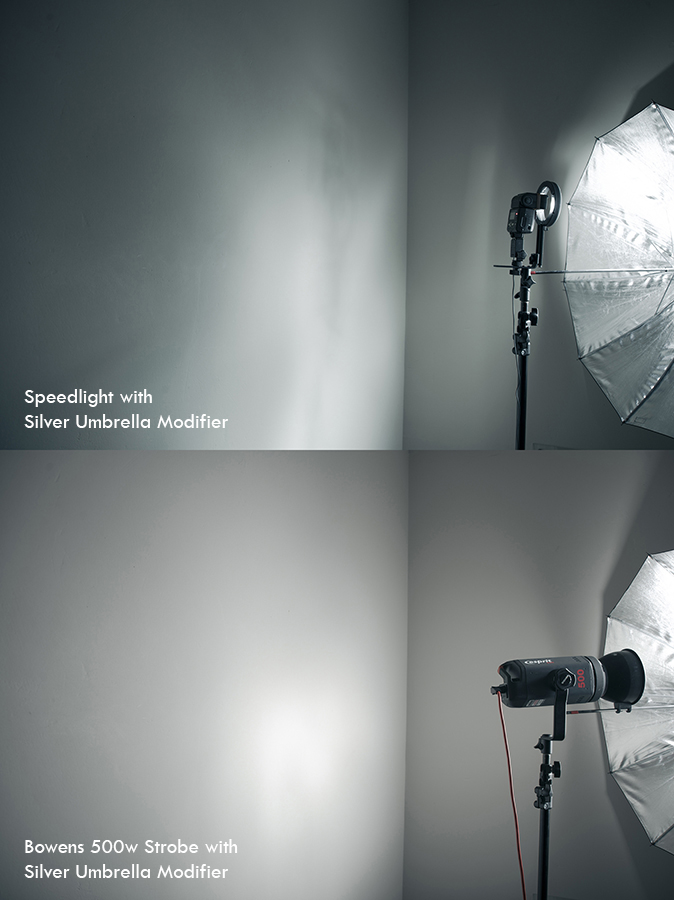
The image at the top was taken with a speedlight fired into a silver umbrella. The resulting reflection can be seen on this white wall. The distorted shadows and highlights circled above would not cast your model in a very flattering light……literally.

Now that we have tried to define quality lets try to define what quality of light means to us photographers by putting some comparisons onto our sliding scale.

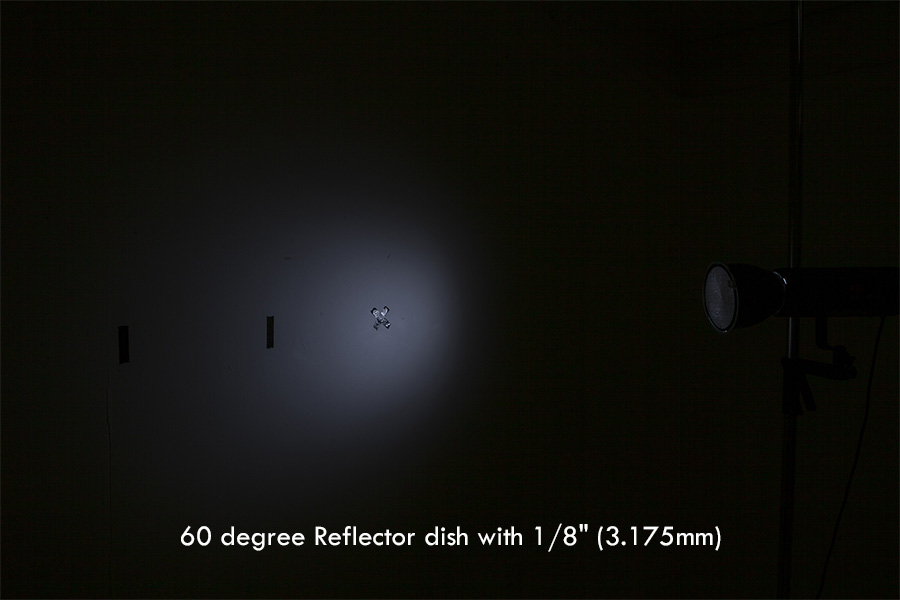
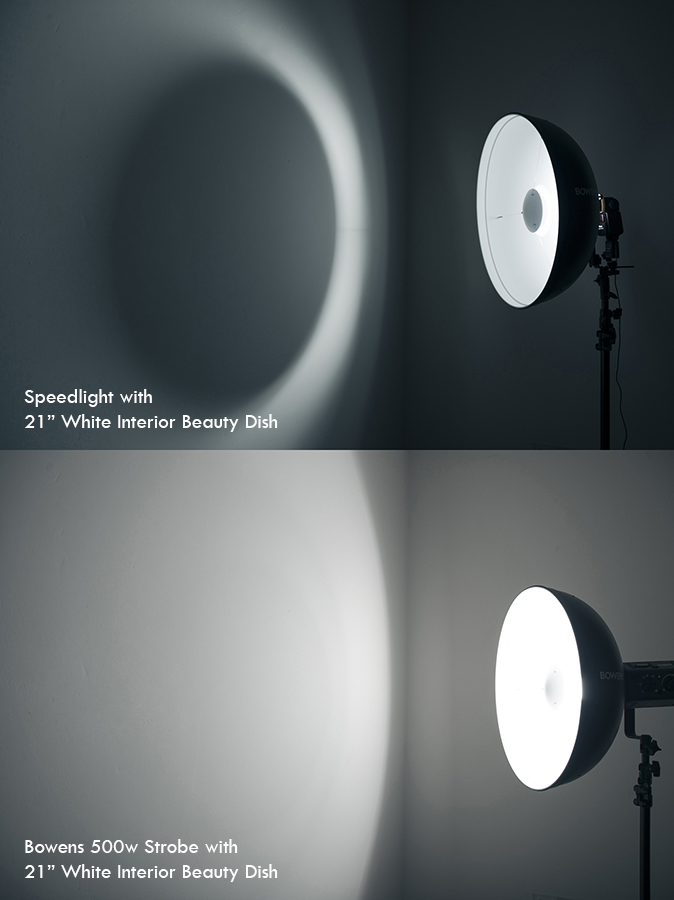
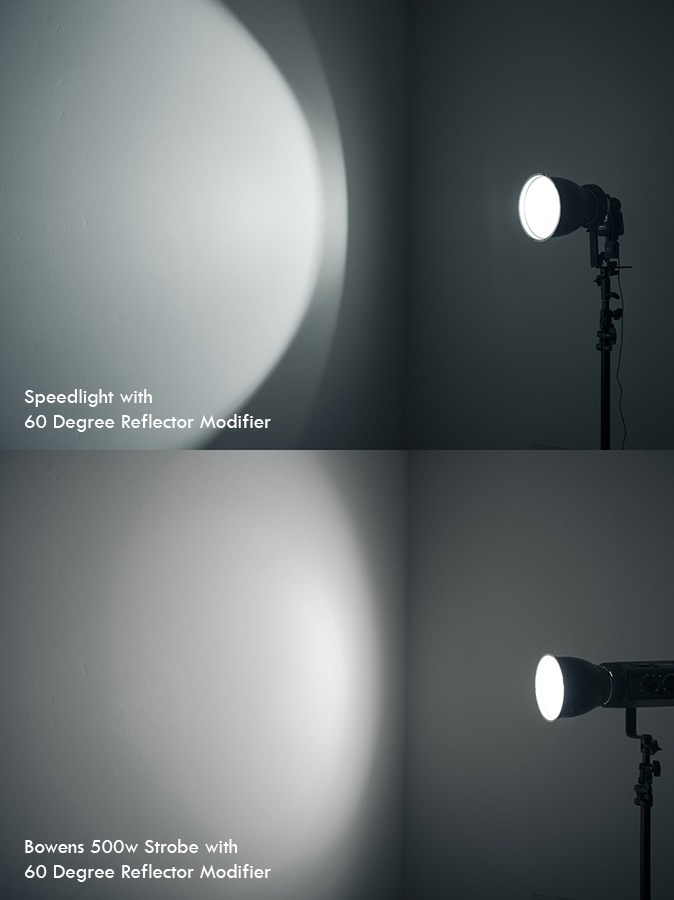
The images displayed here go on to show the results of an experiment I did into how our lighting modifiers and our light sources effect the quality of our light. Firstly I recreated the effect the photographer had sent me; I fired a speedlight into a silver umbrella and then fired my Bowens 500w strobe into the umbrella and compared the two resulting shots. As we can all see, the shot at the top is producing those strange light and dark areas on the wall. This will not look good on a models skin. I say this because in my opinion the more even and clean the spread of light is the higher the quality of light. This speckled lighting effect created from the speedlight is not able to truly represent the blank wall, here it is adding shape through light and dark areas that is not actually there. It should be fairly obvious then that this same effect on skin will give the illusion of shape that is not in fact there resulting in uneven skin texture.

After this little experiment I went on and tried a few more tests with other lighting modifiers that I had. I was aware that a lot of shooters chose to 'upgrade' their speedlights by simply buying an attachment for the speedlight that accepted the s-fit lighting attachments Bowens make. I actually picked one up myself for about £10 for this very article. It's a simple piece of kit, it attaches to the top of a light stand or tripod, you then affix your speedlight and position it to fire through the hoop in front that holds your s-fit modifier. At first this seems like a great idea and for certain modifiers it works fine but for others it can produce some crazy results. Take a look at the resulting images in the test I did.

 
JakeHicksPhotography beauty dish.jpg
JakeHicksPhotography beauty ish diffused.jpg
JakeHicksPhotography honeycomb small.jpg
JakeHicksPhotography reflector dish.jpg
JakeHicksPhotography snoot.jpg
JakeHicksPhotography softbox.jpg
JakeHicksPhotography umbrella.jpg
JakeHicksPhotography beauty dish.jpg JakeHicksPhotography beauty ish diffused.jpg JakeHicksPhotography honeycomb small.jpg JakeHicksPhotography reflector dish.jpg JakeHicksPhotography snoot.jpg JakeHicksPhotography softbox.jpg JakeHicksPhotography umbrella.jpg
 

I think it's important to point out at this stage that I am not hating on the speedlight here and you can make up your own mind from the results shown. Speedlights have their role to play in photography and they are literally invaluable to wedding and paparazzi shooters. They need to be quick on their feet and they need to document whats unfolding in front of them as soon as they see it. They don't have the time to set up the shot and retake it if it doesn't look right. Speedlights are very light and incredibly portable and because of this I would absolutely use them all the time if they could produce the quality of light I require for my shots. Alas I think controlling the light accurately and evenly is outside of their job description. The light is just emanating from too smaller source and the laws of pesky physics is holding them back.

The little piece of inexpensive kit that allows your speedlights to use all the Bowens S-fit lighting modifiers.

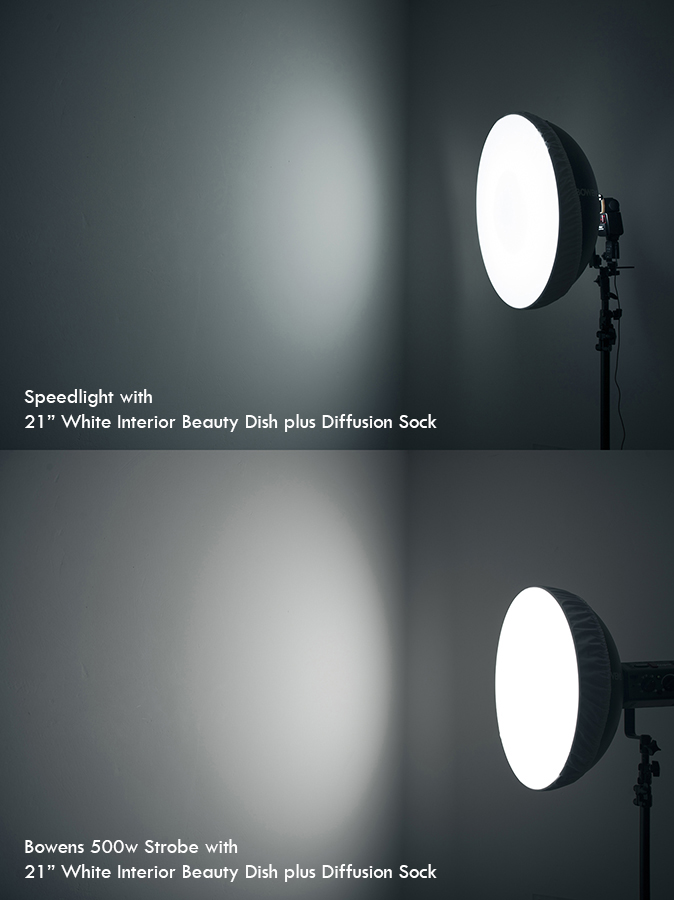
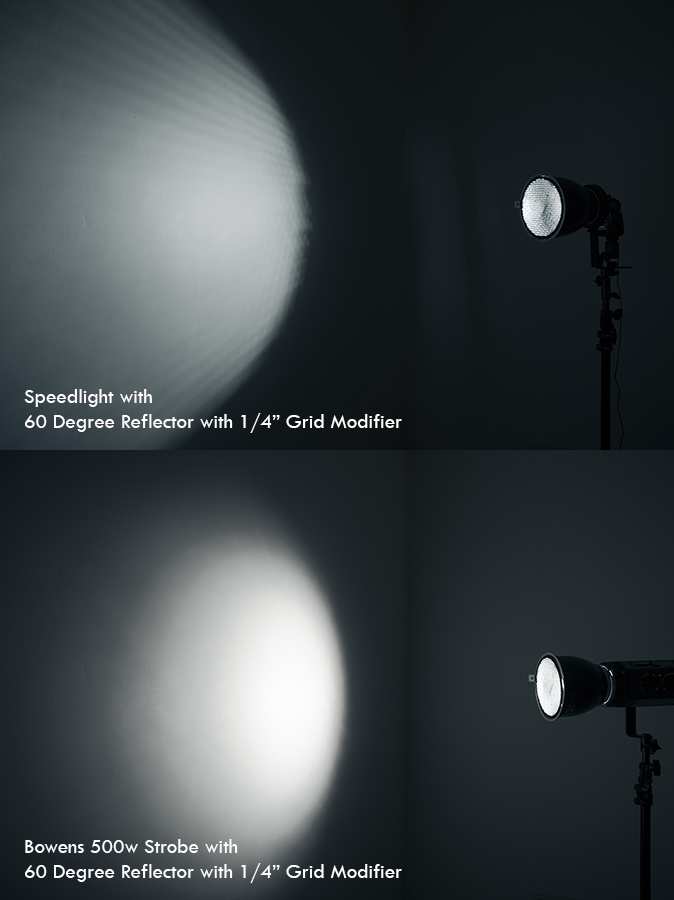
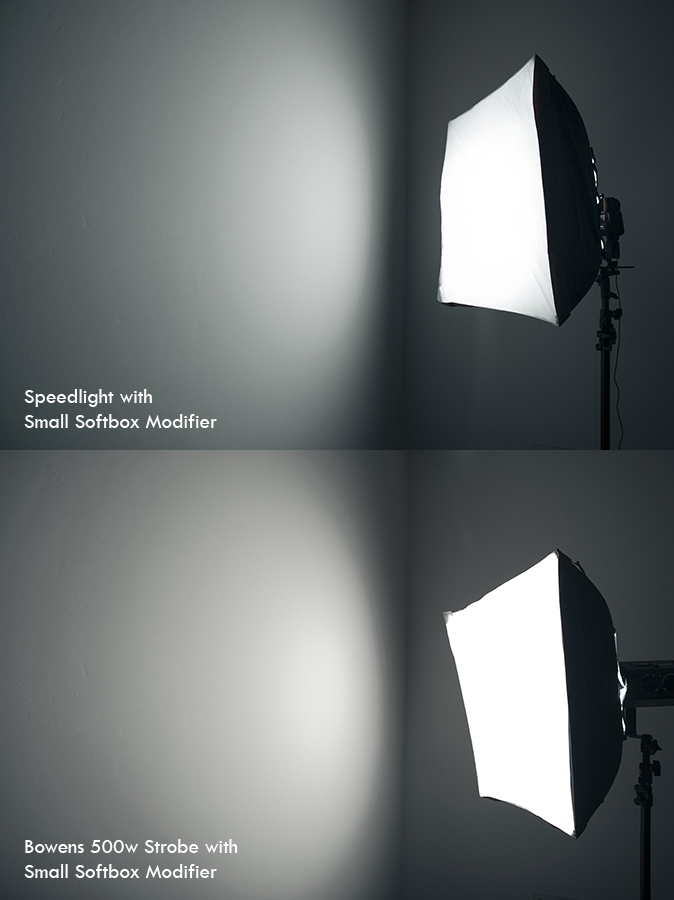
So let's take a closer look at some of the results. To be fair, I was surprised by what I found, sure I knew exactly how the strobe test shots would look, I've been using them for ten years but the speedlight results were certainly not what I expected. Firstly they actually produce quite good results when their light is heavily diffused. The softbox shots look more than acceptable whereas I thought there would be far more of a hotspot present than is apparent from these results. Yes you can see the corners of the softbox going dark and a brighter middle but if you only wanted to use a small softbox like this then it would probably be fine. Secondly though, the speedlights performed worse than I expected with the harder light modifiers like the beauty dishes. In fact I would go as far as to say that the speedlights are literally unusable with them. The original light source of the speedlight is just too small and hard and it just cannot be distributed evenly enough throughout the modifier. The same principle applies to the snoot and honeycomb grids, the light just cannot be softened enough through bouncing the light alone, it really does need a diffusion panel of some kind.

So what does all that mean? It hardly seems fair to test speedlights on modifiers that have not been designed for them. I completely agree and the only reason I even did this test was to experiment with what a lot of photographers already use and try to explain why they are getting the results that they do.

I understand why they use this speedlight to s-fit attachment, you already have your speedlights so rather than go out and buy a whole new lighting system you try and augment what you already have by Frankensteining your current speedlights. We've all done something similar at some point and it's absolutely fine to do so, especially if you only plan to shoot softbox style shots you could probably get away with it. But for those who want to play with other modifiers it can be frustrating to try and achieve the impossible yet still blame yourself for bad and weird looking photos. The moral here is to be realistic with the expectations of your equipment. Do your own tests and experiments on your lights and see if you're happy with the quality of light displayed by your modifiers. If not then don't beat yourself up when you get weird looking lighting effects on your models skin as it really is one of the only times a workman can blame his tools :D

By all means if you've had similar experiences or have found ways to improve the quality of light with your speedlights then please feel free to share them below. It's always good to share your experiences and knowledge.


For further reading and more comparisons between speedlights and strobes take a look at my article on 'Which is better, Speedlights or Strobes?'

Also you may like to look at the results of some tests on my modifiers in this article on 'Testing your Lighting Attachments for Light Fall-Off'

If you'd like to look at getting started with studio lighting and your speedlights, take a look at this article on 'Start taking Studio Lighting Shots for Under £25'


:WARNING: Cool stuff that cost money below :D


Jake Hicks Photography Workshops

If you're interested in learning more about my professional workflow and lighting then why not check out some of my workshops. I run my very popular Gelled Lighting Workshops where I cover everything there is to know about gelled lighting plus I also run a little more advanced days training called my Colour & Exposure Workshop. This workshop is a little more advanced and covers long exposure imagery that mixes ambient lighting and flash photography. On top of that I also run a full days workshop that covers everything I do once I've taken the shots. My Post-Production Workflow Workshop covers everything from import to export in Lightroom and Photoshop. Plus everybody on the day of that course will walk away with an in-depth PDF of everything taught on the day PLUS over 15 of my Photoshop Actions and 30 of my Lightroom presets!


Jake Hicks Photography Video Tutorial

I have also just released a brand new 22 hour complete Gelled Lighting Tutorial video. I go over everything from studio lighting setups with gels to being on location with gels plus I also go through my complete retouching and post pro workflow. For more details and complete breakdown of everything that's include check out my Coloured Gel Portraits Tutorial


Jake Hicks Photography Gel Packs

I also offer comprehensive coloured gel packs. These collections of gels are what I use day to day to create some of the most highly saturated colours around. If you're looking at getting into gelled lighting or need to get stronger and richer colours in your coloured gel work why not check out my Jake Hicks Photography Gel Packs

Tuesday 09.02.14
Posted by Jake Hicks
Comments: 6
 

The Bowens Universal Spot Attachment

I have been shooting pretty much exclusively with studio strobes for well over 10 years now; I'd like to think I've had a go with pretty much every lighting attachment out there but last weekend I got the chance to shoot with something new, the Bowens Universal Spot Attachment. The spot attachment has a few unique features but it's ability to “literally” focus the light is the main reason I particularly wanted to try it.


Bowens Universal Spot Attachment

Focusing the light might not sound ground-breaking at first, but I’m not talking about channelling the light or simply controlling the light – the University Spot Attachment is actually built with a lens on the end that you can move in and out to focus the flash. So what does that mean? Well, it means you can actually get a very “hard” light source.

 
On the left we have a very soft light source, no real shadows as the light wraps around, this was shot with a giant soft box. On the right we have a very hard light source with very hard, crisp shadows; this was shot with a strobes bare flash tube.

On the left we have a very soft light source, no real shadows as the light wraps around, this was shot with a giant soft box. On the right we have a very hard light source with very hard, crisp shadows; this was shot with a strobes bare flash tube.

Whilst there are a million and one ways to “soften” the light, it’s actually quite difficult to get a very hard light source with strobes. Soft light is created by larger light sources like soft-boxes and umbrellas – the larger the light source in relation to the subject the softer the light. Conversely, hard light is typically created by smaller light sources – these are usually grids or snoots, lighting modifiers that funnel the light to one area thereby having a smaller effective light source. So what's different about this Universal Spot Attachment over other light sources like snoots and grids?


Here we can clearly see the effect a snoot creates on a white wall. The light is being channelled and bounced around until it leaves the end of the snoot; the resulting light has many light and dark resulting elements rather than an even spread of light. This is fine for hair lights and edge lights, but for a key light it's definitely not ideal.

For starters, the flash tubes in strobes are actually relatively large, the light is distributed around a tube and is dispersed in all directions. No matter how much shaping and channelling your lighting modifiers do, all they are essentially doing is bouncing the light in a controlled way. However, more importantly, all light shaping affects the quality of the light: the flash will bounce around in a snoot and come out with pockets of light and dark (see inset image for the resulting light of a snoot on a white wall). Grids will also leave a honeycomb grid pattern, which is fine for hair lighting and where it’s not pointing directly onto the skin, but this can sometimes leave undesirable shadows if used as a key light on the model’s face.


All of the above issues are eliminated with the Universal Spot Attachment as its lens focuses the light and does not rely on channelling to control its size.


The Universal Spot Attachment creates an incredibly hard and crisp light. This is due to its lens that focuses the light directly onto your subject. It's also worth noting how clean the light is on the background - there are no patches of light and shadow and it has a fantastic quality of light due to the lens on the front of the attachment. -Clicking on the image will enlarge it-

So now that we've established that it creates a very “hard” light source – what can we do with it? This incredibly hard and stark light is currently very popular as it almost gives the feeling of a “retro flash look”; the nostalgic old flashes were very small and as a result had a very hard lighting effect and this effect is currently seen a lot in fashion advertising. The hard light is synonymous with the brilliant sunlight of a cloudless sky and gives amazing contrast to black and white shots and brilliant saturation to colours; it’s also an incredibly clean light – look at the images here and the background is spotless, no weird shadows from channelled light.

I also experimented with the addition of a subtle fill light in the form of a small soft box at the model’s feet. In the image featured below you can see that it helps to lift the shadow’s density without breaking the strength of the shadow transition. I actually really like this effect and will certainly be playing with this further.

Now that we know what the Universal Spot Attachments niche is in the lighting modifier market, let’s have a look at the actual features. Firstly, as previously mentioned, the attachment has a lens situated right at the end of the modifier which can be moved in and out to focus the light further, and I'll go into why that’s important in a moment.


This image has a fill light in the form of a small soft box positioned at the models feet. This creates a gorgeous quality of light, the soft-box lifts the shadows slightly without reducing the shadow transition and the shadows remain very crisp and clear.  -Clicking on the image will enlarge it-

The removable gobo holder.

The removable gobo holder.

Secondly, another fundamental feature is that the Universal Spot Attachment has a “gobo” (go-between light and subject) holder: this is a metal disk that can slide in and out to allow for a variety of different patterns to be placed between the light and your subject.


Bowens does a specific pack that consists of a variety of patterns like venetian blinds, foliage and shapes; I didn't have this pack but I decided to have a play with my own “gobos” instead.  This really is where the Universal Spot Attachment stands out in my opinion: the ability to shine a variety of shapes, images, gels and such onto your subject or background is pretty unique. Yes, you can do something similar with projectors but this involves a continuous light source – this is not only very dim in brightness and require a higher ISO to be used, but projectors also add another colour temperature if you want to mix it with flash. By having the Universal Spot Attachment shine the desired effect, you not only get the ability to control it via a far brighter flash power but you also no longer have to worry about mixing colour temperatures. As a result you can shine your gobo onto your background and light your subject independently, with the luxury of very quick shutter speeds, low ISO and your choice of aperture. Plus your setup will have a consistent colour temperature throughout, negating the need for a multitude of colour correcting gels.


This image has the punctured Cinefoil placed into the gobo holder and shone directly onto the model. Its important to note that the Universal Spot Attachment lens was adjusted to throw the effect completely out of focus. -Clicking on the image will enlarge it-

Small sheet of Cinefoil, punctured with holes and placed into the gobo holder.

Small sheet of Cinefoil, punctured with holes and placed into the gobo holder.

With the ability to add a variety of gobos to the set-up I experimented with a few different things. First, I made my own basic gobo from simple 'Cinefoil' (essentially heat resistant black tinfoil): I punctured several holes in the small sheet and placed it into the gobo holder. You can get varying results with this technique by bringing the lens further or closer to the gobo, sharpening or blurring the effect. For my preference I went for a very blurry dappling effect on the model and the results are shown here.


A graduated lens filter. These are really designed for landscape photographers to hold in front of their lenses to enhance sunsets but in this instance I'm using it in my Universal Spot Attachment to create graduated gels.

A graduated lens filter. These are really designed for landscape photographers to hold in front of their lenses to enhance sunsets but in this instance I'm using it in my Universal Spot Attachment to create graduated gels.

In this image I’ve shone the gradient lens filter directly onto the model to give a complete sweep of colour throughout the image. I would like to experiment further with this and try having the colour gradient behind the model instead. -Clicking on the image will enlarge it-

Next, I tried graduated gels. I think this is something pretty unique and I struggle to see how else it could be achieved in-camera and using strobes; the idea came from looking at the old landscape photography lens filters, where they place graduated filters in front of their lenses to add colour to sunsets or seascapes and skies. I took one of these sunset filters and placed it into the gobo slot and thanks to the focusing aspect of the Universal Spot Attachment, the colour retained its graduation. Unfortunately I only picked up one colour filter as I was unsure if it would actually work, but now that I know it will maintain its colour gradient I will certainly be picking up a few more of these in a variety of colours. Additionally, because I'm not actually shooting through them I don't need to worry too much about the filter quality so I can get them overseas for literally only a few pounds.


A lot of the previous gobo's I had played with benefited from being projected into the scene out of focus. This time I wanted to try a gobo that I thought would benefit from being in-focus. Here I placed a slide mount covered in small letters into the gobo holder and focused it onto the scene. -Clicking on the image will enlarge it-

I found a few old slide mounts and applied some Letracet letters to create a scene to shine onto the model and background.

I found a few old slide mounts and applied some Letracet letters to create a scene to shine onto the model and background.

Finally, I had a play with something a bit more artistic – I wanted to add something that would lend itself well to the hardness of the light but also benefit from the gobo being in-focus, and decided to play with idea of projecting slides onto the scene. I found some old slide mounts and proceeded to apply some Letracet letters (dry-transfer lettering) to the frame, placed the slides into the gobo holder and focused the letters onto the model. The results can be seen here and they give a very interesting look that works well when the Universal Spot Attachment lens is focused.


Some points to bear in mind whilst using the Universal Spot Attachment.

  • Firstly this attachment will make your flash a very unforgiving light source and the hardness of the light will exaggerate all the subject’s features due to its strong contrasting light, but this can create some dramatic effects.
  • Secondly the Universal Spot Attachment has a lens on the front, as a result of it focusing the light you tend to lose some light intensity and consequently you will probably need to increase the power output on the strobe. As a rough guide, these tests were measured on a 500w head that was positioned about 2 metres away from the subject at full power and metered at ISO 100 at f5.6.
  • Thirdly, because of the focusing ability, the beam is concentrated into a circle of light. If I had zoomed my camera out any further you would start to see the “vignetting” of the attachment. As a rough guide, you would be able to shoot a 3/4 length shot of a model without the vignetting effect with the light, again, about 2 metres away.
  • Finally and most importantly, this attachment is a closed unit to eliminate any light spill. As a result if you use it with the modelling bulb on, the metal casing will become extremely hot. As I was using non-approved gobos, I'm pretty confident they would have melted had I been using them with the modelling bulbs on.

Some of the benefits and features of the Universal Spot Attachment.

  • One of the only ways to get a very hard light source: the ability to literally focus the light onto the scene means that the shadows are incredibly crisp, and as a result the contrast and saturation to the images is fantastic.
  • The quality of light is incredibly clean due to the attachment’s lens, so this is perfect for creating clean stark backgrounds with a consistent exposure throughout the scene. Again there are very few attachments that would be able to achieve this look.
  • The ability to play with gobos in a multitude of ways is not only a lot of fun, but also creates some unique looks that cannot be created in any other way. With the implementation of image slides and products like Cinefoil and lens filters, the creative possibilities are virtually endless.
  • The ability to project any of these gobos through an attachment powered by a strobe is unique. Previously I've experimented with slide projectors and digital projectors but not only do they have a low power output, they are also not colour balanced to the same Kelvin as strobes, meaning you will struggle to maintain colour consistency within an image.

Personally, I love the Universal Spot Attachment and will definitely be keeping it as a regular accompaniment to my kit bag. I’m also looking forward to experimenting with its possibilities further and already have more graduated gels on order, so look out for that unique lighting effect in future shoots.

Be sure to check out the full article in the next issue of the Bowens Litebook

Special thanks to the model Sophie Roach and collar designer Patrick Ian Hartley.


For some further reading why not check out how some other lighting modifiers distort their light in this test I did Testing your Lighting Attachments for Light Fall-Off

Satisfy your curiosity as to Which is Better, Speedlights or Strobes?

If you are looking to experiment with gels and how the light falloff of certain modifiers effects their exposure why not check out Colour Gels Exposed

tags: bowens, universal spot attachment, teambowens, hard light, modifier, strobes, studio photography
Tuesday 08.12.14
Posted by Jake Hicks
Comments: 4
 

Which is better, Speedlights or Strobes?

Many moons ago when I first left art college my first real assignment came along: it was a big hair shoot for one of the Toni & Guy hair salons here in the UK. The brief was to shoot 6 models – all head and shoulder shots and of course, all showing the hair in the best possible light.

At this stage I didn't have any lighting equipment; in fact I think I even used my friend’s Nikon film camera for the shoot – I certainly needed to think about getting my own lighting system.

So I had the camera for the shoot sorted, but no lighting equipment. Art college was great, you went along signed your name and they loaned out all the kit you could possibly need; but those days and privileges were now gone so I needed to start investing in my own equipment. Since I knew that photography was going to be what I wanted to do long-term, I wanted to invest my very limited finances wisely.

My very first commercial shoot way back in 2013, I was straight out of art college and I had a hair shoot for Toni and Guy. This image was shot with my brand new Bowens Esprit 500w strobes that I still use to this day.

My very first commercial shoot way back in 2013, I was straight out of art college and I had a hair shoot for Toni and Guy. This image was shot with my brand new Bowens Esprit 500w strobes that I still use to this day.

This shoot took place in the salon in the evening after their working day. Although this particular shoot required flash lighting, I knew that most of my work in the future will need supplemental lighting too since I've always been an artificial light shooter. All I needed was to figure out which lighting system was best for me: should I just grab a couple of extra speedlights, or should I plump down a lot of money upfront and get some studio strobes which would have everything I needed for my shoots for the foreseeable future?

The two main choices I had were speedlights or strobes, each certainly have their key features and trade-offs.

I don't have the exact figures for back then, but let's look at modern day equivalents in terms of specs and pricing since the same lighting options are still available and nothing new in terms of lighting systems has really been introduced over the past few decades. Apart from LED lighting – this is not strictly relevant as a comparison here as this is a constant light and geared more towards video than stills.

For some reason the most common route many photographers seem to take when they start building their kit is to buy some speedlights. I had a cheap one initially and I know most people always have a speedlight before that have a strobe, but in hindsight I’m not really sure why.

Speedlights are small and light: you can attach them to the top of your camera, and now most modern cameras will also control that flash with incredible accuracy. So I suppose from that perspective, speedlights are the less technically intimidating choice. I also think that it's easier to build your lighting kit piece by piece with speedlights without any seriously large investment up-front - you buy your speedlight then you buy all the little add-ons, slaves, modifiers and so on. You can take your time and build your kit as you go along giving you the impression of saving money, but investing in a strobe kit does require you to make more of an initial investment. However, if you want to make it more financially viable, picking up a kit of lights will save you a considerable amount rather than buying all the pieces individually.

Ten years on nearly to the day, I still have my same strobes. I've certainly added a lot more modifiers to my kit but essentially I've been carting around the same original four Bowens Esprits from the beginning, making these lights a pretty solid i…

Ten years on nearly to the day, I still have my same strobes. I've certainly added a lot more modifiers to my kit but essentially I've been carting around the same original four Bowens Esprits from the beginning, making these lights a pretty solid investment for me.

So before we start out down the road of investing in a lighting solution there are certainly many choices to consider in both the speedlight and strobe camps. We are going to look at the optimal setup; and considering we are starting out we will be looking for value as well as long term investment in quality. There are many cheap knock-off speedlights and strobes available but they are generally not very well made and don't offer long term reliability when shooting for and in front of paying clients, so I won't be considering those here. Remember: we are “investing”.

First and foremost you want know exactly what you want to be shooting; knowing what your “bread-and-butter” work is going to be will dictate your kit. It's easy for wedding and press photographers – they know they need speedlights, no “if’s” no “buts”, they need them to do their job. If something special comes along, then sure they can hire a strobe kit occasionally, but they need the speedlights to be light on their feet whilst shooting.

Still-life shooters like car photographers and other fields that require them to be in a studio 99% of the time will need strobes. They are dealing with detailed work where the quality of the work is paramount for big clients. They need the best quality of light they can get so strobes and their plethora of attachments is the only way for them to go.

For the rest of us though, the decision might not be so obvious. I think for this it just comes down to personal choice of what you actually want to shoot. Fashion photographers can choose to only shoot on location so they might rely heavily on natural light, but other fashion photographers may also only exclusively shoot in a studio so may prefer to use strobes for their specific style. Once you've figured out how you want to shoot you can better make the judgement on your system – there is clearly little point in investing in a flash lighting system if you predominantly work with natural light.

So let’s assume that we want to be mindful of value as we are starting out, but will be predominantly shooting with flash lighting, and shooting for clients with most of our work being done inside in a controlled environment, whether that be a studio, a client salon or even a home-studio. We also want to consider the size of our initial studio lighting kit; realistically a lot can be done with two lights and I will discuss the pricing for that, but to get anything really special and worth charging for you really want to look at three to four lights to be able to offer a client some semblance of choice and variation within the shoot.

So what are some of our choices and what are the pros and cons for each?

My first and only speedlight. &nbsp;I picked this one up when I had to shoot the occasional wedding when I started out. The Nikon SB600 is very light and fairly easy to use even if the menu system is a little convoluted.

My first and only speedlight.  I picked this one up when I had to shoot the occasional wedding when I started out. The Nikon SB600 is very light and fairly easy to use even if the menu system is a little convoluted.

The speedlight-er’s two light studio kit

Please bear in mind that all the prices listed below are guides and I have tried to give an average cost using prices from stores like Amazon. Photographic stores like Calumet can sometimes charge double these prices for a higher quality similar product but conversely places like eBay will charge half for a lesser quality similar product. The resulting final prices reflect this and although you could probably save money on inferior items you could certainly spend more on others.

The actual flash itself; the Nikon SB600 or SB700. These are not top end but they are still very good speedlights and these retail for around £200-£250 each.  Heres the SB700 on Amazon, for higher end options you could also look at the top of the range Nikon speedlight which is currently the SB910 and retails for £339

The light-stand for a pair of speedlights £25-£30. Very flimsy at this price so be aware of the weight of attachment you will be applying to stands like this. 2x 220cm lighting stand.

Attaching the speedlight to the top of a light-stand via a bracket – around £20 each. These will also have the ability to hold an umbrella. Generic ball head hot shoe mount and umbrella bracket.

An umbrella lighting modifier. These vary drastically depending on size and quality but you can pick them up for around £20 each. Lastolight 80cm umbrella.

A soft-box lighting modifier; again these vary drastically but for a reasonable size and quality soft-box that includes the attachment to a speedlight you can pick them up for around £50. Heres a little 22cm x 22cm speedlight softbox by Lastolite.

The speedlight power source; 4 rechargeable batteries £7.50 (realistically you will need at least one spare set for each speedlight so 1 speedlight would require 8 batteries) plus a battery charger at £9. Amazon link.

We will also need to sync our speedlights to our camera; this is one of trickiest pieces to get right as the prices vary so dramatically that you're never quite sure why and if you should go cheap or not. They realistically range from £30-£300 for a transceiver and receiver but you only need to buy one cheap set to realise that you should have spent a little more. You can probably get a decent one for £50-£100 though, (here’s a great review on varying quality triggers and prices by Digital Camera World). Remember that this will only fire one speedlight so to fire two you will need another receiver and that will cost £299 for a transceiver and two receivers.

So to sum up the speedlight kit for two heads:

2x speedlight SB700 at £225 each is £450

2x light stands £25

2x speedlight to lightstand bracket at £20 each is £40 for a pair

1 umbrella lighting modifier £20

1 soft-box lighting modifier £50

Speedlight power source consisting of 4xAA plus 4 spares plus a charger is £24

Speedlight wireless sync including one transceiver and two receivers is £299

Total: £908 for a two light speedlight studio setup

Total for a four light studio speedlight setup is £1816


My preferred lighting weapons of choice, my original Bowens Esprit 500w heads.

My preferred lighting weapons of choice, my original Bowens Esprit 500w heads.

The strobist’s two light studio kit

I chose a good starter option of two strobes with a power output of 400w. This power is going to cover nearly all of your strobist needs for a while and even though not hugely powerful for a strobe it still offers more power than nearly every speedlight on the market. This subject of comparing powers between speedlights and strobes is a slightly controversial one as you can't strictly compare the two power outputs accurately due to several variables such as modifiers on strobes, and speedlights always being focused in their housing. Though, as a very rough guide I know that an SB900 speedlight at full power gave the same exposure as a 300w strobe at 1/4 power.

Currently you can pick up a kit of two 400w Bowens heads for £557 at Calumet. This is actually the newer RX model with the built-in Pulsar radio receivers enabling you to fire the lights remotely from your camera but you can still pick up the older kits without them and they are going for £466 at Calumet.. If you feel that you won't need all that power then you can save a little and go for the 200w heads for around £399.

What do you get with that kit? Well pretty much everything we looked at for the speedlight-ers kit; 2x 400w heads, 2x heavy duty light stands, 2x 90cm Umbrellas, 1x sync lead, 1xPulsar Tx radio trigger (these fire the strobes wirelessly) and a carrying bag for it all.

You could also pick yourself up a soft-box lighting modifier too for around £50-£100 and here's a great portrait size 80cm x 100cm Bownes softbox from Wex for £75.

Total: £632 for a two light strobist studio setup including the extra soft-box.

Total for a four light strobist studio setup plus the two extra soft-boxes is £1264

This shot was taken using four Bowens Esprit 500w heads, 2x floor stand, 1x small softbox, 1x strip softbox, 1x 60 degree reflector, 2x umbrellas and a variety of gels. Most of this equipment comes straight out of the initial 2 kits I originally pur…

This shot was taken using four Bowens Esprit 500w heads, 2x floor stand, 1x small softbox, 1x strip softbox, 1x 60 degree reflector, 2x umbrellas and a variety of gels. Most of this equipment comes straight out of the initial 2 kits I originally purchased over a decade ago.

So to recap, if you are looking to be shooting in a home studio or at clients’ premises or anywhere that you can drive to, and has power, the strobist setup is definitely the only choice in my opinion. The speedlights will take up a lot less space; they will be a lot lighter and will always be the go-to choice for wedding, press and any other shooter that has to be light on their feet. But for home studio users like portraiture, model portfolios etc, the strobes are certainly going to offer the best versatility and value in the long-term.

Like I mentioned at the start, I think people start down the speedlight-ers path because it’s easier to build your kit piece by piece. I think we all start out with a speedlight, play with that on the camera for a few months then maybe buy a couple of modifiers then eventually think about getting it off the camera and pick up some wireless triggers. That's the natural progression but if you know you want to stay the course with your photography and you have the money for the initial investment upfront, going for the strobist kit it will save you money long-term for sure.


There are of course many other things to consider between the speedlights and strobes – light quality, which I believe is the most important factor. Light quality is something rather subjective and like everything else, needs to be traded off against other variables. This is a huge subject and beyond the scope of this article, but I will certainly be testing and exploring it in the near future.

A final word on that investment statement is that the four Bowens Esprit 500w heads that I bought and used on that first shoot straight out of college over a decade ago. I actually still use those same four heads today. That’s a pretty good return on my investment considering I've had four digital cameras since then and they cost a lot more than all my lighting equipment combined many times over.

But please, by all means if you have an example of a great starter kit for speedlight or strobe shooters then please feel free to share them in the comments down below.


Further reading...

So you've got your two lights, here's a great and simple way to use them with this lighting set-up and diagram 'Using Two Lights to Create Incredibly Flattering Portraits'

Still not convinced you want to take the plunge on investing in a strobe kit, why not look at a cheap alternative to a studio lighting set-up by reading this article on 'Taking Studio Lighting Shots for Under £25'

Think you'd like to expand your kit even further? Here's a lighting set-up with lighting diagrams on 'Your Basic 6 Light Set-Up'

Tuesday 07.22.14
Posted by Jake Hicks
Comments: 4
 

How Copying other Photographers can Help Develop a Personal Style

Technique Tuesday How Copying other Photographers can Help Develop a Personal Style.jpg

We've all done it, we've all denied it, we aren't proud of it, but I guarantee that at some point on our creative journeys each and every one of us has copied somebody else's work.

It's one of those things we tend to feel bad about, it’s like invisible theft, nothing has changed hands but you now have something that somebody else had. Because of this feeling of stealing, we all vehemently deny it and desperately scramble to try and find differences in the work.

I personally feel that the act of copying others is at an all time high in the photographic industry right now, and there's a few reasons for this. Firstly we are all becoming visually saturated by literally thousands of images every day now with Facebook, Instagram, Pininterst etc etc. The list is huge and ever growing so it's only natural that we’re going to produce an image like we've already seen somewhere along the line. Secondly though, and I think most interestingly, we copy one another far more now than ever because of the pace that the medium of photography is evolving at.

'Photographers' can take images within the first week of owning their first camera and that certainly wasn't possible by masters of the craft 25 years ago. Technology is also filling in the knowledge gaps and giving a helping hand where needed. Plus the affordability and accessibility of the equipment is within reach of even the most basic consumer too.tha


So why all the copying?

I think it comes down to a mindset and a false sense of security within the medium itself. I’ve bought all the gear and I want to use it. I don't want to have to learn how to use it at University for three to five years. I want results today. And why not?

Photography is not alone with this modern need for instant results, in fact nearly anything that employs technology to garnish results has fallen foul to this idea. We've spent good money so we expect outstanding results. Technology enables us to run before we can walk, so we inevitably run regardless of the consequences. So what does this actually mean for us photographers? Well it means we get stuck-in and start using the equipment without be taught how to use it, the only way, and I mean the only way this technique can produce results is to copy others.

There, I said it. It's out there.

The image on the left was taken in 1929 by George Hoyningen-Huene for Vogue. The image on the right by Mikael Jansson for Interview Magazine May 2012. Hoyningen-Huene's entire style of the time was models in bathing suits posed in classical sculptur…

The image on the left was taken in 1929 by George Hoyningen-Huene for Vogue. The image on the right by Mikael Jansson for Interview Magazine May 2012. Hoyningen-Huene's entire style of the time was models in bathing suits posed in classical sculpture poses. Mikael Jansson's 2012 editorial was clearly influenced by this as it is a complete removal from his straight to camera posing and separate model shots. Although this is a direct copy its clear to see Jansson's personal influence as he shifts the plane to add depth and reinterprets the lighting to enhance form. This is an evolved copy.


Is a Formal Photographic Education Still Important?

A while ago I was interviewed by a University and one of the questions I was asked was;

'Do you still feel a formal education in photography is an important factor to success?'

The following was my response;

'I think formal education in photography is extremely important and I would recommend it to anybody. Formal education provides you with the unbiased tools to help any photographer realise their own individual creativity. I see a lot of photographers announcing they are 'self taught' like it's a badge of honour. Not only do I find this ironic, 'yeah I'm self taught by hundreds of other photographers on YouTube', but it's also stating that 'look at my work, its good and I taught myself'.

I know personally that my photography would be nowhere near as good today had it not been for my formal photographic education. I guarantee that a lot of great photographers out their today who actually have their own individual style are the ones who were formally educated. The people copying them were not.'

I think it’s pretty clear to see where I stand on the topic, and granted there are some bold sweeping statements in there but please, just let me briefly elaborate and hopefully explain what I mean.

I was fortunate enough to be taught what the tools can do, not how to use them. There is a very small but very important distinction here. Once I am aware what can be achieved I am left to figure out how to achieve it. This by its very nature builds individual style, something that is very difficult to maintain with technology.


Technology is diminishing our individuality and personal style

For example; if I was to put five photographers in a room with five cameras, five tripods and five light meters and asked them all to photograph the apple on the table in front of them, how different do actually think those images would really be?

The technology is going to get in the way of the creative process and the results will reflect that. Now imagine putting five artists in the same room and asking them to produce an image of the same apple but all they had was a brush, a box of paints and piece of paper, imagine how varied those paintings would be in contrast.

Technology is getting in the way of our creativity by distorting what it means to be a photographer. It is diminishing our individuality and thus our personal style.

The image on the left was shot by Patrick Demarchelier for Harpers Bazaar for the December edition in 1992. The copy on the right was for the December issue in 2013 and recreated by James White. I think its pretty clear that White was requested to c…

The image on the left was shot by Patrick Demarchelier for Harpers Bazaar for the December edition in 1992. The copy on the right was for the December issue in 2013 and recreated by James White. I think its pretty clear that White was requested to copy Demarchelir, whether it was by the magazine or an art director, either way this is an example of a direct copy but White still applied his own style, most noticeably with the lighting . He decided to soften the whole look, whether for his own benefit or for Kidman's. The light in White's' image is far more flattering and by adding additional lights from behind he's enabled more dimension with the very diffused key light. I would definitely argue that this is an evolved copy.


Copy with Pride

If you've read this far then congratulations, you're nearly there but let's just quickly recap the ranting and refocus the point of this article. Photographic technology is empowering us to be 'better' photographers. With modern equipment we don't need to go to school to learn how to use the kit and get all smelly in elbow deep toxic chemicals, we can take a 'great' photograph very easily on our own, the camera does that part.

So now we can take 'great' shots, what's next? Well now we need to look at other photographers work to get ideas on what's possible because remember, we haven't been taught what's possible, we've only been taught how to get there and the camera is doing that bit for us. So finally the copying begins.

Copying has been around forever, its only now that with thousands of people seeing our images that it's become so difficult to get away with it and hide. So don't hide it, be open about it. Embrace the copying because you will not get away with it, we are all simply too connected these days to hide it, somebody will always catch you out. That's exactly what legendary photographers Mert and Marcus did, they were honest about it right from the get-go and they were proud of where they were coming from. 

The two images on the left are from legendary fashion photographer Guy Bourdin. Bourdin made a big name for himself in the 70's by using filters to exaggerate and saturate the colours in his photographs. Mert and Marcus who shot images like the Gucc…

The two images on the left are from legendary fashion photographer Guy Bourdin. Bourdin made a big name for himself in the 70's by using filters to exaggerate and saturate the colours in his photographs. Mert and Marcus who shot images like the Gucci advert on the right openly copied this style but took it forward by using modern digital manipulation techniques to achieve the same 'hyper-real' saturated colours. A style that would stay with them right up until the present day.

Mert & Marcus

Mert and Marcus are an incredibly famous fashion photography duo that specialise in photographing nearly every female icon of the past two decades and imortalising them on every front cover imaginable. Their work is bright, bold and they always portray their female stars as powerful, sexy and glamorous icons of their time. You will have seen their work even if you don't know it, but how have they carved out this style? Well, they copied it. Mert & Marcus are self professed copycats at that, they aren't shy about it and why should they be, their work speaks for itself. It’s harder to see now, but twenty years ago their inspiration came from the legend Guy Bourdin. Bourdin was their 1970's equivalent and a quick peruse over his work will show you that he photographed the exact same qualities from his female subjects and portrayed them in bold, brash super saturated colours, making them leap from the page. But Mert and Marcus didn't stop there, in fact they have actually made a career out of openly copying others and adding their own personal evolved style to it and usually to great effect.

I'm sure we all remember the Madonna Album cover from a few years ago (right hand image). This was shot by Mert and Marcus but they copied the fluted glass effect from Erwin Blumenfeld's 1943 portraits (left hand image). Personally I have a lot of r…

I'm sure we all remember the Madonna Album cover from a few years ago (right hand image). This was shot by Mert and Marcus but they copied the fluted glass effect from Erwin Blumenfeld's 1943 portraits (left hand image). Personally I have a lot of respect for the nerve it must of taken to even suggest the technique for an album cover for a mega star like Madonna. Conversely, respect is also due to Madonna for choosing to go with it. For somebody whose self image is as iconic as hers, it was certainly a bold decision to then distort it. Also note the distinctive saturation that is present in the Mert and Marcus image, a style choice that is always present in their work.

So if Mert and Marcus are self confessed copycats how can this be morally acceptable and what makes them different? The catalyst comes from the fact that Mert and Marcus aren't classically trained. I think they had backgrounds in music and graphic design respectively so the only way they could photograph at first was to copy. So how do you copy somebody but remain unique? Well Mert and Marcus took Bourdins style and simply evolved it. The biggest change they made though was to add the huge string of technology to their bow. Their work pushed the digital medium right from the beginning and they made sure their images stood above the rest by simply being ahead of the curve with their digital manipulation and it became their style. They took the Bourdin style of saturated colours that he achieved with filters years ago and added the new era of digital to create their 'hyper-real' look. In an interview with them in The New Yorker in 2004 Grace Coddington (director of Vouge at the time) spoke about Mert & Marcus’ style and referenced a shoot they had done the previous year in Dubai.

They do not hide the fact that they do so. “It’s very fakey, fakey, fakey, but that’s what it’s supposed to be,” Coddington said. Even real things seem fake: a year ago, they traveled, at great expense, to the desert of Dubai to shoot a campaign for Louis Vuitton. In the end, the dunes looked computer-generated anyway.'

The Jean Paul Gaultier Jeans advert on the left was shot in 2009 but Mert and Marcus took that shot and copied it in their own style in 2013. They applied their loose composition technique, an off-kilter look that emphasises an instant and more pers…

The Jean Paul Gaultier Jeans advert on the left was shot in 2009 but Mert and Marcus took that shot and copied it in their own style in 2013. They applied their loose composition technique, an off-kilter look that emphasises an instant and more personal feel to the crop but most importantly they have applied their highly saturated look that has stayed with them right from the early days of the Guy Bourdins influence. They have copied it, but evolved it.

Admit it and move on

So it’s fine to copy, like I mentioned at the start, we all started out doing this but if we accept we are copying we have to evolve past it. The key is to not hide it, especially at the start, don't deny you're copying somebody if you are. It's part of the creative process and for those who are 'self taught' you have to copy whether you like it or not because nobody is showing you how to create, you are only left to copy what you've already seen. By accepting this I think it enables us to move past this copying stage far faster and your personal style can emerge on the other side far quicker and far more defined. It's just human nature for us to reject and feel bad about copying, if we acknowledge we are copying we are forced to move on very quickly because although we've acknowledged we're copying we aren't proud of it.

We all inherently want our own voice.

Finally we have Mert and Marcus' most famous copy. On the left we have two images by Jeff Bark from 2009 and on the right we have the 'copy kings' Mert and Marcus doing what they do best. This particular photoshoot of theirs caused huge controversy …

Finally we have Mert and Marcus' most famous copy. On the left we have two images by Jeff Bark from 2009 and on the right we have the 'copy kings' Mert and Marcus doing what they do best. This particular photoshoot of theirs caused huge controversy at the time and although they're very open about their copying, they do usually make more of an effort to add their own mark than this. In fact I am personally inclined to believe that this may well of been more of a marketing ploy by them at the time and a risky one at that (I'd also like to point out that this was huge exposure for Jeff Bark too and if you google the guys name, its always these shots that appear). I don't think there is actually many high profile shooters who could get away with this level of immaculate copying without receiving huge back-lash from the industry. I think it's because Mert & Marcus have always been so open about their copying in the past that everybody just accepted it as just that, a copy and everybody appreciated it for what it was. Brave, but bold and Mert and Marcus made considerable ground on making copying more acceptable purely because if top tier shooters like them can do it, then we all can.


Help me Evolve too

So I'd like to caveat my earlier sweeping statement in my interview, 'I guarantee that a lot of great photographers out their today who actually have their own individual style are the ones who were formally educated.'

I would like to add that although a formal education can actually quicken the process of an individual style, I do believe that copying others and accepting it as such can also be the seed of an individual style.

Here we have an example of a photographer being inspired by my work. This photographer got in touch with me a few months ago thanking me for my tips and tutorials and sent me a few shots to have a look at. The images on the left are my images and th…

Here we have an example of a photographer being inspired by my work. This photographer got in touch with me a few months ago thanking me for my tips and tutorials and sent me a few shots to have a look at. The images on the left are my images and the images on the right are their copies. Remember copying is not a bad thing whilst you're developing a style, so resist the temptation to replace the word copy for inspiration at this stage.

A few months later and this is that photographers images now, in fact some of these were actually shot just weeks after he initially sent me his first shots. You don't need a PhD in art theory to see that these are definitely no longer copies. The p…

A few months later and this is that photographers images now, in fact some of these were actually shot just weeks after he initially sent me his first shots. You don't need a PhD in art theory to see that these are definitely no longer copies. The photographer has evolved the look and developed a clear individual style very quickly. I personally think these images are stunning and I'm certainly impressed by his interpretation of my work, on top of that I will certainly be looking at exploring a darker look to some of my own shots in the future and see where that takes my own personal style.

I personally get sent photos all the time from photographers who are practising my techniques. Sure they're copying me, they're acknowledging it and they're telling me. It's a great process, we discuss the shots they've taken, they reshoot it and without exception the next shoot has evolved and an individual style is starting to already emerge. But it doesn't stop there. I share my techniques, people send me their shots using my techniques and I see new ways of developing my own style too, it's win-win so I love it when people send me their copies.

So go ahead, please send me your copies and allow my style to evolve too :D


Do you agree?

Thank you as always for reading this article. I appreciate your time is important so I am certainly grateful that you decided to spend it here. But what do you guys think about copying? Do you think it’s a valid form of learning? Have you ever copied someone else’s work? Did you mention your inspiration in your final pieces, or did you simply deny it? Let me know in the comments below.


Resources

Photographer: George Hoyningen-Huene

Photographer: Mikael Jansson

Photographer: Patrick Demarchelier

Photographer: James White

Photographer: Guy Bourdin

Photographer: Mert & Marcus

Photographer: Erwin Blumenfeld

Photographer: Jeff Bark

Photographer: Edit April 2017- The photographer who originally took inspiration from my work at the end of this article has asked for his name to be removed from this article.


1477588220230-2.jpeg

More Free Tips & Techniques

Thanks as always for checking out my articles. I know your time is precious and there’s almost an infinite amount of other things you could have done with the last 15 minutes of your life, so I really do appreciate you checking this out :)

If you’re after more tips and tricks on studio lighting then don’t forget to check out my monthly newsletter and my free 10 page pdf on studio lighting techniques. If you’re interested then follow the link below and download it immediately.

Did you receive my FREE 10 page PDF on Studio Lighting Tips yet?

Sign up to my monthly newsletter and receive my free 10 page pdf of my all time ‘Top 10 Photography Tips & Techniques’.

Once a month I’ll send you a newsletter of at least four photo related tips and tricks (one for each week I post them on here if you miss them) plus I’ll also keep you apprised of my new workshop dates as well.

Sign up now and you’ll get yourself a FREE 10 PAGE PDF of my all time ‘Top 10 Photography Tips and Techniques’!

NEWSLETTER SIGN UP - PLUS FREE 10 PAGE TECHNIQUES PDF

banner offer text 2000px gel packs.jpg

banner offer text 2000px video tuts combined.jpg
Tuesday 07.01.14
Posted by Jake Hicks
 

Testing your lighting attachments for light fall-off

I had an hour or so spare in the studio the other day whilst waiting for a client so I thought I'd have a quick look at the light fall-off of some of my attachments. Why would I bother doing this you ask? Well its not quite as ridiculously geeky as it first sounds. We all need to know our equipment and for those of us that have been shooting a specific camera for years will tell you, it becomes an extension of yourself and you could happily operate it in the dark because we know it so well. The same theory should really apply to all the equipment you own and you're probably going to have your lighting kit a lot longer than your camera so it's a great idea to find out exactly how its responding. As a result you will have a better understanding of light and how you can control it and with this knowledge it will mean you can easily pre-visualise how a set-up will look and more importantly you will have a better idea of whats going wrong if the resulting image isn't looking right.

Lighting set up lighting fall-off test

The experiment was set up like this, the strobe was locked off and wasn't moved throughout, it was angled at 45 degrees to the wall or 135 degrees, however you want to look at it. The flash was set to a constant power throughout the test and the camera settings were also fixed at ISO 100, 1/160 second at f16.

Clicking on the images below will enlarge them.

View fullsize 1 4th grid.jpg
View fullsize 1 8th grid.jpg
View fullsize 60 degree.jpg
View fullsize 65deg.jpg
View fullsize 120 deg.jpg
View fullsize big sb.jpg
View fullsize bigbd.jpg
View fullsize small sb.jpg
View fullsize smallbd.jpg
View fullsize snoot.jpg
View fullsize grids.jpg
View fullsize attachmentsall.jpg

The results

The findings were measured like this, everything  was set and unchanged throughout, the only adjustments were the actual swopping of attachments. A light meter reading was taken at point X on the wall and at both point I's on the wall also. The resulting fall-off of light was recorded with a light meter at each of these points and recorded.

Data reads as follows - Attachment Name - Reading at Point X - Reading at first Point I - Reading at second point I - Total number of stops of light fall-off

  • Large 21" Beauty Dish with diffusion cover  - f8 - f6.2 - f5.2 -   Total of 1.25 stops of fall-off
  • Small 15" Beauty Dish no diffusion cover   - f15 - f10 - f7.3 -   Total of 1 stop of fall-off
  • 65 degree deep reflector dish   - f12 - f9.5 - f8 -   Total of 1 stop of fall-off
  • Small Soft-box   - f8 - f6.7 - f5.6 -   Total of 1 stop of fall-off
  • 120 degree wide angle reflector   - f8.7 - f7.3 - f6.2 -   Total of 1 stop of fall-off
  • 15 degree Snoot   - f5.6 - f4.8 - f3.4 -   Total of 1.25 stops of fall-off
  • 60 degree reflector dish   - f9.5 - f8 - f6.7 -   Total of 1 stop of fall-off
  • 60 degree reflector dish with 1/8" grid   - f8 - f4.8 - f2.8 -   Total of 3 stops of fall-off
  • 60 degree reflector dish with 1/4" grid   - f8 - f5.6 - f4 -   Total of 2 stops of fall-off
  • Large Soft-box   - f8.7 - f6.7 - f5.6 -   Total of 1.25 stops of fall-off

Clicking this spreadsheet will enlarge it

So apart from that being an excuse to finally use a spreadsheet what purpose did it actually achieve? Well it was pretty much as I expected but it was interesting to see the brightest and darkest attachments for the same power output. The 65 degree deep dish outputting the most power over the 15 degree snoot loosing the most. It's also easy to see on the chart above how they all drop off over distance with the most aggressive clearly being the grids. There were a couple of things I did learn though, the grids were far more controlled than I had originally anticipated. I actually thought the snoot might of had more control of the light than it did and in the chart above you can see its fall-off of light is a lot more gradual than I first thought. The other thing that struck me was how much fall-off of light the big soft box produced. It actually had 1.25 stops of fall-off compared to the small soft-boxes 1 stop. In reality you'd think that a large open spread of light like that would have a consistent reading throughout the 24" range and as a result I took multiple readings because I was sure it was wrong. The only thing I can reasonably surmise from this is that at close range like this (36") the large soft-box does not have time to spread and on further inspection I realised that it did not have an internal baffle to further scatter the light. So as weird as this sounds, at close range in its current baffle-less state you would actually get a more uniform and softer light from the small soft-box.

If you have a quick half hour I do recommend trying this experiment with your own attachments, yes its pretty nerdy but it will definitely help you better understand your kit and it may even show you something you weren't expecting as it did for me (and yes I'm pretty sure a spreadsheet of your findings is mandatory).

Monday 06.02.14
Posted by Jake Hicks
Comments: 5
 
Newer / Older