• Technique
    • Latest Techniques
    • FREE TIPS
    • Quick Tips
    • Video
    • Site Search
    • Blog
    • Archives
  • Mentoring
  • >Online Workshops<
  • Workshops
  • Studio Lighting Books
  • Contact
    • Newsletter
    • Contact
    • Statement
Jake Hicks Photography
  • Technique
    • Latest Techniques
    • FREE TIPS
    • Quick Tips
    • Video
    • Site Search
    • Blog
    • Archives
  • Mentoring
  • >Online Workshops<
  • Workshops
  • Studio Lighting Books
  • Contact
    • Newsletter
    • Contact
    • Statement

5 Bizarre Photo-Tech Relics You've Forgotten About

I ordinarily share nerdy lighting setups and techniques, but with it being a very busy week for me, I thought I’d share something quick and lighthearted instead. Hopefully you’ll still appreciate this quick jaunt down this photo-related memory lane.

Recently an old friend and I were chuckling over some long-forgotten photo-tech that in hindsight, looks pretty damn bizarre! So here are 5 of the more commonly known ones that for better or worse many of us still remember.

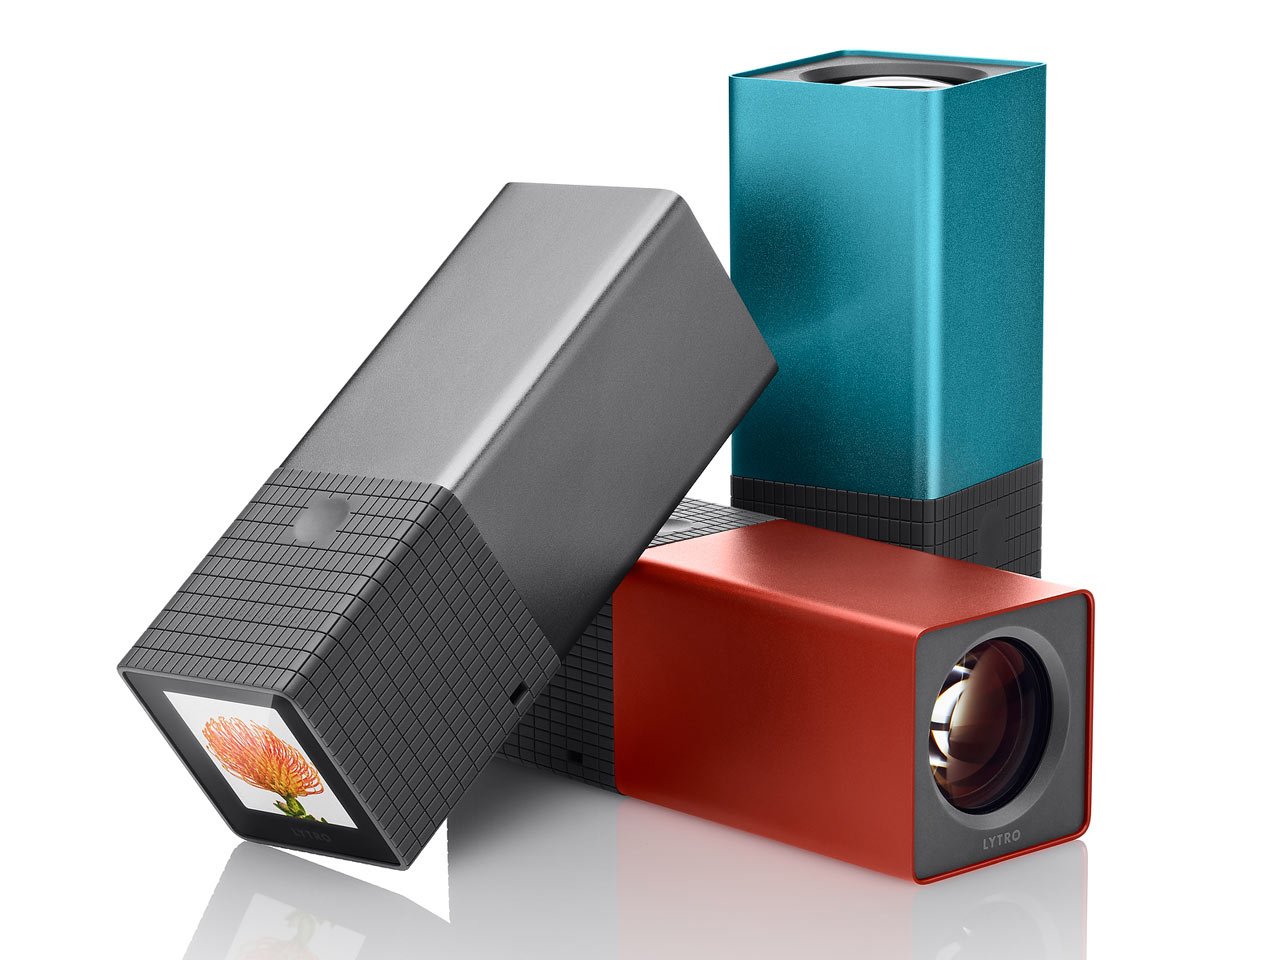
One of the most unusual-looking cameras ever to make it to market, is the Lytro. But the Lytro didn’t just get attention for its Bizarre shape as it also enabled photographers to focus the image after it was taken.

The Lytro Camera

For those of you who were around 10 years ago, this quirky-looking camera was constantly in the press as it boasted a very bizarre feature. The Lytro camera could in fact take perfectly sharp images every single time. How? Thanks to its “proprietary light field science” that’s how! Essentially the little 5-inch long f2 camera and its light field sensor captured the entire scene in front of it, which consists of 11 million light rays of data (11 Megarays) and then displayed the image on its 1.5-inch rear LCD screen. The user could then choose the focal point after the shot had been taken.

Of course, this tech was running in real-time and capturing the scene constantly so there was no shutter delay or lag and no time is taken for the lens to focus either, resulting in a truly instant capture device that didn’t even require the photographer to choose a focal point in the frame as that could all be done later. At the time we grumbled that it took the creative spirit out of photography, as essentially re-focussing the image after the fact was seen as cheating somewhat. Granted the previous generation of photographers had said the exact same thing regarding autofocus. There was no skill to autofocus and again it was deemed as cheating. But unlike autofocus, Megarays never really took off in the photographic market.

Back in 2012 when the Lytro camera was released, this 1.2-megapixel monster sold for $399 and $499 for the 8GB and 16GB models, but the hype quickly died down. It could easily be argued that nearly $500 was a lot of money to pay at the time for a 1.2-megapixel camera. You have to remember that back then, Canon released its EOS 5D Mark III that boasted a 22.1 megapixels full-frame sensor and even Nikon managed to bring out a half-decent camera that year in the form of its D600 full-frame 24.3-megapixel sensor. Photographers were still chasing the ‘bigger number = better’ dream back then and Lytro offering to focus your images for you simply wasn’t enough to get this camera off the ground.

It wasn’t long before Lytro took their light-field tech and tried to implement it in other fields and in 2015 they pursued VR video capture cameras for use in CGI. Sadly this new-tech story ends like so many others as it was reported that Lytro was acquired by Google, although it’s rumoured that just the Lytro employees were acquired (further clarity is needed on that though).

So for now it looks like we’re all stuck focusing our own photos as the Megarays are sadly no more. Interestingly though, if you go to the www.lytro.com website, it relocates you to the Raytrix brand that is still using the light field tech to capture detailed moving parts in machinery and even medical science in 3D. It certainly looks like a clever end-use for the technology.

Wiki - Lytro Camera

DP Review - Lytro Announcement

Raytrix - Light Field Tech

The light field technology shows how you can choose a variety of focal points after the image had been captured.

Apparently, a selection of colours was also available

This image best shows the small scale of the camera


Star in your very own sci-fi movie and make yourself a social pariah in the process. The very controversial Google Glass truly offered you a camera everywhere and anywhere.

Google Glass

This next item could be argued as more of a piece of tech or gadget rather than an actual camera, but Google Glass did highlight a few concerns regarding privacy and data collection that comes with having an ever-present and wearable camera.

Many have argued in the past that, ‘the best camera you have, is the one you have with you’ and Google Glass really pressed that mindset by releasing a camera that was designed to be with you at all times and worn at all times. Quite literally never miss another shot as your camera is always ready to go and a simple tap on the glasses frame can capture an image.

Google Glass was released in 2014 for a cool $1500, but to be fair, Google packed a lot of tech in a very small space, especially for the time. The camera was actually fairly impressive for its size as it boasted a 5MP camera and 720p video along with 16 GB of storage. So why didn’t this take off?

Putting aside the fact that Google suffers from ADHD and can’t focus on any project for longer than it takes to sip a venti Americano Misto before getting bored and wandering off, Google Glass was certainly met with a lot of resistance. Glass released its product to a select few qualified "Glass Explorers" (I’m not making that up) and some of those ‘explorers’ were even well-known photographers at the time who certainly sung its praises, but again, it couldn’t cut through the public negativity surrounding a product that we all feared was recording us at all times. In reality, the Glass could only actually record 10 seconds of video and it still had to be triggered by the user. But we all think those businessmen who seemingly wear those Bluetooth headsets to bed look like idiots, so imagine being sat in a bar with a chump wearing this thing strapped to their face the entire time! I think we were simply just too vain for this to garner any appeal to those with any self-respect.

As I mentioned a moment ago, Google Glass did bring to bear some serious questions about privacy concerns though. It was never clear if you were being recorded by it, so unless you were happy to be a social pariah or punching bag, you simply weren't going to be wearing this whilst visiting the mens room!

Having our phones with us and the camera that comes with it at all times was enough for us. The wearable camera died almost just as soon as it was released and a collective sigh of relief from introverts the world over was certainly sure to follow. Bear in mind that Glass was released to the public in May 2014 and in January 2015 Google announced it would stop producing the prototype. Google did then go on to release Google Glass Enterprise Edition in 2017 and in 2019, Google announced the Google Glass Enterprise Edition 2.

I’ll be honest, I had no idea they were still being made as I’d not heard anything about them in years. But alas it was not meant to be and in 2023 Google announced they’d discontinue the Enterprise Edition 2 and all support ceased later that same year.

Granted, I don’t think this product was ever targeted at photographers specifically, but the camera that’s always with you is an enticing idea. After all, I’m sure we can all agree that there are plenty of fantastic shots we’ve all missed due to not having a camera or simply not being fast enough to get set up. I assume a Google iris implant is just around the corner and having ads beamed directly into your retina every three and half minutes will be a small price to pay for us being able to capture the cat falling off the sofa.

Wiki - Google Glass

Screenrant - What happened to Google Glass?

Google Glass had several models over the years

Plus they could even be attached to your prescription glasses too


What started as an April Fools joke, soon escalated into a cult following. But is the 35mm digital film canister destined to remain a joke forever?

35mm Digital Films

This next one is more of a series than an actual product, but oddly, it all started with an April Fools joke. Back on April 1st 2011, design company Rogge & Pott posted about their latest ‘product’, the Re-35. Essentially the idea behind it was to use a flexible sensor that would lay across the film plane of any 35mm camera and the images captured were then stored in the 35mm canister ready to be downloaded afterwards.

The April Fools got a little out of hand at the time because the joke seemed legit, it seemed like such an obvious solution to revive all of those old cameras that we now only use as ornaments behind us in Zoom calls. Sadly, it later came out that it was indeed an April Fools and once again our old cameras were put to rest.

At the time the design company had to put out a disclaimer stating it was fake, but they also had this to say “there is a gigantic community of photographers with analog equipment out there that is desperately waiting for a product like this to come along”. As disappointing as this April fool's news was, they were right, there indeed were a ton of people who were desperately wanting a product like this.

Fast forward to 2018 and a very similar product appears that is trying to make the joke a reality thanks to the persistence of the Hong Kong based ‘Film 35’ product.

Film 35 is extremely similar in design to the fake Re-35. A 35mm canister attached to a flexible-looking sensor strip that you inserted into your camera. The Film 35 even boasted some decent specs too. You could shoot jpegs and even raws, the resolution was 12mp and it even had ISO settings from 100 to 12800. It had a battery life of 150 shots and you could store images via Micro SD plus it even had external WiFi! This was shaping up to be a very legit product and I for one wanted one.

Sadly, funding for Film 35 fell short and in my opinion, I really feel like this was a marketing issue as it looked to be a very promising product. Ironically, had they gotten the original April Fool's design agency Rogge & Pott to promote this, this ingenious little product may well have made it to market. The wait continues for another contender to take up the digital 35mm film canister mantle.

Re-35 - April Fools

Kickstarter - Film 35

Touted specs of the Film 35 digital film canister

Resulting image taken with the digital sensor on a 35mm analogue camera


The Light L16 camera certainly turned a few heads with its very distinctive look, but was its camera-bag-in-your-pocket approach to photography enough to ensure its success?

Light L16 Camera

Some of you may instantly recognise this very odd-looking camera and the promo images of its SIXTEEN lenses certainly gained a lot of attention. In 2017 the company ‘Light’ released the L16 camera as a “breakthrough optics design with never-before-seen imaging technology to bring you the camera of the future.” But what did this odd-looking camera actually do? The camera boasted a focal range of 28mm up to 150mm and it delivered 52mp images all while being only slightly bigger than a phone. The camera was essentially trying to put your entire camera kit of DSLR and lenses in your pocket and for the most part, it succeeded.

Upon release, it was extensively reviewed, but sadly it didn’t perform well. Yes, it certainly took the full focal range of images as it promised, but it did this by stitching images together from its 16 lenses. When you hit the shutter the L16 took ten 13mp images and then stitched them together resulting in a monster 52mp final shot! There was really no other way to make a 150mm lens short enough to fit in your pocket, but during this stitching process, artefacts and mismatched seams between the shots were visible under closer inspection.

It was a very interesting idea and although adjustable focal ranges are possible in many smartphones, they zoom in using a ‘digital’ zoom which simply crops into the original shot you took. The L16 however was using optical lenses to capture various focal lengths and some of the full zoom 150mm shots of buildings are incredible considering this thing is only 24mm thick!

So again, why did it fail? It delivered what it intended and it seemed like a street photographers or nature photographers dream to have your entire lens collection in your pocket. The issue was the stitching of images and some disappointing results in low light. This would be fine for most casual photographers though as you really did have to look closely at the shots to see these flaws. The issue with all this was the target audience. The L16 cost a hefty $2000 at launch and that price point is going eliminate all but the most hardcore casuals. That was a hefty price tag certainly aimed at professionals, but sadly it just couldn’t deliver professional results.

The L16 was yet another piece of camera tech relegated to bizarre-looking memorabilia and in 2020 the company Light turned its attention to the mobile market. To be fair, it made total sense and there is infinitely more money to be made there and last I heard, they did actually make a new multi-lens Penta-camera that went in the Nokia 9 PureView.

The Verge Review - L16 Light Camera

DP Review - L16 camera manufacturer Light abandons consumer imaging

An image showcasing the impressive optical zoom variations of the Light L16

L16 promotional image

Light went on to develop a Penta-camera setup on the Nokia 9 PureView


Arguably one of the coolest looking cameras ever made, but behind this steampunk monster is the story of a corporate giant's downfall.

Kodak’s First Digital Camera

Many of the camera relics on this list could be argued as failures. Although the Lytro camera died very quickly, its light field technology paved the way to be used in other industries and even the short-lived L16 camera was a tech demo on how to pack optical lenses into a phone-sized package that ironically went on to be used in that market. But Kodak's first digital camera is far from a failure, it's just tragic how shortsighted Kodak was with the tech that they’d bizarrely pioneered and then swiftly abandoned.

The New York Times did a great write-up on this and I’ll link it below, but essentially in 1973, Kodak hired a 22-year-old lad called Steven Sasson to sit in some abandoned broom cupboard in the basement to work on some crazy new ideas. One of these ideas was involving this brand new piece of tech called a charged coupled device (C.C.D.). 2 years later Sasson emerges with what could arguably be described today as a prop from a steampunk movie, but it was in fact the very first digital camera.

Sasson initially struggled with the CCD as it couldn’t hold the quickly dissipating electric pulses of the image. Instead, he decided to use a new process called ‘digitalisation’ which instead turned the electric pulses into numbers that he ultimately got stored onto magnetic tape.

You have to remember, this was the early 1970s, home computers weren’t even available at this time, so this tech was certainly pushing the boundaries. Sasson’s first camera took 100-pixel by 100-pixel black and white images and the process was surprisingly fast. You took the shot and then 23 seconds later the image would be written to the tape. You then simply pop the tape out and display it on a TV.

This demonstration was given to the Kodak executives, but it failed to excite them and according to Sasson, “They were convinced that no one would ever want to look at their pictures on a television set.”

Sadly we know how this story ends as although Kodak were quite literally at the forefront of this technology, they were reluctant to develop a product that would take customers away from their colossal film sales market. This would be the start of their inevitable downfall and in 2012, Kodak filed for bankruptcy.

As I mentioned, the New York Times did a great write-up on this which I highly recommend you read as it is a crazy tale of how shortsighted major corporations can be when it appears as if the money will endlessly roll in. Regardless though, I’m so happy this steampunk-looking photo relic was preserved from Sasson’s dungeon as it's one of the coolest-looking functioning cameras out there.

The New York Times - Kodak’s First Digital Moment


Thank You

As always, thanks for checking out this article and spending a little bit of your day with me here. I hope you found it useful and if you left with a little more knowledge than when you arrived, it’s been worth it.

If you have any questions or comments, or if something doesn’t make sense, by all means, fire away in the comments below and I’ll do my best to answer what I can. Thanks again and I’ll see you in the next one.

Don’t forget to sign up to my newsletter to be sent all of these photo tips and techniques articles every month in case you miss one.


JHP Livestreams…

If you give this setup a go, I’d love to see how the shots turn out, so feel free to share them my way. One way to do that is via my Livestream. I Livestream every other Tuesday night via my FB Page and there I answer your questions, critique your shots, take community images into Photoshop to work on them and discuss all manner of lighting tips and techniques. I look forward to seeing you and your work there real soon. JHP Facebook Page


ONLINE WORKSHOPS - LEARN MORE
JHP COLOUR GEL PACKS - BUY NOW
LEARN MOREONE-2-ONE MENTORING - LEARN MORE

 
Tuesday 05.23.23
Posted by Jake Hicks
 

Rotolight's LED Flash Duration

We rarely see any big changes in the flash lighting world, but one area that is constantly evolving rapidly is LED lighting. One of the more interesting innovations we’ve seen come out of that field is LEDs that can also flash. But what does that really mean? How are LEDs actually flashing and is it a feature you need?

As many of you know, I’m currently a ‘Master of Light’ for Rotolight who are a U.K. based LED lighting manufacturer. Essentially that title means Rotolight deem me decent enough to use their lights to their fullest potential and that I have the ability to share my thoughts on them via socials and in-person training. But why on Earth would they choose me? After all, for the past 20 years I’d been happily using my flash heads alone, I’d never really used an LED light before and for good reason. Until now.

I’ve been using studio flash for 20 years, why change to LED now?

In the past, I’d always felt LEDs were a far-cry from being the ideal solution compared to flash for several reasons, paramount among them, being their limited power unless you spent a ton of money. The white light from older LEDs was often a sickly green instead pure white and the LED colours themselves were usually muddy and indistinct. Yellows were often light green and the reds were closer to dark orange than an actual rich red colour.

As a heavy colour user myself, this was a complete no-no, but it wasn’t until a chance meeting at a studio a little while ago that I got to witness what the Rotolight LEDs could do and I was instantly impressed.

I’ll save my tribute and shopping list of reasons as to why I was immediately blown away by these lights for another time, but suffice it to say, elements like unbelievably clean-looking light, gorgeously deep and rich colours and a very usable brightness for almost any situation certainly got my attention. Of course, the one other feature that really got my attention was their ability to also flash.


LEDs that Flash

So what are LEDs that flash? In short, the LEDs in these lights essentially overclock themselves for a very brief moment to give you a very bright burst of light. The LED bulbs can’t sustain that brightness continuously without substantially reducing the lifespan of the bulbs, but they can happily give you incredibly fast bursts of flashes with zero recycle time for a sustained period with no issue or overheating worries.

Me working with the Rotolight AEOS 2 Pros at a recent lighting event.

As I mentioned, this tech has been around for a little while now, and although a few companies are using the flash feature for white light, Rotolight are still the only LED lighting manufacturer that can flash their LEDs in the complete 16 million+ RGB spectrum! Now you’ve got my attention.

What are the benefits of having LEDs that flash?

To be honest, one of the greatest features of LED lighting is just how unbelievably simple and easy the continuous lighting make lighting in general. Why on Earth would you give that continuous light up to use flash when you can quite literally see exactly the type of lighting you’re going to get before you even hit the shutter? No more guessing how the flash will look and couple that with the electronic viewfinders (EVF) of many modern cameras that show you the exact scene for your given settings, it really is ‘what you see is what you get’.

Photography has NEVER been easier than it is today.

So again, why give up the cheat-code of LED lighting for the flash mode? One big reason (and I can’t speak for other LED brands), but the Rotolight flash mode actually doubles the brightness of their ambient mode LEDs. That double brightness can certainly make a big difference in a shot, so even if you only use it for that feature alone, having a double-power button is always worth having.

Of course, the other core reason any of us would use flash is to capture movement.


Capturing Movement

Most of you reading this now are likely flash users, you know all about capturing movement and how flash is the best way to do this. We know a faster shutter speed will easily capture fast-moving objects and render them stationary in the shot and we all know that flash is a very fast burst of light that captures moving objects too.

Click to enlarge: Examples of various shutter speeds on fast-moving fan blades.

So, the faster the shutter speed, the more stationary the object is rendered in shot. The only drawback to very fast shutter speeds then, is that it requires a lot of light to still capture that object when the shutter is only open for a tiny fraction of a second. This is where flash is great. We don’t have to worry too much about the shutter speed now, because as long as the flash fires when our shutter is open, we’ll have a burst of light that is very short and that will capture the subject.

So to summarise; to capture something moving, we can either use a very short shutter duration or we can use a flash as that burst of light is also very short.


Flash Duration

So how fast actually is a flash? It’s very easy to understand how long our shutter is open, after all, we can simply look at the camera display and many modern cameras today are very comfortable shooting at 1/2000th of a second, 1/4000th and even 1/8000th of a second. But what about flashes, how fast are they really?

This is where things can get a little overly complicated as contrary to what many people think, flashes are not instantly bright and then instantly dark again. So to explain this, let me briefly show you how some typical flashes work.

Many flash units will have a glass tube filled with Xenon gas. This tube of gas is then ionised via an electric trigger and a very bright spark is formed between the two electrodes AKA the flash. As this is a chemical reaction, there is indeed a build-up when the gas is triggered and the resulting light is formed. Again, this light must then dissipate and although seemingly happening instantaneously, it is in fact taking a period of time and that period can vary from flash to flash. Some flashes have a duration of 1/500th of a second and others are much faster at 1/4000th of a second and beyond.

But here’s the bit that gets a little more complicated; how do you measure that flash duration?


Measuring Flash Durations

Because of this build-up and taper-off, flash lighting manufacturers had to agree on a way to measure the duration of their flashes. Do you measure the time from when the spark ionises the gas? Do you measure it from when the light has reached maximum brightness? Do you measure from spark to total dissipation? You can see how this would be confusing.

Ultimately flash durations are measured on a bell curve like we see on the diagram here and most flash manufacturers quote the T0.5 value as the duration of their units.

The T0.5 value is the time it takes from when the flash reaches 50% power, up to 100% power and then drops back down to 50% power.

When I first discovered this, I was very surprised, because as you can see from this curve here, there is an awful lot of time which is not measured in the ‘flash duration’ measurement, but the flash is still very visible. This did explain to me why I was getting movement in my photos when I thought I shouldn't, especially when I was using a flash that supposedly had a flash duration of 1/4000th of a second. The manufacturers weren’t lying about the durations of their units, they just didn’t have to include all of that extra time the flash was active.

If you wanted a clearer representation of the duration of your flash, you should really be looking at the T0.1 value as this is measured from when the light reaches 10% power, up to 100% and then back down to 10%. Many manufacturers have this data, you just have to seek it out. At the very least, you just need to be aware of what the T0.5 means and just be aware that your flashed scene will be receiving a lot more light than you originally thought.


Does it really even matter?

It feels like we’re splitting hairs here right? Surely we’re being overly nerdy about flash durations for no reason. Yes, for the most part, nearly every modern flash unit’s duration is incredibly fast and for the vast majority of us, these flash durations are absolutely fine. Unless you’re photographing toddlers or hummingbirds, you’ll likely not notice any movement in your shots. That being said, fast-moving dancers, clothing flowing about and hair blowing in the wind of a fan, can actually display movement in the final shot. It’s one of those things you don’t really notice because it’s always been there, but once you see it, you sadly can’t stop seeing it.

Of course, there are other faster-moving things like water and falling objects in still-life photography where pin-sharp and crisp motion are paramount. So to test the flash durations of my strobes versus the flash duration of my Rotolight AEOS 2, I decided to drop some metal ball bearings (actually cheap cake decorations!), onto a metal plate. During the time these silver candy balls were bouncing off of the metal plate, I would fire the flashes and capture the results.


Testing and Comparing the Flash Durations

For clarity, the test was performed with a single studio strobe and single Rotolight. The shots were taken against a sheet of black velvet and the camera was mounted on a tripod with a 70mm lens.

All of the photos for both the studio strobe and the LED were captured via a flash trigger and I tried both high and low power outputs of both to see how that affected the results.

Resulting Images Captured with the Studio Strobe Unit

Click to enlarge: Flash fired at high power

Click to enlarge: Flash fired at low power


Now let’s do the same test but with the LED light.

Resulting Images Captured with the Rotolight AEOS2

Click to enlarge: LED fired at high power

Click to enlarge: LED fired at low power


Conclusions

Look, I’m going to be completely honest here, I had an inkling that the LED shots would be crisp, but I certainly wasn’t expecting this comparison to be anywhere near this conclusive! You don’t need to look too closely at these comparison photos to see the very stark differences between them. The LED shots are damn-near crystal clear (these images are all shot on a Nikon and with a Nikon lens, so trust me, this is clear as it gets), compared to the huge amount of movement we see from the flash images. Also, there’s a big difference between the amount of movement at higher powers on the strobe due to how the strobe units work too. But why is there such a big difference between the strobe and the LED?

Breaking it Down

Earlier on I explained to you how a flash tube worked. I said that a flash is triggered by a spark that ionises Xenon gas that in turn displays a very bright light before dissipating. I then showed you a diagram of that curve of light as it rises quickly before peaking and then finally trailing back down. This is why we see those ‘tails’ of light on those bouncing metal balls in the resulting shot, this is the flash dissipating and trailing off leaving that ghost of an image behind them.

But what about the LEDs? How do they ‘flash’? Thankfully, this is actually where it gets very simple. LEDs are simply powered via an electric charge and as we know, electricity moves extremely quickly. So just like you turning on a light at home, the light is (almost) instantaneously on and it can also be turned almost instantaneously off again. This is the ‘flash’ of an LED and I mocked up an example of that same bell curve diagram here just to illustrate the path that LED flash takes compared to the strobe version. As you can see, it reaches maximum power output instantly and then reaches zero output instantly again too due to the electric current being flipped on and off. I may have even exaggerated how long the flash is present in this diagram too. Put alongside the strobe curve, the LED flash could even just be a singular vertical line going straight up with almost no duration at all.

To be clear, I want to point out that this is just me experimenting with my lights with rudimentary-at-best parameters. This was far from a scientific test, but even with the basic results that I captured, it was pretty clear to me that the LED flash is no mere gimmick or feature to include on the side of the box. The LED ‘flash’ function of the Rotolight is an extremely viable tool.


What Does This Mean for Photographers?

At this stage, some of you may be thinking, ‘So what Jake? I bought my LEDs for an easy-life, I wanted to leave the finicky world of flash behind me and embrace the painless pleasures of ambient light’.

I’m right there with you, like I said, ambient lighting is just so easy I almost feel guilty of cheating like this. And now that LEDs are bright enough, the white light is clear enough and the colours rich enough, I have zero issue using LEDs over flash. But there are things that only flash can do and obviously one of those things is capture stuff in motion, and in some of my work, I also like to take things one step further and combine both ambient and flash in the same frame. With these new Rotolights, I can do just that.

Take a look at some of the mixed-lighting shots below, all captured in a single frame with the new Rotolight LEDs. Some of the Rotolights are set to ambient and some of them are set to flash and triggered from my camera like normal.

Click on any of them to fit them to your screen.

As you can see, the Rotolight’s ability to both be used as an ambient light and a flash is completely unique, especially when you consider that it can flash in the full Kelvin spectrum and any of the 16 million+ colours too. Couple that with its ability to capture movement like this in pin-sharp clarity that not only rivals flash, but supersedes it, it is fast becoming the only light I need!


Final Thoughts

As you may well imagine, I was blown away by the results of the Rotolight’s ability to flash. Sure, we already have hundreds of flash units on the market today and people usually tend to buy LED lighting for film and video as they want that continuous light for motion video. But Rotolight is one of the very few LED manufacturers at the moment who are making LEDs for photographers as much as they are videographers. With that in mind, they are making lights with more and more flash functionality than anyone else, like I said at the start, Rotolight LEDs are the only lights in the world that flash in the full 16 million+ RGB colour spectrum!

I’d wager that in 5 years, we’ll see all new LEDs coming to market trying to include this full-colour flash function, as a standard feature!

Plus, the actual flash duration and quality of that flash is incredible as I demonstrated earlier, so much so, that the flash on these units kinda needs its own name. Can you really even call an LED flash this unique, a flash anymore?


Tech Specs

Just briefly and for those that are interested, here are a couple of bullet points of info regarding the flash capability of the Rotolight AEOS 2 PRO & NEO 3 PRO.

  • High Speed Sync RGB flash

  • Flash in any one of 16.7 million colours

  • Zero recycle time

  • Up to 100,000 full-power flashes on a single battery!

Also, I mentioned before about triggering the Rotolight from my camera and with the new Rotolight PRO units, you can even combine them with your current strobes by triggering them from your current trigger. Those transmitters include:

  • Godox

  • Profoto

  • Elinchrom

  • Neewer

  • Pixapro

One last note is that not all of these features are exclusive to the PRO versions of the lights and most of what I’ve spoken about here is very achievable on the older AEOS 2s and NEO 3s and many of the example shots I’ve shown here are taken on those older units.


Products Used…

Although I am sharing my own personal thoughts and findings about the lights mentioned in this article, many of you will want to know that I am now a ‘Master of Light’ for Rotolight. As such, I have been given a discount code to share with you when purchasing any of their products via the Rotolight website. Use my code ‘JAKEHICKS10’ when purchasing and you’ll save a bunch of money and I will enjoy a beer in your honour for doing so.

Rotolight AEOS 2 PRO

With the AEOS 2 PRO, the world is your studio. Combining the shoot what you see benefits of powerful continuous light with a High Speed RGBWW strobe, AEOS 2 PRO offers unmatched versatility for photographers and filmmakers. Uniquely lightweight with an ultra-thin design, it’s never been easier to achieve beautiful soft light on the move.

AEOS 2 PRO Website Link


Rotolight NEO 3 PRO

Small but mighty, NEO 3 PRO is the brightest LED on-camera light ever made. Experience unrivalled power and industry-first innovations in a compact form factor you can take anywhere.

NEO 3 PRO combines the shoot what you see benefits of continuous light, with a High Speed Sync RGBWW flash for unlimited creative possibilities.

NEO 3 PRO Website Link


Thank You

As always, thanks for checking out this article and spending a little bit of your day with me here. I hope you found it useful and if you left with a little more knowledge than when you arrived, it’s been worth it.

If you have any questions or comments, or if something doesn’t make sense, by all means, fire away in the comments below and I’ll do my best to answer what I can. Thanks again and I’ll see you in the next one.

Don’t forget to sign up to my newsletter to be sent all of these photo tips and techniques articles every month in case you miss one.


JHP Livestreams…

If you give this setup a go, I’d love to see how the shots turn out, so feel free to share them my way. One way to do that is via my Livestream. I Livestream every other Tuesday night via my FB Page and there I answer your questions, critique your shots, take community images into Photoshop to work on them and discuss all manner of lighting tips and techniques. I look forward to seeing you and your work there real soon. JHP Facebook Page


ONLINE WORKSHOPS - LEARN MORE
JHP COLOUR GEL PACKS - BUY NOW
LEARN MOREONE-2-ONE MENTORING - LEARN MORE

 
Tuesday 05.09.23
Posted by Jake Hicks
Comments: 7
 

Lighting Setup: Simple Long Exposure LED Portraits

Long-exposure photography has been around as long as photography itself, but it’s had a tentative relationship with its audience over the years.

20+ years ago when I was shooting analogue film, long exposure was fairly common, even though it was pretty risky to do without the instant feedback of seeing the resulting image. Then digital came along and with it, a brand new world of creative options opened up in the form of Photoshop, consequently, some of the more traditional creative skills fell by the wayside.

The image above shows the likes per shot over the last couple of weeks on my Instagram account and the long exposure photo I posted the other day, far exceeds the others!

As with many trends, popular styles are cyclical, fast-forward to the present day and we are seeing a rise once again in the more traditional in-camera creative techniques as a younger and new generation of photographers are seeing them for the first time.

Is long-exposure the next new hotness?

As with any interesting creative look, it won't be for everyone, but if you’re after a visual look that gets people's attention, long exposure is certainly a technique that will make people look twice. I for one have seen an uptick in interest for the look and if you’ve never played with long exposure before, I’d urge you to try it out as it’s not as tricky as you may think, especially with this simple long exposure lighting setup I’m about to share with you below.


What is long-exposure photography?

I mentioned above that there are many new and younger photographers today that are discovering long-exposure photography for the first time, but what is it? To give you a very broad and generalist answer, it’s an image that has a long enough shutter duration to see movement within the frame. Granted, that is a broad example as motion blur caught at 1/60th of a second can be argued as long exposure, but for the sake of this article, let’s look at purposeful and very noticeable movement in the shot. For purposeful long-exposure shots where we aim to capture a sense of movement, you’re often looking to leave your shutter open for at least half a second. Of course, we can take it to the extreme opposite end and look at astrophotography that captures the light trails of stars in the night sky, they can leave their shutters open for many hours at a time, but again, for the sake of this article, let’s keep it focused on controlled long-exposure portraits. In my experience, long-exposure portraits often have a shutter speed of around 0.5 seconds to 2 seconds. This will vary of course, but this small timeframe will still give you plenty of opportunity to capture movement from both you with your camera and your subject's movement.

Click to enlarge: Above you can see some examples from my archives of some varied long-exposure techniques being used in portraits.

As I alluded to, long-exposure effects can be achieved in a huge number of ways and in the above images you can see just a few of them. The core looks shown here include movement from me and the camera, movement from the model and even movement from the light within the shot itself. From here you can add additional creative effects like coloured lights and even lens filters. But regardless of how you achieve your long-exposure shot, the result is always varied and engaging to look at.


The example image above shows you the lighting setup we’ll be learning today.

Keep it simple

As the name of this article implies, let’s dip our toes into this extremely creative world of long-exposure photography by first looking at a pretty simple long-exposure lighting setup.

The shot we’re trying to achieve

As you might imagine, the shot we’re looking to achieve here shows some movement within the frame, but we also want to capture a crisp and still image of the subject too.

Long-exposure by itself is pretty simple, after all, anybody can set their shutter-speed to a couple of seconds and swing their camera about to get some movement in shot, but it’s the addition of capturing a still image of the subject as well as simultaneously capturing the movement where it gets a little trickier.

As you can see in the example image here, there is a perfectly still image of the subject as well as blurring and ghosting of the subject too. But why are they different colours?

Another aspect I want to talk about and explain, is the colour difference between the still and blurred version of the subject, why it happens and also alternative shooting solutions to avoid it if necessary.


The Lighting Setup

Look I get it, I’m a visual learner too, I learn by seeing and I know for a fact many of you have skipped all the way down here just to look at the lighting diagram. So to avoid you skipping the entire article, here it is and below that I’ll go into more detail about explaining the setup and how to achieve the final look.

Click to enlarge: Cut-out-and-keep


TL;DR/ADHD/Artist Setup Explanation

  • Set up a backdrop (preferably coloured) behind the model.

  • Place your key-light fairly close to the subject, up high and angled down - Set this key-light to flash

  • Your second light should be a large softbox or light bounced into a V-flat. Place it further back and set this light to ambient.


What You Will Need

2 Lights - This may be the first hurdle to pay attention to here as I’m not asking you for 2 flashes. 1 of them needs to be a flash, but the other doesn't, it simply needs to emit a constant light. I’m using 2x Rotolight AEOS 2’s as they are ambient LED lights that are also simultaneously capable of flashing, but you can use whatever you have. For example, one option could be to use 2 flash heads, but only use the modelling lamp on one of them.

Nearly every strobe has both a flash and a modelling bulb. If you have two, you can use the flash on one and the modelling bulb on the other.


Coloured Background - This is a fairly important item to pay attention to as the background you use will drastically affect the final look you capture. One popular option is to go for a simple white background. The issue with this is that the long-exposure light trails (motion blur) simply don’t stand out against a white background and I’ve found that a darker colour allows for a stronger contrast to make them more visible. I guess you could go with black or grey if you just wanted to test it, but it is a little boring and oppressive for this very energetic-looking shot we’re after. For me, I’d encourage a coloured backdrop and I simply used a very inexpensive window blind here. I rarely use flat-coloured backgrounds, so to save spending loads on a pricey Colorama I barely use, a cheap window blind is a great alternative.

Note: I don’t recommend a busy background like a hand-painted backdrop here either. As you’ll see, we’ll be moving the camera during our long exposure and a busy backdrop will create a very eclectic image behind the model. By all means, try it out, but just be warned it may look very messy.

Window blinds make great backdrops as they’re cheap, lightweight and come in a huge variety of colours.


Modifiers - We only have 2 lights so we only need to think about 2 modifiers thankfully. One of them needs to be fairly controlled and directional and the other needs to be very soft and throw the light over a wide area. I simply used my Rotolight AEOS 2 with its diffusion dome as my key and somewhat directional light when placed in close to the subject, and then I fired my second AEOS 2 into my DIY V-flat to make it a very soft and diffused light. You could use a bare reflector as your key, alternatively, I’d recommend a beauty dish instead. As for the soft light, a big softbox or large umbrella would work, or like me, simply fire your open dish flash into a V-flat.

I use Rotolight AEOS 2’s and their diffusion domes, but you could substitute that for a beauty dish and couple it with a V-flat.


Making some DIY foldable V-flats is not as tricky as you might think. Check out my article on how I made mine DIY Foldable V-Flats

DIY Foldable V-Flats - I’m always using my DIY V-flats in my shoots and I’m always getting questions about them. If you’re interested in making your own, then I’ll share the link to how I made mine here, as I highly recommend you do so or at least get something similar. Firing your light into a large white V-flat like this results in that light being incredibly soft and it’s exactly that softness that we sometimes need in our shots. Look at these V-flats as a fundamental lighting modifier of your lighting kit just like a beauty dish or softbox. Failing this, bouncing light against a large white cotton sheet can also be a good substitute.


Camera Settings

  • Camera - Nikon D850

  • Lens - 24-70mm f2.8

  • Shutter Speed - 1/2 Second

  • Aperture - f5.6

  • ISO - 80

  • Kelvin - varies based on shot from 3500K - 5000K

  • Focal Length - 58mm - 70mm


The Results

Click to fit any of the shots below to your screen.


Breaking it Down

Now that you’ve seen the setup and checked out the resulting images, let’s now break down exactly how we go there and why some of the shots above are different colours from the others.

Studio Ambient Light - First and foremost, I need to remind you that these long-exposure images require the shutter on our cameras to be open for an extended period of time. This means we need to be very conscious of how bright the room or studio we are working in is. If you can close the curtains or shutters to eliminate any ambient light coming in from outside, do so. If this isn’t possible, either block up the windows with sheets or boards and if this isn’t possible and you’re still letting in too much ambient light, you may even need to wait until the sun has gone down to continue. Failing to make your room somewhat light-free will ruin this long exposure shot so managing the ambient light in the studio will be your first priority.

Colour Temperature - This is a significant factor to keep in mind, but its importance will depend on the type of lights you’re using. Firstly, what is colour temperature? All light rays technically have a ‘colour’ and even though it may seem like most lights like bulbs, the sun, flashes, LEDs and so on all appear white, they’re actually all slightly different colours, it’s just that our eyes are incredible at colour correcting them in real-time to the point that we barely notice it.

As photographers, we measure the colour of light via ‘colour temperature’ on the Kelvin scale

As you can see above, we photographers use this Kelvin scale to measure colour temperature. For example, candlelight is very orange and consequently sits very low on the Kelvin scale at 2000K. At the other end, we have bright daylight and blue sky is measured at 9000K. Somewhere in the middle there, you’ll notice that orange light dips to almost white before it starts to appear blue and it's this mid-range that we see the noon-day sun residing as well as our flash lighting.

It’s because of these colour ranges that we must be very mindful of what we set our camera white balance or Kelvin to. If we are shooting with tungsten bulbs, we would need a very different white balance than if we were using flash.

Here we see how varying Kelvin’s affects the type of lighting you use. The top images are shot with flash and the bottom images are shot with tungsten.

In the above images, you can see how drastically different the images look when shot with different light sources and with different Kelvin values on the camera. If we are using flash lighting, our cameras are often set at around 5000K, and if we are using tungsten lighting, our cameras are often set much lower at 3000K.

Combining Colour Temperatures - At this point you may be wondering why I’m explaining this, after all, you may have been shooting flash and daylight images up until this point with no issue arising in your colour temperatures. You’d be right to think that as we only really run into colour temperature issues when we start trying to combine multiple colour temperatures in the same shot, for example, when we mix tungsten and flash. When we do this, we have to choose one of these colour temperatures to set our camera to, but in doing so, the other colour is now noticeably different.

Take a look at the images above. See how one has an orange-looking long exposure effect and the other has a blueish one? This is what happens when you choose not to neutralise the long exposure (ambient) light. I’m not saying it looks bad with the orange effect and it can look cool, but it is something to be aware of.


The Power of LEDs

One of the biggest reasons I love my new Rotolight LEDs is their ability to adjust and fine-tune the Kelvin colour of the white light they produce. For example, at the touch of a screen, I can set my white light to either 3000K, or all the way up to 10,000K! As you might imagine, this is a fantastic feature when trying to combine varying lighting temperatures within the same shot.

In the images above, you can see the touchscreen on the rear of my AEOS 2 that shows the colour temperature slider. You can also see the huge difference in the white light colour from 3000K compared to the 10,000K.

For the shoot I’m sharing here, I was using one AEOS 2 LED light to ‘flash’ and another AEOS 2 LED light set to ambient (not flash). Below, I’ll show you what each of these lights were doing separately.

In this image, I’m showing only what the AEOS 2 light that was flashing was doing. This light is set to around 5000K.

In this image, I’m showing only what the ambient AEOS 2 light is doing. This light is set to 3000K.

From the resulting images above, it should be far clearer as to what each light is doing and the effect that each of their Kelvin settings is having on the final image. Remember that my camera is set to around 4500K for these images. All we need to do now is turn both of these lights on and you’ll get both the still image and blurred image within the same frame.


LEDs that Flash

I feel like I need to address and explain the elephant-in-the-room, which is me referring to my LEDs lights that ‘flash’. If you’re not aware (which I know many people aren't ), Rotolight LED lights like the NEO and AEOS range, do indeed flash. In reality, this means that they emit a very bright burst of LED light at double the maximum regular output in a very short space of time, AKA flashing.

The Rotolight AEOS and NEO LED lights also have the ability to flash.

In the images above, you’ll see some of the flash settings on the back of my AEOS 2. Here you can adjust the power of the flash, the colour temperature of the flash and even the flash duration too. Another incredible feature of these Rotolight’s is their ability to flash in the full RGB spectrum! That means there is no need for colour gels and to my knowledge, Rotolight’s are the only LED lights in the world that can do this.

To be clear, you don’t need these LED panels to achieve this lighting setup. In fact, as long as you own some colour correction gels like Colour Temperature Blue (CTB) or Colour Temperature Orange (CTO) gels, you can achieve the same look. But these LED panels just make life so much easier. I can’t tell you how many CTB gels I’ve melted on my hot tungsten lights over the years and these panels negate all of that via the touch of a screen. It certainly makes the shoot significantly easier, cheaper, faster and safer without the worry of burning yourself or the model on hot tungsten lamps.


Why are the images different colours?

As I mentioned at the start of this article, some of the images I took had orange blurs in them and some had blue blurs in them. I just want to quickly clarify what is going on in each of these shots in case it still wasn't clear.

Remember that in both of these shots, the camera is set to around 4500K. Also, the AEOS key-light that is flashing in both of these images, is set to the same Kelvin value of around 4500K, in fact, the only thing that is changing here, is the Kelvin value of the ambient LED light.

For the orange blur shot, the ambient AEOS 2 light is set to a Kelvin of 3000K and in the blue blur shot, the ambient AEOS 2 is set to a Kelvin of 10,000K.

It’s worth noting here, that if I’d set the ambient AEOS 2 to around 4500K as well, then the blurs would most likely be white and not blue. Use this information to your advantage if you don’t want any colour shifts in your long exposure shots.


Points to Consider

Although I’ve explained where each of the lights are placed and what they’re doing, long exposure images are about far more than simply looking at a lighting diagram. Take note of the very important additional factors below as well.

  • Creating the blur - Of course, just setting your camera to a slow shutter speed won't instantly give you cool-looking long exposure shots. Remember that whilst your shutter is open, elements of your image must be moving, whether that be you with the camera or the model, you will only get blurs if something is moving. I’d advise experimenting with a variety of techniques that include both you moving, the model moving and even both of you moving for more dramatic effects.

  • Improving the blur - Any movement that happens whilst the shutter is open will be displayed in the final image, but there are ways to make the effect more prominent. One of the biggest contributors to these cool-looking light trails will be the models styling. If they are wearing dark trousers and a black cotton T-shirt, the effect will likely look awful and more like a smudge than a lighting technique. Shiny items work best and consider shiny jackets and jewellery for the best results.

  • Contrasting the blur - I mentioned at the start about me choosing a blue background. This was an intentional choice as I knew that the blue background would contrast well against the orange blur from the low Kelvin images. But look at the blue blur images again and see how the blur of the model's body disappears against the blue backdrop. Think about the type of look you want to go for and consider a contrasting background colour to complement it.


Closing Comments

This is a simple lighting setup in that it only requires a couple of lights and very basic modifiers, but I fully appreciate that long exposure can be daunting for newer photographers. The concept of slower shutter speeds and varying colour temperatures can be new to many and having to consider your camera movements in the spit-second your shutter is open will take some getting used to.

However, I would strongly urge you to give this technique and other long-exposure techniques a go. Long-exposure images are one of the very few techniques that are unique to us photographers and us alone. You quite literally cannot see these long exposure images with your naked eye, nor can film or video recreate them. Long exposure shots are magical in that regard, as every single time you press that trigger, you’ll be confronted by an utterly unique image each and every time.

I’ve run lighting events and workshops all over the world for many, many years and without fail, the long exposure workshops are the ones that always get the most ‘oohs and ahhs’ from photographers that shoot the long exposure techniques on the day.

Long exposure photography really is an incredibly creative process that is so heavily influenced by your physical movements and actions during the shutter release. In a time where we’re free-falling into an ocean of sterile AI-generated images, unique and visually engaging photos like these are garnering more and more attention by the day.


Featured model: Alba Sanchez


Products Used…

Although I am sharing my own personal thoughts and findings about the lights mentioned in this article, many of you will want to know that I am now a ‘Master of Light’ for Rotolight. As such, I have been given a discount code to share with you when purchasing any of their products via the Rotolight website. Use my code ‘JAKEHICKS10’ when purchasing and you’ll save a bunch of money and I will enjoy a beer in your honour for doing so.

Rotolight AEOS 2

The AEOS 2 is one of the newest lights to market from Rotolight and with the design goal of bringing the majority of the features from their flagship Titan to an affordable package, I’d say they succeeded. This light is unfathomably lightweight for its output and features, plus everything is instantly accessible on the back of the light via a full-colour touch screen!

AEOS 2 Website Link


DIY Foldable V-Flat

I mentioned this DIY V-Flat article above, but here it is again. I honestly use these things on nearly every shoot I do now. Whether it be bouncing light, blocking light or even channelling light, these white and black V-flats come in handy on set all the time. They might take a long afternoon to make, but I promise it’ll be worth it.

DIY Foldable V-Flats


Thank You

As always, thanks for checking out this article and spending a little bit of your day with me here. I hope you found it useful and if you left with a little more knowledge than when you arrived, it’s been worth it.

If you have any questions or comments, or if something doesn’t make sense, by all means, fire away in the comments below and I’ll do my best to answer what I can. Thanks again and I’ll see you in the next one.

Don’t forget to sign up to my newsletter to be sent all of these photo tips and techniques articles every month in case you miss one.


JHP Livestreams…

If you give this setup a go, I’d love to see how the shots turn out, so feel free to share them my way. One way to do that is via my Livestream. I Livestream every other Tuesday night via my FB Page and there I answer your questions, critique your shots, take community images into Photoshop to work on them and discuss all manner of lighting tips and techniques. I look forward to seeing you and your work there real soon. JHP Facebook Page


ONLINE WORKSHOPS - LEARN MORE
JHP COLOUR GEL PACKS - BUY NOW
Learn moreONE-2-ONE MENTORING - LEARN MORE

 
Tuesday 04.25.23
Posted by Jake Hicks
 

Lighting Setup: Affordable LED Tubes

In the last year or so, I’ve experimented with and tested a huge range of LEDs lights. From the $15,000 Panalux film production monsters to the versatile Godox S-fit compatible heads to the incredible Rotolight panels. But this week I take a look at the other end of the pricing spectrum as I play with the very affordable PixaPro RGB tubes.

That is correct, that isn’t a biscuit crumb on your screen, that is indeed a decimal point between those 9’s!

I know for the most part you’ll see me sharing somewhat advanced lighting setups and with that often comes multiple lights and with multiple lights comes many, many nights where you can’t afford to turn the heating on! Not this time though, as this week’s article looks to show you what these very impressive and somehow very inexpensive LED tubes can do. But spoiler alert, I do use four of them, so maybe only one night where you have to wear a hat and scarf to bed!


Disclaimers upfront; I reached out to Essential Photo and explained that I had an idea for a photoshoot involving LED tubes. They offered to loan me these tubes on the proviso that I had to return them. So although Essential Photo didn’t ask me to test these lights, they did let me borrow them. I do however have affiliate codes with Essential Photo, so if you do choose to purchase something via one of my links, I may well benefit (albeit minimally) from any purchases. Plus if you use my ‘HICK5-OFF’ discount code to save money on any product purchase via their site, I may also benefit.


The basic premise for this shoot was to have the LED tubes so close to the subject, that they’d actually appear in-shot. But that can present certain issues…


The Lights

This isn’t strictly a review of the lights, but more an overview of what they can do as I share my experience after I worked with them on this recent shoot. If you’re interested in all the detailed specs, you can find all that via the Essential Photo website here Rainbow Series 320-Degree RGB LED Neon Light Tube

What’s different about LED Tubes?

These tubes have a 320 degree spread of light with only a small shadow area at the back where the LEDs are actually mounted.

I know LED tubes have been on the market for many, many years now, but I’ve actually never used any. I’ve used LED strips recently, but not tubes. So what’s the difference? The core attribute of LED tubes is that they spread light all around them. Most lights throw light straight out in front of them and this is great for directing and controlling the light via various modifiers, plus, by throwing all the light forward, you really maximise the brightness of the bulb/s within. But tubes spread light all around them and these PixaPro tubes here boast an impressive 320 degree spread! In fact the only area that they don’t spread the light, is that tiny dark strip on the back of the tubes where the actual LEDs are mounted.

For my shoot idea where I wanted the actual lights to appear in-shot, this was very important as not only did I want the tubes lighting the model, but in doing so, I would likely see the back of the lights from where I was shooting and I wanted to be able to see this light from everywhere, not a dark shadow of the back of a light.

One other important distinction straight away is that I went for the 120cm long tubes. These are what I’d recommend if you were interested in these tubes, as although the shorter 90cm are cheaper, you only save a little money whereas the longer 120cm offers a brighter tube for your money due to their increased size.


PixaPro LED Tube Light Controls

All the PixaPro tubes come with a basic remote that enables you to access all of the tubes features and that includes the 12 standard colours including white, brightness adjustments, strobe effects and all other manner of coloured animations for all of your horrendous TikTok needs!

A couple of nice features include 32 levels of brightness which enable you to really fine-tune exposure if needed and although having them set to max brightness at all times is likely going to be your default, certain LED colours are brighter than others at max output. Having that adjustable brightness of each colour can certainly help to keep colour exposures even in a single shot.

Also, another convenient feature is the ability to lock a specific remote to a specific light. That way, when all of your tubes are on set, you can adjust each tube separately with individual remotes without affecting them all at the same time.

Lastly, I was pretty impressed at how long these lights lasted on their internal battery. I was shooting for several hours at full power and none of them ran out. The only downside is that they do take several hours to charge. This isn’t a huge deal, but seeing as you can only really use them on battery power, you definitely need to check they’re fully charged prior to starting as there is no battery power indicator on the lights that I’m aware of.


Last minute edit: Individual LED Bulb Visibility

I’m just adding this last minute edit as I was asked a good question on my FB Page about the LED bulb visibility. The question came up as the poster, who currently owned different LED tubes to these, was disappointed with how visible the LED bulbs were in their own tube lights. If you’re not sure what that means, then it refers to the individual LED bulbs being visible through the frosted housing surrounding them when the lights are on.

These tubes produce a very clean and even light with only rare instances where I could see the individual LEDs within.

I actually encountered very little of this and I did not have to ever edit or blur any of the tubes individual LEDs in any of the final retouched shots from this shoot. You can see in the iPhone pics above that the tubes appear very clean along the entirety of the tubes and in all of my BTS shots, I only really found the LEDs to be visible in a couple of them. I will add that I think the only reason they’re even appearing here is due to most smartphones inherently HDR’ing every image it takes to limit any clipping the user may unintentionally create.

In conclusion: In normal studio use, I never encountered a time where the individual LED bulbs shone through the frosted housing.


Initial Shoot Idea

As I mentioned above, I had an idea for a photoshoot that involved these LED tubes for a while. The idea itself wasn’t too complicated, but this setup did have a slightly unique element in that it would include the actual lights in the final shot. Having lights appearing in-shot (on purpose) and so close to the subject is unique in that it presents some interesting factors to consider, namely the drop-off of light.

Practical Application of Light Drop-Off (skippable)

The following few paragraphs are fairly nerdy, so if you’ve yet to have your morning coffee, feel free to skip this.

If you’re not sure what I mean by light drop-off, then basically it means how fast the light diminishes from bright to dark. For the most part, many of you are likely very familiar with the dreaded ‘inverse square law’ as a way to determine light drop-off. The inverse square law states that light falls off by a factor of 4, so if you double your distance from the light source you’ll receive a quarter of the light.

To many of you, this will be very foundational knowledge, but achieving this in reality is fairly tricky due to not only bounced light, but because the inverse square law applies to omnidirectional lighting and a single point of light, which in reality does not exist. That being said, for the most part, the ISL (inverse square law) applies to many regular light bulbs as they are small enough in relation to us and they throw light all around them which is very similar to a flash tube.

Where we can get into trouble, is if we start to apply the ISL to larger light sources like LED panels and LED tubes. These light sources throw light thanks to many, many smaller bulbs and essentially create a mini wall of light compared to a singular bright point.

I do find it slightly funny that the inverse square law is something many of us photographers hold as ‘gospel’ and a core tenet of our craft, yet it’s more built on theory and lighting in a vacuum rather than practical application. For example, NASA can’t use this seemingly foundational principle of physics as it’s simply too flawed. Yes, the light from the moon follows the inverse square law, but that’s because it’s a tiny point of light in relation to us on Earth. As we get closer to the moon and its surface fills our vision, the inverse square law simply falls apart.

It’s worth keeping that example in the back of your mind when it comes to light drop-off and pay close attention to the type of light you’re using and how it’s modified before it hits your subject. All of this will dramatically affect how the light looks and it plays a huge role in the seemingly esoteric ‘quality of light’ idea you hear so much about. Plus, I haven’t even begun to include the parameter of collimated light yet… but I’ll leave that for another day.

To give you a very rough example of how light drop-off compares light to light, take a look below at a very simple visual.

Light drop off from a regular point of light strobe with reflector dish

Light drop off from a regular point of light strobe and bare bulb

Light drop off from an LED panel

Light drop off from an LED tube

Note: The above example exposures were measured by pointing the light meter directly at the light. This is why similar exposures above may look different as you’re seeing the bounced exposure from the adjacent wall. I want to be clear, this isn’t the greatest example as I’m only reading the light in a strait line at varying heights for the purposes of this test and it’s tricky to simulate 3D space with a 2D image, but hopefully it’ll help visualise what I mean when discussing light drop-off.

The very rough example above shows what I mean by light drop-off from varying sources. The inverse square law is a very loose guide and it rarely applies in practical application on set due to bounced light and using varying modifiers to control the light. In fact, you can see here that the bare-bulb flash head readings are all over the place the further from the light you get due to the increase in bounced light, hence why you’re seeing brighter numbers towards the outside compared to middle.

The one constant in these shots is the light meter reading of f5.6 at 50cm from the light itself. From here you can see how dramatically different the light drops off for these various shaped light sources.

If nothing else, I want you to pay close attention to how the light drops off from that LED tube. This drop-off is extremely even from top-to-bottom which makes this light incredibly easy to use on-set due to its very consistent exposure across a very large area. Look at the exposure values 50cm above and below the centre; they’re exactly the same, down to a 10th of a stop!

For example, think how even the light would be across a subject’s body if one tube was placed on one side mere inches away from it. Now compare what that same shot would look like if you placed a strobe that close to a subject. One side would be blown out whereas the other side would practically be in shadow. Strobes are great, but they are especially useful when brought further away from your subject, so if we want a light source in-shot and extremely close to the subject, the LED tubes are perfect.

Working with Lights in Shot (welcome back)

If you skipped the section above, the conclusion was that the LED tubes will be the ideal lights to have in-shot and close to the subject, due to their very even drop-off of light thanks to their larger surface area. This will be perfect as I aim to have these lights mere inches away from my subject which simply wouldn't be possible with other lights without blowing out the highlights.


Holding the Lights In-Shot

This may seem obvious, but I needed a way to actually hold the lights in-shot and in an aesthetically pleasing way. Balancing them on the end of the bookcase just wasn’t going to cut it. The LED tubes themselves are simply naked white tubes, they have no mounts or brackets, and they have no stands or fixtures so I needed to come up with a way to hold them in-shot and it needed to look good whilst doing it.

It is worth noting that these tubes do also have custom-built attachments, for both vertical floor mounts and even light stands, but they weren’t suitable for the look I was after.

I’m sure there are many ways of suspending these tubes in-shot, but let me share how I held mine. Initially, I used clamps and primary among them are the very popular crab-clamps. These worked to a point, but the clamps simply applied too much pressure in two precise areas that ultimately ended up crushing and squashing the plastic tubes which was noticeable in-shot.

Once I understood the problem, I looked at a solution that would apply even pressure all around the tubes, thereby reducing the look of them being crushed. The simplest solution I found to this was from plumbing brackets that hold pipes to walls.


These rubber-lined Munsen rings I found were a perfect solution. They applied even pressure and easily held the plastic tubes at any angle without crushing and misshaping the tubes. Plus, seeing as they aren’t designed specifically for photography, they aren’t stupidly overpriced either!

So I’d found a way to hold the tubes, now I just needed to find a way to attach them to a stand. Again, I tried various methods and I originally tried to get thread sleeves to allow a regular 1/4” photographic spigot to screw directly into these. This did kinda work, but it wasn’t snug enough and there was too much play in the connection for a firm attachment.

Once again, I went back to the plumber’s toolkit and looked at how they attached Munsen rings to walls. As usual, Occam's razor kicked in and the simplest and most obvious solution was the best in the end. A simple threaded metal rod was all that was needed.

This is a pretty simple solution, but just be mindful of the thread size in relation to the base of your Munsen rings as they can vary. For example, the base of my Munsen ring was ‘M8’ (8mm), so I needed to purchase M8 threaded rods. The only other consideration is the rod length. I went for the 55mm long ones here and for my setup and clamp which follows, these were perfect.

Finally, I just needed to attach all of this to my stands that would be appearing in-shot. I opted for my shiny silver C-Stands as they not only reflected the lights but have an industrial aesthetic that matched the look I was after.

I simply inserted the threaded rod with the tubes attached into the C-Stand grip-head, and I was done. This allowed for complete omnidirectional control of where I placed the tubes in-shot and they were rock-solid on the C-Stands as a result.

It’s starting to come together now and even as I took these iPhone shots of the setup, I was getting excited at just how damned sexy some of these colours were looking as they were reflected in that industrial silver!


The Setup

Ironically, this is the simplest part! Why? Because the entire lighting setup is actually present in every photo!

Long-time followers of my -Technique Tuesdays- will know that I always diligently build a 3D diagram detailing every aspect of the shoot including light placements, model, styling, backgrounds and anything else that even tangentially has anything to do with the final image.

In fact, I'm so practised in this workflow now that I systematically started to build a 3D model of the lighting design just like I always do. It wasn’t until I’d gotten halfway through this process before I realised it was pointless! Why? Because to see absolutely everything that is involved in this setup, all you have to do is look at the final images!


Final Images

Click on the shots below to fit them to your screen.

As a full-time professional artist, I have the predisposition to be generally unhappy with my own work. This is just part of being a creative and I long ago came to terms with it and learned to embrace this self-inflicted negativity as a catalyst to want to improve.

But with all that being said; holy crap I LOVE how these shots turned out!

As I said, I’m ordinarily pretty hard on my own work, and that’s fine, but even as I was taking these shots, I knew I was onto a winner! I think I ultimately retouched twice the required amount of final shots from this shoot as I loved so many of them and this is just a handful of the finals here. I’ll get the full set up on the front page of my site soon. Again, another sign of how much I love them.

But let’s get into the nuts and bolts of these shots and look at some of the finer details. Below I’ll address problem areas I faced, things to keep in mind whilst shooting, camera settings and ultimately, limitations and tips on working with these LED tubes.


Camera Settings

  • Camera - Nikon D850

  • Lens - 24-70mm f2.8 / 105mm f2

  • Shutter Speed - 1/125th

  • Aperture - f2.0

  • ISO - 400

  • Kelvin - 5500K

  • Focal Length - 105mm / 70mm


Elements to Consider

Lighting in 3D

As is very apparent by now, all of the lights used in this setup are actually visible in the final image. Sure, you may have had the occasional light in-shot before, but ALL of them? It’s unlikely, and the reason for that is in part due to the light drop-off I discussed earlier. Most lights are simply too powerful to have that close to the model and sure you can turn their power down, but by doing that, you lose the spread of the light. So again I’ll say that having all of your lights in-shot is rare and doing so brings up some areas to be aware of.

One of the biggest challenges I came across when using LED tubes this close to my subject, was dealing with light in 3 dimensions.

Yes, all light is present in 3D, but here I mean that the same light (tube) may be lighting the head in front as well as the leg behind due to its size and closeness to the subject. Most lights don’t have this issue and normally you can break lighting down to a key, fill and hair lights for example, but here your lights are so large and so close, they’re illuminating the front and behind. It’s tricky to explain until you start playing with them yourself, but just be prepared to play with not only the height of them but the angle and rotation at which you use them to cover certain areas of the body. All of this is further compounded by the fact that these tubes are emitting light in 320 degrees around them. Again, this is a fairly unique issue, but a very interesting one to work through.

These aren’t the final colours I used, but in this early test image, you can see my dark background at the back here and how it helps to make the coloured tubes stand out.

Background

For my setup, I opted for a very dark background to make the colours of the tubes really pop out from the surrounding darkness. Bringing the subject off and away from the background will also ensure that none of the light reflects off of the background too.

Atmosphere

I’m sure it’s obvious to many of you, but my final images shared here contain some haze, smoke or even some form of lens filter to add a sense of depth and atmosphere to the images. I did experiment with a variety of smoke, haze and filters and they all worked to some degree. My advice is to try and see what works for you and if you don’t have a smoke machine or are unable to use one, a lens filter does a very good job emulating the hazy look too. Try some bloom filters or diffusion filters like a Cinebloom, Black Pro Mist or even a Low Contrast filter like I used.

Fashion

Styling (as always) is actually a huge consideration and it plays a very important role in how the final images will look. I bought a shiny black trenchcoat for this shoot as I had a very specific look in mind when I was setting this up, but other shiny items will also work. Be mindful to avoid anything that absorbs too much light like cotton and other matte fabrics as the model’s shape and form will simply be lost in the darkness.


Limitations

To those that scrutinised the camera settings I listed above, you may have raised an eyebrow at the ISO value. Yes, these images were all shot wide open at f2 and with an ISO of 400, but this wasn’t an aesthetic decision, these LED tubes are very close to the subject and this is still the exposure values I’m getting. The LED tubes are not bright like the flashes you may be used to. These LED tubes were at max brightness and although I personally don’t have an issue shooting wide open at ISO 400, many of you may be put off by this.

Some of you may have older cameras or even cameras not particularly great at dealing with higher ISO values, but for the most part, nearly all of you with have a modern enough camera that it’ll have no problem with ISOs up to 1000 and even beyond.

The modern ISO topic is something I’d like to discuss in more detail at a later date, but I think for many of us, high ISO values are a scary realm to explore.

20+ years ago when we shot film, anything above ISO 100 was taken under the banner of ‘artistic’ and anything above ISO 800 needed to be printed in black and white just to ‘save’ it. But these are foreign concepts to young photographers today. They don’t associate higher ISOs with images that appear to have the surface of the moon overlayed upon them, higher ISOs are simply a method with which to achieve more light and most modern cameras can do this with ease today.

My point here is that yes, these LED tubes from PixaPro are very cheap compared to their more expensive counterparts, but with that comes weaker power outputs. I just did a quick search and, although I’ve never used them, the very popular Pavotubes are a very established LED tube brand. As I mentioned, I’ve never used the Pavotubes myself and I’m sure they are excellent lights, but they are 10 times the price of the tubes I’m using here. Of course, there are many factors to consider like colour consistency and colour control and choice and it’s not simply about comparing output alone, but if you wanted to dip your toe into LED tubes as I did, and you’re willing to shoot at higher ISOs to do so, the PixaPro tubes are a great first choice in my opinion.


Closing Comments

Ultimately I am over the moon with how these final shots turned out. Yes, we are discussing how I ended up creating these shots and you’re seeing all the bumps-in-the-road I faced to make them, but with photography, the journey rarely matters. Our audience only cares about how the final shots look and I think both me and my audience are happy with how these landed and I think I’ll be adding this setup to my regular rotation for the foreseeable future.

Brightness Limitations

As with any new lighting technique, I learned a lot along the way whilst shooting with the actual light source in-shot and yes, as usual, I MacGyvered a solution that I think worked perfectly for the look I was after. The biggest issue beyond actually affixing the lights was of course their brightness, and the power output of these LED tubes is certainly something to be aware of.

When shooting anything in low light like f2 and ISO 400, we need to be extremely cognisant of any other ambient light in the room. Many of you following my work on here may well be used to working with flash in bright studios, but these LEDs simply cannot be used in bright rooms and a tightly controlled environment is needed to make the most of these lights. For the most part, closing the curtains or simply waiting for the sun to go down will be more than enough to secure some very cool-looking shots, but I do think it’s worth being aware of this if you’re looking to pick some of these up for yourself.

Are These LED Tubes Worth Purchasing?

At the start of this article, I mentioned that Essential Photo had loaned me these LED tubes to play with. I am required to return them now the shoot is complete, but I think I’m going to buy my own ones anyway. Do they have limitations? Sure. Do they offer something extremely unique? Absolutely and that’s why I’m going to buy some. No, I’m not going to replace any lights I already own with these and I may only use them once or twice a month for that very specific look I’m after, but I’m certainly willing to lose a couple of stops of light to save myself £2000 in the process!

If you were looking to try some LED tubes yourself, then these very inexpensive tubes are an obvious first step. LED tubes, powerful or not, create a very unique look due to their light drop-off and although I doubt they’ll replace the lights you currently own, there’s a reason you’re seeing more and more tubes like this hitting the market every year. The light drop-off I discussed at the start is a very real factor in why so many people like the look of these, but it won’t be for everyone, so like I said, if you want to see for yourself, 50 quid isn’t a huge risk to take in my opinion.

I’ve already shot with these tubes in several shoots in recent weeks that I’ve yet to retouch and share. If you’re interested in seeing more examples of these tubes in action, be sure to follow my work on socials in the coming weeks.

Featured model: Izzy.S from MOT models


Products Used…

Please note that I’ve included affiliate links below for PixaPro and I will benefit (albeit minimally) from the sales of any of these products should you purchase them. To that end, please feel free to use my discount code ‘HICK5-OFF’ at Essential Photo to receive a discount on any purchase via their site.

Rainbow Series RGB LED NEON Light Tube

I was using the 120cm long tubes, but be aware that 90cm length tubes are also available. More information on these tubes can be found via the link provided.

Rainbow Series 320-Degree RGB LED Neon Light Tube


Detachable Base C-Stand

Every decent studio has a few C-Stands in them as they’re rock-solid when it comes to holding kit and backdrops. I only have a couple myself, but I always want more. If you have a more permanent space to shoot from, I doubt you’ll ever regret getting some of these.

3m Professional C-Stand Spring Loaded Detachable Turtle Base


C-Stand with Grip Arm

I personally think the grip arm is essential to a C-Stand as it offers a lot of flexibility when it comes to attachments and light placement. I have a grip arm on both my C-Stands for this reason.

50" Collapsible And Portable C-Stand With Grip & Arm Set


C-Stand Grip Head

This very versatile grip head that works on all C-Stands and arms. I was using this atop my C-Stands in this shoot to hold my LED tubes via the groves between the grip disks here.

2.5” Stainless Steel C-Stand Grip Head


Thank You

As always, thanks for checking out this article and spending a little bit of your day with me here. I hope you found it useful and if you left with a little more knowledge than when you arrived, it’s been worth it.

If you have any questions or comments, or if something doesn’t make sense, by all means, fire away in the comments below and I’ll do my best to answer what I can. Thanks again and I’ll see you in the next one.

Don’t forget to sign up to my newsletter to be sent all of these photo tips and techniques articles every month in case you miss one.


JHP Livestreams…

If you give this setup a go, I’d love to see how the shots turn out, so feel free to share them my way. One way to do that is via my Livestream. I Livestream every other Tuesday night via my FB Page and there I answer your questions, critique your shots, take community images into Photoshop to work on them and discuss all manner of lighting tips and techniques. I look forward to seeing you and your work there real soon. JHP Facebook Page


ONLINE WORKSHOPS - LEARN MORE
JHP COLOUR GEL PACKS - BUY NOW
ONE-2-ONE MENTORING - LEARN MORE

 
Tuesday 03.28.23
Posted by Jake Hicks
Comments: 3
 

Lighting Setup: Using a DIY Scrim in the Studio

There are quite literally thousands of lighting modifiers on the market today, but which ones are good, which ones should you avoid and… can you make some of them yourself?

TL;DR

In this article I want to discuss:

  1. What a scrim is.

  2. What a scrim does.

  3. And how you can make a very simple scrim for yourself if you like the look it provides.


What is a scrim?

Scrims have been around an extremely long time, in fact in their simplest form, they’re probably amongst some of the oldest modifiers still being used today. But what is a scrim? A scrim is simply a piece of fabric that goes between the light and the subject. This fabric is colour-neutral and although they are sometimes used to reduce the power of some lights that can’t be manually dimmed, their primary function is to reduce the hardness or harshness of the light being used. You and I are used to seeing a scrim-like material as the front of our softboxes for example. They simply ‘soften’ the light before it reaches the subject.

If you’ve not heard of a scrim before, then it’s because they aren’t often used by photographers, but they’re extremely common in the film industry and have been used on film sets since the early 1900s. As I mentioned, they aren’t too common to us photographers and that’s simply because we often use posh-scrims, called softboxes.

Click to enlarge: In this image, we can see a direct like-for-like comparison of what a scrim does to the light. In the top images, we see the light effect without a scrim and in the bottom image we see the light quality change dramatically with the scrim placed between the light and the subject.


Why would you use a scrim?

As I mentioned above, we studio photographers already own scores of softboxes in a multitude of sizes and shapes, why on earth would we even use a scrim? You are correct of course, a softbox is super convenient, but a scrims usage ultimately came about in the film world as a way to not only reduce the power of the sun, but to soften the harshness of sunlight. You can’t very well throw a softbox on the sun or turn it down and this is where scrims are most useful.

One other factor that I’ve personally grown to love about scrims though, is their flaw/feature of not directing all of the light into one spot. Softboxes are great at softening the light, but they also focus all of that light in one area. Many of you are likely thinking this is fantastic and some of you may even focus your softboxes even further with grids on them too. I sometimes do the same, but there are times when I want a little more ambient or even fill light in my shot and a softbox with its very directional light can often prevent this.

A scrim by its nature is just a sheet and there are often no walls to direct all of the light through it. Light is allowed around the scrim, over and under the scrim and although that light may not directly hit the subject, it is illuminating the scene around the subject.

In the images pictured above, we can see the power a scrim has when it comes to controlling daylight. In the lefthand image (top image if you’re brave enough to wade through this thesis on mobile), you can see what the sunlight looks like without a scrim. In the righthand image, you see the huge difference a scrim has on the light and not only can the poor model now open her eyes, but the quality of light on her skin is significantly softer. Plus, these images are a great example to show you what the light looks like outside of the scrim too.


Using a scrim in the studio

For the 3 natural-light shooters that follow my work, you’ve just seen how powerful a scrim can be when used in conjunction with the sun, but what about the rest of us, are scrims even useful with artificial light in the studio?

You can see that even though I’m using a huge modifier here, I’m still using a large scrim to soften that light even further.

SIDEBAR: If you’re new here, I’ll just come right out and say it, I really HATE softboxes! In fact, I’ve not used a softbox as a keylight in any of my shoots for many, many years and the reason for that is simple. The quality of light softboxes provide when used in small spaces like on-location shoots in offices or people’s homes is terrible. Yes, if you’re in a big studio and you can pull a big softbox further away from the subject to allow the soft light to spread out a little, fine. But in smaller spaces where the softbox and light need to be super-close to the subject, the quality of light is awful and the images immediately look like they’ve been shot with speedlghts and are not natural or aesthetically pleasing at all. No hate from me if you enjoy using softboxes like that, but at least consider trying alternatives, just to check you can’t see the difference. I’ve dedicated whole articles to explaining the quality of light concerns of softboxes in the past, so I won’t bore you all again with it now, but I just wanted to remind you why I personally do not use softboxes and why I opt for umbrellas, beauty dishes and scrims for my keylights instead.

I’ve only been using scrims in the studio for the past few years, but I immediately noticed a shift in the look of my work when I did. As I mentioned above, a scrim does allow for light to spread a lot more and there are times when the light escaping around the scrim can help too. All too often studio-shooters will have pure black areas of deep shadow in their shots and this isn’t always a good look. Our eyes inherently dislike areas of mystery thanks to heavy shadow and pure black areas in a shot are a good example of this. Plus, one of the first things you’re taught in art is that there’s no pure black and pure white. Even deep shadows in nature will be very dark brown and the brightest highlights will often have yellow or blue undertones. Understanding this allows for your studio shots to look a little more visually pleasing thanks to the images appearing more real and organic compared to an unrealistic deep contrast that doesn’t appear in the real world.


The Setup

Let’s look at a recent shoot of mine where I used a DIY scrim to soften the light on the subject.

Click to enlarge

I’ll post more BTS of this setup below, but for now, let’s break down what’s going on.

TL;DR/ADHD/Artist Setup Explanation

  • Set up background behind model and shine small yellow light at it

  • Place hair light high and to camera left set to yellow

  • Position key light in front of model and fire it through a scrim


What You Will Need

  • 3 Lights - I’m using all LEDs in this shoot, but flash will also work. Rotolight AEOS 2 as my key, the Rotolight NEO 3 as my small background light and the Godox SZ150R as my hair light.

  • 1x Reflector (DIY V-flat) - You know I love using these big reflectors in my sets and the DIY V-Flat here is simply bouncing back some light from my key. If you’ve not got one yet, here’s the article on how I made mine: DIY Foldable V-Flats

  • DIY Scrim - I have a professional purpose-built scrim that I often use and I’ll link that down below, but here I’d not set it up and due to time constraints, I quickly made one myself on set. More details on that included below.


Camera Settings

  • Camera - Nikon D850

  • Lens - 24-70mm f2.8 / 105mm f2

  • Shutter Speed - 1/125th

  • Aperture - f2.8

  • ISO - 125

  • Kelvin - 5000K

  • Focal Length - 105mm / 70mm


The Results…

Click on the shots below to fit them to your screen.


Breaking it Down

Nothing too crazy-tricky right? A key light, a hair light and a background light, fairly standard stuff, but I’ll do my best to outline the most important parts of the setup.

The reflector/fill

The shot itself is simple in that the key light is bouncing off of the white reflector to camera left to add some much needed fill-light to the shadow-side. Try moving that reflector in close if you want more fill, or move it further back if you want less.

The hair-light

It’s always nice to have a separation light like this behind the model, that way you add that extra layer of dimension to the subject against the background. I’d recommend having the hair-light up nice and high and angled down on top of the model to ensure as much of the light is hitting them as possible. It doesn’t need to be coloured, but the yellow was a nice contrast against the blue.

The background light

Again, this light is about adding depth and separation between your subject and background. Don’t fall into the trap of it being too bright and drawing the viewer’s attention away from the subject though, and just a pop of light is all that’s needed. Again, this doesn’t need to be coloured, but here I’m matching it to the hair lights colour of yellow.

The flare

I know long-time followers of my work are used to me using this, but the coloured flare you see present in some of these shots is thanks to a low-contrast filter from LEE Filters being attached to my lens. These lens filters are a great way to add a little extra depth and interest to the shot, without first having to fill the room with haze. If you’ve not tried them, give them a go when you have a light coming back into the lens.

Of course, the main topic of this article is the scrim, so with that in mind, I did take some reference shots with and without the scrim in front of the light, so you can see exactly what’s going on and what it’s doing.

With and without the scrim

Below I’ll share some shots with and without the scrim in place.

The image on the left (top image if on mobile) is with the scrim in front of the light and the image on the right is with no scrim. Bear in mind, I’m using a 12-inch circular LED light as my key, so yes, although it’s unmodified, it is a large-ish light source, plus it has a diffusion dome in place on the light as well. I’ll include actual photos of the BTS below in case you’re not sure what the Rotolight AEOS 2 looks like.

In these BTS you can clearly see how close the AEOS 2 light is to the model and where the scrim is placed in relation to it.

Without the scrim in situ, you can immediately see how the resulting light affects the model. Plus, look at how much light is spilt organically around the set with and without the scrim in place too.

I’m sure it doesn’t take a genius to see the difference in these final shots, but let’s break it down a little. Firstly, the skin is night and day different in these shots. Yes, the skin is purposefully shiny from makeup, but that shine is extremely evident in the non-scrim shot. The smaller light source hitting the subject without the scrim is a far harder light and this results in a more contrasty light. This increased contrast translates to more saturation in colour shots too and you can see that in the skin and jacket. Conversely, the light and scrim are obviously far softer due to the light effectively being enlarged in front of the model. This in turn results in a softer, less contrasty light.

I’d also ask you to look at the background behind the subject as well as the shadow on the model’s right cheek (camera left cheek). See how much more detail is present in both those areas thanks to the scrim forcing some light to bounce around the environment.

Modifier Size

I mentioned above about the size of the light affecting its hardness. In the two shots above, we can very clearly see the size difference between the lights with and without the scrim. Also (and I triple-checked this), these two images are taken with the same camera settings for both. That scrim does a remarkable job of spreading the light you have. Note: The scrim is hanging over the frame, so it's effectively double-diffusion as the light passes through the semi-folded sheet..

Take a look below at a couple more examples with and without scrim:

Just like before, the left-hand image is with the scrim in place and the right-hand image is without.

Here it’s very obvious which shot is using the scrim as we can clearly see a big difference in the specular highlights in the glasses too.


DIY Scrim

A long time ago I made a DIY scrim out of copper pipes and pipe connectors, but that was a fair amount of work (here’s the link if you’re curious: DIY Scrim/Silk Frame For Huge Diffused Lighting Modifier ). As I said, that was a fairly involved process and truth-be-told, I rarely use it now that I have a proper one (link below). But if you don’t want to get a proper one and don’t want to buy 2 miles’ worth of copper piping, here’s a pretty damn good alternative that’ll cost you very little.

My budget scrim is actually a collapsible clothes rail for its frame and then a cheap sheet of diffusion material is thrown over it. Sounds pretty sketchy right? Well, it’s actually surprisingly effective, plus, if you get this out on set, you won’t look like a part-time plumber either!

These clothing racks are actually worth getting anyway for shoots as believe it or not, people use them to keep models’ clothes from creasing on set as well as DIY scrims. They pack away very easily and weigh very little too.

I got mine from ‘Dunelm’ here in the U.K. for around £15, but you can find any amount of similar clothes rails on Amazon and other sites too. One thing to look for is height. The taller, the better. I was fortunate that my model sat down for this shot, but if they’re standing, you may need an alternative or a way to raise it.

The one other item you’ll need is the scrim material itself. You can use almost whatever you want as long as it allows light to pass through it and is very colour neutral. I always carry a couple of sheets of diffusion with me in case I need to throw them over a window somewhere, so getting some is well worth it, plus it’s not expensive either. Amazon affiliate link DIY Scrim Products


Points to remember

  • Try using a scrim instead of a softbox - you may prefer the look!

  • The scrim will often allow light to spread around the modifier and bounce around the room - This is okay and let it happen to see if you like how it looks.

  • Don’t have the scrim right up close to the light - puling the light further away will allow the light to spread.

  • Play with the colours - As always, don’t be afraid to add some colour to your shots. Just be mindful of what colour is already there and what colours would work well with it.

  • Point the hair light back into the camera - If you have a hair light coming back into the camera lens like I have here, consider playing with a lens filter like my low contrast filter. They can easily add some atmosphere and depth to a shot.


Closing Comments

A scrim produces a very different look compared to a simple softbox and this is especially apparent in smaller studios and tight locations. The light that is allowed to pass around the scrim and bounce around the scene will often help to give you a far more organic and natural looking light. This is why you see scrims being used on movie sets all the time as the directors certainly don’t want their scenes looking like a studio shot.

The setup I’ve shared here is very simple, but it would be a great setup to try with a scrim for a few shots and a softbox for few shots. Only by doing this will you see the difference between them and remember, like with so many things in photography, a scrim isn’t going to replace a softbox as it provides a very different look, but just be prepared to prefer it.


Products Used…

Although I am sharing my own personal thoughts and findings about the lights mentioned in this article, many of you will want to know that I am now an ‘‘Master of Light’ for Rotolight. As such, I have been given a discount code to share with you when purchasing any of their products via the Rotolight website. Use my code ‘JAKEHICKS10’ when purchasing and you’ll save a bunch of money and I will enjoy a beer in your honour for doing so.

Rotolight AEOS 2

The AEOS 2 is one of the newest lights to market from Rotolight and with the design goal of bringing the majority of the features from their flagship Titan to an affordable package, I’d say they succeeded. This light is unfathomably lightweight for its output and features, plus everything is instantly accessible on the back of the light via a full-colour touch screen!

AEOS 2 Website Link


Rotolight NEO 3

The NEO 3 is quite literally everything the AEOS 2 is but in a smaller package. The same full RGB colour features, the same full Kelvin scale adjustments, it’s even got the same size full-colour touch screen on the back! As I say, if you need all the functionality, but in a smaller light, its the NEO 3.

NEO 3 Website Link


Please note that I’ve included affiliate links below for PixaPro and I will benefit (albeit minimally) from the sales of any of these products should you purchase them. To that end, please feel free to use my discount code ‘HICK5-OFF’ at Essential Photo to receive a discount on any purchase via their site.

An LED studio strobe that will accept any of your current S-Fit modifiers.

Godox SZ150R

Essentially this is an LED studio strobe. You can use it with any S-Fit modifiers like beauty dish and softbox you already own, plus you can also change this to any colour and any Kelvin you’d like. It’s only 150 watts though, so you will want to use this in a controlled studio environment.

Godox SZ150R Link


In this article, I’ve shown you a cheap and practical-ish DIY scrim alternative. The biggest downside of that is not only its small size height-wise but its versatility. Most of the time, I use the scrim you see listed here as my scrim.

Large Scrim

I originally got this for cinematic studio lighting, but now I nearly use it on every shoot that requires a soft light. This scrim produces noticeably cleaner and softer light over simply using a softbox alone.

Large Scrim Link


Thank You

As always, thanks for checking out this article and spending a little bit of your day with me here. I hope you found it useful and if you left with a little more knowledge than when you arrived, it’s been worth it.

If you have any questions or comments, or if something doesn’t make sense, by all means, fire away in the comments below and I’ll do my best to answer what I can. Thanks again and I’ll see you in the next one.

Don’t forget to sign up to my newsletter to be sent all of these photo tips and techniques articles every month in case you miss one.


JHP Livestreams…

If you give this setup a go, I’d love to see how the shots turn out, so feel free to share them my way. One way to do that is via my Livestream. I Livestream every other Tuesday night via my FB Page and there I answer your questions, critique your shots, take community images into Photoshop to work on them and discuss all manner of lighting tips and techniques. I look forward to seeing you and your work there real soon. JHP Facebook Page


ONLINE WORKSHOPS - LEARN MORE
JHP COLOUR GEL PACKS - BUY NOW
ONE-2-ONE MENTORING - LEARN MORE

 
Tuesday 02.28.23
Posted by Jake Hicks
Comments: 2
 
Newer / Older