• >>>NEW Colour 2.0 Workshop<<<
  • Technique
    • Latest Techniques
    • FREE TIPS
    • Quick Tips
    • Video
    • Site Search
    • Blog
    • Archives
  • Mentoring
  • >Online Workshops<
  • Workshops
  • Studio Lighting Books
  • Contact
    • Newsletter
    • Contact
    • Statement
Jake Hicks Photography
  • >>>NEW Colour 2.0 Workshop<<<
  • Technique
    • Latest Techniques
    • FREE TIPS
    • Quick Tips
    • Video
    • Site Search
    • Blog
    • Archives
  • Mentoring
  • >Online Workshops<
  • Workshops
  • Studio Lighting Books
  • Contact
    • Newsletter
    • Contact
    • Statement

JHP Xmas 2022 Lightroom Preset Pack

As a thank you to my most dedicated members of my community, I’ve put together an exclusive Lightroom Preset pack to say thanks for all the chats and discussions we’ve had in some of my Live Streams this year.

Below you’ll find a pack of 10 exclusive Presets that have been designed and used for some of the shots I’ve had this year. As you might expect, they are heavily tailored towards coloured gels and studio strobe images. As a result, these are not your generic ‘one-click’ solution to many shots, but the Presets work best as a foundation for you to adjust and develop for your own needs.

Tips on using my Presets

As I alluded to above, many Presets are often a one-click solution, but consequently they may not be doing anything too dramatic to the final image. Much of my work involves very bold colours and to maintain as much data in the raw file as possible when shooting such saturated colours, I often underexposure my images. With this in mind, you may notice that some of these Presets are a little strong when you initially use them. My advice is to consider playing with the Kelvin (white balance) and exposure after you’ve applied them to get a better fit for your work.

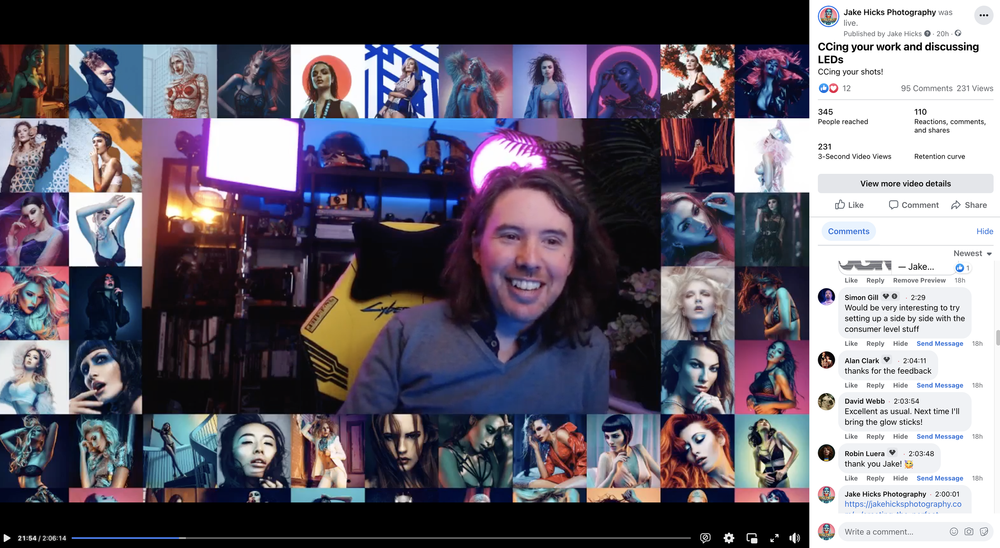
Take Part in the Community Live Streams

With that being said, enjoy the free pack and have fun playing with them on your own shots. I look forward to seeing what you produce with them.

As always, if you’d like to share what you create with me and the rest of my colour-nerd community, feel free to take part in my weekly -Share-a-Shoot- each Monday on my Facebook Page. Every fortnight I also go live and stream via my FB Page to offer critique and feedback on community images too. I’d love to see you there.


JHP Xmas 2022 Lightroom Preset Pack

The Download Link will appear once you’ve clicked the Submit button below.

Name *
Please Confirm *

Thank you! Enjoy your free Jake Hicks Photography Xmas 2021 Lightroom Presets via the download link below…

LINK >>> JHP Xmas 2022 Lightroom Preset Pack

Note: The download link above should start to download as soon as you click it


JHP Xmas 2022 Lightroom Preset Pack Before & Afters

View fullsize 01.jpg
View fullsize 02.jpg
View fullsize 03.jpg
View fullsize 04.jpg
View fullsize 05.jpg
View fullsize 06.jpg
View fullsize 07.jpg
View fullsize 08.jpg
View fullsize 09.jpg
View fullsize 10.jpg

JHP Livestreams…

If you give this setup a go, I’d love to see how the shots turn out, so feel free to share them my way. One way to do that is via my Livestream. I Livestream every other Tuesday night via my FB Page and there I answer your questions, critique your shots, take community images into Photoshop to work on them and discuss all manner of lighting tips and techniques. I look forward to seeing you and your work there real soon. JHP Facebook Page


ONLINE WORKSHOPS - LEARN MORE
JHP COLOUR GEL PACKS - BUY NOW
ONE-2-ONE MENTORING - LEARN MORE

 
Tuesday 12.13.22
Posted by Jake Hicks
 

This Week in Photo (TWIP) Jake Hicks Photography Interview 2022

I’m very proud to say that Frederick over at This Week in Photo, invited me back on the show to do another interview with him. This time around I took a deep-dive into my image making process with regards to coloured lighting. I discuss my philosophy on what I believe ‘quality of light’ really means, how to avoid washed out colours, as well as why you should never use a grey backdrop with coloured lights!

Frederick also quizzes me on my recent shift to LED lighting. Why did I decide to start using LEDs? Why are they better than strobes for me? What are some of the very real and practical benefits of the new Rotolight LEDs over the flash that I’ve been using for the past 20 years.

I just rewatched this myself to double-check what we spoke about and we actually touched on a huge range of topics. Yes, you’ve likely heard me talking about LEDs at length recently, but this interview covers an absolutely ton of other topics and ideas that I really do think you’ll find interesting.

TWIP is known for its incredibly long running podcast show, so although this is available on all good podcast networks, I’d encourage you to watch the video as I’ll be referencing a lot of visuals on my screen too. Enjoy and let me know what you think.

Either check the actual TWIP website to watch it with the reference shots here TWIP, or simply watch it via YouTube below.


TWIP can also be found on every major podcast network, just search TWIP or This Week in Photo to find all the episodes including this one. For example, here’s a link to the Spotify version here.

Alternatively; Podcast: Download (Duration: 1:14:18 — 85.0MB)


Thank You

As always, thanks for checking out this article and spending a little bit of your day with me here. I hope you found it useful and if you left with a little more knowledge than when you arrived, it’s been worth it.

If you have any questions or comments, or if something doesn’t make sense, by all means, fire away in the comments below and I’ll do my best to answer what I can. Thanks again and I’ll see you in the next one.

Don’t forget to sign up to my newsletter to be sent all of these photo tips and techniques articles every month in case you miss one.


JHP Livestreams…

If you give this setup a go, I’d love to see how the shots turn out, so feel free to share them my way. One way to do that is via my Livestream. I Livestream every other Tuesday night via my FB Page and there I answer your questions, critique your shots, take community images into Photoshop to work on them and discuss all manner of lighting tips and techniques. I look forward to seeing you and your work there real soon. JHP Facebook Page


ONLINE WORKSHOPS - LEARN MORE
JHP COLOUR GEL PACKS - BUY NOW
ONE-2-ONE MENTORING - LEARN MORE

 
Tuesday 12.06.22
Posted by Jake Hicks
 

How to Use Gels to Create a Glow Effect - PixaPro LIVE demo TPS 2022

This was another of my lighting demos recorded live at ‘The Photography Show’ earlier this year. TPS is held at the NEC in Birmingham and this year I was invited to the show to run several live demonstrations for PixaPro using their strobes and modifiers.

In the video below, you’ll see me explaining a couple of creative lighting setups that not only require very little space, but only need a couple of basic modifiers too. I explain what modifiers to use and why, plus I’ll explain where each light should be placed, but more importantly why they should be placed there. What to look for, where the shadows should be and where to position yourself to get the best look.

Also, be sure to scroll down, as below the video I’ll include the kit list, camera settings and a lighting diagram too.

As always, if you have any questions, let me know.


Kit List

Please note that I’ve included affiliate links below and I will benefit (albeit minimally) from the sales of any of these products should you purchase them. To that end, please feel free to use my discount code ‘HICK5-OFF’ at Essential Photo to receive a discount on any purchase via their site.

  • CITI600 PRO Battery Powered 600w Flash

  • 240cm Retractable Light Stands

  • 300cm C-Stand + Grip Arm

  • 600 Floor-stand for Backlighting

  • 80x120cm FlatPak Softbox

  • 22” Beauty Dish + Grid + Diffusion Cover

  • Flatpak 60cmx60cm Softbox

  • 61cmx76cm Flag Set

  • Pro ST-IV 2.4GHz Trigger

Colour Gel Packs

As always, my colour gel packs are still available. The saturated colours I used in this shoot all came from the Definitive Colour Pack and the CTO gels came from my Utility Gel Pack.

Colour Gel Packs


Lighting Diagrams

Click to enlarge - Cut out & keep

Click to enlarge - Cut out & keep


Camera Settings

  • Camera - Nikon D850

  • Lens - 24-70mm f2.8

  • Shutter Speed - 1/125th

  • Aperture - f5.6

  • ISO - 100

  • Kelvin - 4500K

  • Focal Length - 70mm


Final Shots

Click to enlarge

Click to enlarge

Featured model: Jaye Hicks


Thank You

As always, thanks for checking out this article and spending a little bit of your day with me here. I hope you found it useful and if you left with a little more knowledge than when you arrived, it’s been worth it.

If you have any questions or comments, or if something doesn’t make sense, by all means, fire away in the comments below and I’ll do my best to answer what I can. Thanks again and I’ll see you in the next one.

Don’t forget to sign up to my newsletter to be sent all of these photo tips and techniques articles every month in case you miss one.


JHP Livestreams…

If you give this setup a go, I’d love to see how the shots turn out, so feel free to share them my way. One way to do that is via my Livestream. I Livestream every other Tuesday night via my FB Page and there I answer your questions, critique your shots, take community images into Photoshop to work on them and discuss all manner of lighting tips and techniques. I look forward to seeing you and your work there real soon. JHP Facebook Page


ONLINE WORKSHOPS - LEARN MORE
JHP COLOUR GEL PACKS - BUY NOW
ONE-2-ONE MENTORING - LEARN MORE

 
Tuesday 11.22.22
Posted by Jake Hicks
Comments: 1
 

Impactful Editorial Portraits - PixaPro LIVE demo TPS 2022

This year was our first time back to the U.K.s biggest photo expo after a few years off during the lockdowns. ‘The Photography Show’ is held at the NEC in Birmingham and this year I was invited to the show to run several live demonstrations for PixaPro using their strobes and modifiers.

In the video below, you’ll see me explaining a simple but impactful editorial-style portrait that uses subtle colours via the use of colour gels and camera tricks to give an eye-catching look. I explain why modifiers to use and why, plus I’ll explain where each light should be placed, but more importantly why they should be placed there. What to look for, where the shadows should be and where to position yourself to get the best look.

Also, be sure to scroll down, as below the video I’ll include the kit list, camera settings and a lighting diagram too.

As always, if you have any questions, let me know.


Kit List

Please note that I’ve included affiliate links below and I will benefit (albeit minimally) from the sales of any of these products should you purchase them. To that end, please feel free to use my discount code ‘HICK5-OFF’ at Essential Photo to receive a discount on any purchase via their site.

  • CITI600 PRO Battery Powered 600w Flash

  • 240cm Retractable Light Stands

  • 22” Beauty Dish + Grid + Diffusion Cover

  • Large 130cm Black/White Umbrella

  • 4 Grids for CITI600 Pro

  • Standard Reflector with Umbrella Slot

  • 2x3m Hand Painted Backdrop Canvas (Blue)

  • Pro ST-IV 2.4GHz Trigger

Colour Gel Packs

As always, my colour gel packs are still available. The saturated colours I used in this shoot all came from the Definitive Colour Pack and the CTO gels came from my Utility Gel Pack.

Colour Gel Packs


Lighting Diagram

Click to enlarge - Cut out & keep


Camera Settings

  • Camera - Nikon D850

  • Lens - 24-70mm f2.8

  • Shutter Speed - 1/125th

  • Aperture - f5.6

  • ISO - 100

  • Kelvin - 4500K

  • Focal Length - 70mm


Final Shots

Click to enlarge

Click to enlarge

Featured model: Jaye Hicks


Thank You

As always, thanks for checking out this article and spending a little bit of your day with me here. I hope you found it useful and if you left with a little more knowledge than when you arrived, it’s been worth it.

If you have any questions or comments, or if something doesn’t make sense, by all means, fire away in the comments below and I’ll do my best to answer what I can. Thanks again and I’ll see you in the next one.

Don’t forget to sign up to my newsletter to be sent all of these photo tips and techniques articles every month in case you miss one.


JHP Livestreams…

If you give this setup a go, I’d love to see how the shots turn out, so feel free to share them my way. One way to do that is via my Livestream. I Livestream every other Tuesday night via my FB Page and there I answer your questions, critique your shots, take community images into Photoshop to work on them and discuss all manner of lighting tips and techniques. I look forward to seeing you and your work there real soon. JHP Facebook Page


ONLINE WORKSHOPS - LEARN MORE
JHP COLOUR GEL PACKS - BUY NOW
ONE-2-ONE MENTORING - LEARN MORE

 
Tuesday 11.08.22
Posted by Jake Hicks
Comments: 2
 

Simple Full Cover Gelled Lighting

Controlling gelled lights can be tricky. We all struggle with washed-out or even muddy colours occasionally and the core reason for this, is your coloured lights overlapping and mixing.

The golden rule of coloured light is ‘you can only add a gel to a shadow’.

The reason I repeatedly say this, is because coloured light don’t mix like regular colours. When we mix paints, the more colours you add, the closer you get to a muddy brown colour. Cast your mind back to preschool and you’ll know what I mean.

Sadly, we have to forget how colours mixed when the greatest thing in our lives was a Dairylea Triangle. We now have to relearn how colours mix when applied to lighting, so fast forward a few years from preschool and you should recall a science lesson that explained how white light was actually the full spectrum of colours. Remember that glass prism that split the white light to reveal the rainbow?

This is why coloured light can so easily be washed out, as the more coloured lights you mix, the closer you get to white light, not that muddy brown paint-soup you were so proud of.

Click to enlarge

So that is why many gelled lighting shots may look washed out. But why is that important today? Because I’m going to break my one golden rule of coloured light and show you how to mix coloured lights in the same space.

Developing an Impactful Setup

The lighting setup I’m about to share with you is a setup I developed for a large group of portrait studios here in the U.K. nearly a decade ago. When I get called in to help develop photographers working in a studio or studios, there is usually a few guidelines I need to be aware of, especially if those lighting setups are to then be used in multiple locations.

If you’re a busy studio shooter, having a handful of impactful-looking lighting setups that can easily be implemented quickly, is a must!

These guidelines normally look this:

  • A setup that is quick to implement

  • Forgiving to get right

  • Must have an instantly impactful look

  • Should be achievable with minimal lighting kit

Time

As those of you poor souls, like me, who’ve spent many years of your life working in busy studios will know, time is everything! You need to set the next lighting setup up without the client getting bored or anxious. Plus the faster you set up your lights, the faster you can get another setup in play with the limited time you have and the more unique setups you have, the more money you often make.

Forgiving

The other aspect of this is that it shouldn’t take a lighting-genius to be able to make it look good. Some nutters out there are measuring out their lights and tripods with tape measures and using light meters to check each light! Very busy studios don’t have anywhere near that sort of time, so a setup that is generous with where the lights are placed and the powers they need to be is always a plus.

Impact

Coloured lighting is why I saw a rise in popularity many, many years ago, but in reality, the reason for this is due to how eye-catching a coloured lighting shot is. I know everybody and their estranged grandmother is shooting with coloured gels today, but 10 years ago, when you saw a shot with a bright pink and blue coloured lady in it, it caught your attention. With this in mind, an impactful gel shot often comes down to just how much colour you can cram between the sprockets, so a full-cover gel shot was always a winner.

Simple

This last aspect was always a tricky one for me to tick off, ‘The setup should be achievable with minimal lighting kit and lights’. The reason for this is that not all studios would have 6 lights and a dozen modifiers, so the lighting setup couldn't be too elaborate. On top of that, the more kit you use, the slower you become. Most studios have a minimum of 4 lights and basic modifiers like softboxes and grids, so that was often what most of the setups involved at the time.

If you’re looking to develop your own lighting setups, either for your clients or even just for yourself to freshen up your workflow, these 4 guidelines are a great place to start. Studio photography has never been as approachable as it is today and as a result, there are thousands of modifiers and tools for us to play with in the studio. More choice is always a good thing, but it can be a bit overwhelming for some and it can be difficult to know where to start. Sometimes giving yourself some constraints like this can help you narrow your vision and focus your results.


The Lighting Setup

As always, let’s show you what we’re shooting and then break it down from there.

Click to enlarge

Click to enlarge

Click to enlarge

Click to enlarge

Click to enlarge

TL;DR/ADHD/Artist Setup Explanation

  • Setup a large softbox to camera-right and point it at a white wall - affix blue gel

  • Place a small softbox to camera-left down low and aim at the subject - affix orange gel

  • Position an open reflector dish behind the subject and point it at the white wall behind - affix pink gel

  • Angle an optical snoot down and onto your subject’s face - no gel


What You Will Need

4 Lights - These can be strobes or speedlights or even LEDS. As long as we can modify the light with the following modifiers, this one is fairly flexible.

Large softbox - I’m using a 80x120cm one here which is perfect for what we’re trying to do and that’s cover a very large area with coloured light. The large softbox enables us to do that.

Small Softbox - I’m using a 60x60cm softbox here and that is ideal for a fill-light such as this. Using a larger one here would throw too much light around the studio and the small one allows us to get that light in nice and close to the subject.

Open Reflector Dish - This should be an easy one as nearly all strobes come with a simple dish and a small one like this is ideal for hiding behind the subject. One note worth mentioning here is that I’m using a diffusion gel along with my coloured gel.

Optical Snoot - I love my optical snoot as it enables me so much control over where the light is actually going. This particular optical snoot (I’ll list all the kit used at the bottom) is even better too as it has adjustable shutter blades to really narrow in the light if needed.

Alternatively, you could use an open dish with a tight honeycomb grid here instead. Yes, I always recommend an optical snoot, but as good as it is, the very hard light is not essential here and the control a gridded dish would offer is also more than fine.


Camera Settings

  • Camera - Nikon D850

  • Lens - 24-70mm f2.8

  • Shutter Speed - 1/125th

  • Aperture - f2.8

  • ISO - 100

  • Kelvin - 4500K

  • Focal Length - 70mm


The Results…

Click to fit any of the shots below to your screen.


Breaking it Down

This setup is fairly self-explanatory as it’s actually a simple setup that produces excellent results for the effort involved in setting it up. Every light has a clear role here, so simply set it up one light at a time and you shouldn’t have too many issues.

Click to enlarge

Blue Light

I prefer to start with the blue light when setting this up as that’s the light that is doing the most. One aspect I recommend taking advantage of, is the corner of your studio. I’ve set the whole thing up at one side of the room so that I can bounce that blue off of the side wall and let it then fall back on the subject as well as the background.

I know what some of you are already saying ‘Jake, I don’t have my own big, white fancy studio to work in!’

This can still be done in a home studio as the same principle of bouncing light applies no matter the size of your space. You simply need a white background/wall and then a white sheet to one side to bounce the light off of.


Click to enlarge

Orange Light

Next, you can bring in the small orange fill light. Be sure to have this low and angled up and also make sure you’ve brought it in nice and close to the subject to control the drop-off of light. One thing you’ll want to watch out for is to make sure no orange light falls onto the background behind. If this happens, it’ll wash out the blue and we definitely don’t want that.


Click to enlarge

Pink Light

Now that the two tricky lights are in place, the background spot should be easy. Do your best to hide the light behind the subject, but don’t panic too much if they move around when shooting and it starts to appear. It’ll be a very easy fix in post if that happens.

I know I mentioned it above, but I’ll say it again here; I did include a diffusion gel with the pink gel on this light. The diffusion gel is always a good idea on background lights as it helps to soften colour transitions as well as reduce any aggressive banding that might appear with the reflector.


Click to enlarge

White Light

Ironically, the key-light is often the light I add last. The reason for this is simply because it’s the easiest to add to any gel setup. Place this light above eye level and angle it down on the model’s face. I’m using an optical snoot here so I’m able to control exactly where the light falls, but even if you’re using a gridded dish, you’ll easily be able to position it to only light the head and shoulders as I’ve done here.


All Lights

Now that all the lights are in place, turn them all on and your shot should look something you see below.

Click to enlarge - With all the lights now on, it should look like this.


Breaking the Rules

At the start of this article, I recommend that you should never mix coloured lights, in fact, I went as far as to say that the golden rule of gelled lighting is that ‘you should only apply a gel to a shadow’.

Of course in this setup, I’ve broken that golden rule by shining both blue and pink on the same area. When I set the pink light up on the background, there certainly wasn’t a shadow there as it was already being lit by the blue light.

But as with many rules, most can indeed be broken in certain situations. Here I’m using a very bold and vibrant colour to overpower a darker, more muted colour. That pink is perfectly suited to dominate the blue, but it won’t work with any-and-all colour combos. Explaining combining coloured light is a book in its own right, let alone its own article, but if you want to play with layering colours in this way, just try them out. A yellow wouldn’t work here as the delicate colour would be overpowered by the blue. A red however would be fine. Try some colour combos yourself, but be prepared for some interesting and bizarre interactions with various colour combos that you might not expect….. Spoiler Alert: Red and Green make Yellow?!??!


Points to Remember…

As always, I’ve done my best to equip you with all the knowledge you should need and for the most part, the diagrams above will get you most of the way there to a half-decent shot. With that being said though, there are a few tips to bear in mind.

  • Consider setting up the lights one at a time like I’ve done here - Start with the blue, then the pink, then the orange and finally the white key.

  • Play around with how close the subject is, not only to the background but the side wall as well - Remember that the blue on the right of the model is coming from that wall bounce to camera-right.

  • Lighter-coloured styling is certainly preferred - Although possible with darker clothes, this setup will be far more impactful with lighter outfits.

  • Model blocking - This is a term I give to posing that blocks and affects how the lighting looks in the final image. You’ll notice in my shots that the model is always facing to one side. This is to allow the colours to clearly appear on each side.

  • Experiment with varying colours - As I mentioned above, the colours used in this setup will make a big impact in the final shot. Look at dominant and recessive colours to do the heavy lifting here and be prepared to switch things up if it isn’t looking right.

Good luck guys and if you give this one a try, please let me know how you get on. Plus, if ever want some feedback on your shots, be sure to post them in my -Share-a-Shoot- every Monday on my Facebook Page.

If you have any questions about anything then pop them in the comments below. Enjoy and stay creative!


Featured Model: Jaye Hicks

Studio: Aura Photographic


Products Used…

Please note that I’ve included affiliate links below and I will benefit (albeit minimally) from the sales of any of these products should you purchase them. To that end, please feel free to use my discount code ‘HICK5-OFF’ at Essential Photo to receive a discount on any purchase via their site.

FlatPak Softboxes

I got the 60cmx60cm and the 80cmcm 120cm softboxes and I’ve attached the links below.

Link - 60x60cm Easy-Open FlatPak Softbox (Patented Design)

Link - 80x120cm Easy-Open FlatPak Rectangular Softbox (Patented Design)

via GIPHY

NOTE: I’ve recently switched to these new ‘FlatPak’ softboxes. I was sent a couple by Essential Photo here in the U.K. and they’re very cool. Why? They quite literally take 3 seconds to put up due to their very clever new quick-open design. By all means, follow the link below to check the video about them, but they really are the easiest and quickest to assemble softboxes I’ve ever seen.


Optical Snoot

I know I’ve spoken a lot about optical snoots in the past and if you have one already, you’re all set. This particular one that I used is useful however as you can adjust the separate blades to channel the light exactly where you want it.

Link - Optical Snoot with built in shutter blades


Standard Reflector Dish

This is your standard reflector that you may already have. I prefer these wider, open dishes for backgrounds as they spread the light quite quickly if tucked in behind the subject.

Link - Standard reflector dish


Lighting

What you use to light this is fairly flexible, but some of you may have spotted a couple of unique items in the BTS so I thought I’d mention them here….

Link - Remote flash extension

Remote Flash Head

I absolutely love this thing and granted it won’t be for everyone, but it certainly has its uses. This extension requires you to pull out the flash bulb on your strobe (e.g. Citi 600 - see the full list of compatible heads via the link) and then you simply plug this in where the bulb was and plug your flash tube into the extension instead. Now you have a very lightweight extension to your strobe that can easily be hand-held with a modifier or even suspended above the model without fear of excessive weight above.


CITI600 PRO

This is your bread-and-butter strobe! This has more than enough power for 99% of what most of us do day-to-day. Its battery lasts all day and you have no cables to worry about, plus it has TTL if you need it too.

Link - Godox CITI600 PRO


Storm III 600

If you’re a busy studio shooter that needs a workhorse strobe that will go all day without fear of a battery letting you down, the Storm series are a great solution.

Link - Storm III 600


Colour Gel Packs

As always, my colour gel packs are still available. The saturated colours I used in this shoot all came from the Definitive Colour Pack and the diffusion gels came from my Utility Gel Pack.

Colour Gel Packs


Thank You

As always, thanks for checking out this article and spending a little bit of your day with me here. I hope you found it useful and if you left with a little more knowledge than when you arrived, it’s been worth it.

If you have any questions or comments, or if something doesn’t make sense, by all means, fire away in the comments below and I’ll do my best to answer what I can. Thanks again and I’ll see you in the next one.

Don’t forget to sign up to my newsletter to be sent all of these photo tips and techniques articles every month in case you miss one.


JHP Livestreams…

If you give this setup a go, I’d love to see how the shots turn out, so feel free to share them my way. One way to do that is via my Livestream. I Livestream every other Tuesday night via my FB Page and there I answer your questions, critique your shots, take community images into Photoshop to work on them and discuss all manner of lighting tips and techniques. I look forward to seeing you and your work there real soon. JHP Facebook Page


ONLINE WORKSHOPS - LEARN MORE
JHP COLOUR GEL PACKS - BUY NOW
ONE-2-ONE MENTORING - LEARN MORE

 
Tuesday 10.25.22
Posted by Jake Hicks
 
Newer / Older