In my recent monthly newsletter I spoke about the importance of making a photo book of your own work each year. Shortly after that I received several messages with questions regarding where I get mine made? And what constitutes a ‘good’ photo book in terms of printing and binding etc?
So as a result, I thought I’d put this quick blog post together on why I think it’s important to make an annual book of your best work each year, and my recommendations on where to get yours made.

Printing an annual photo book each year can seem costly and time consuming, but in time, you’ll be thankful that you did it.
What is this ‘photo book’ exactly?
I appreciate that this might not be as immediately obvious as it sounds, especially in todays digital world where some of you may have never experienced a ‘physical’ manifestation of your work. For us older folks, that might sound very odd, but I’m sure there are plenty of photographers out there who have never, ever seen a physical representation of their work. They may have never had the need to print out a single photo or curate a physical portfolio, so the concept of a photo book may indeed seem odd to them.
A photo book is essentially exactly that; a book of your best photos. Think of it like a mini portfolio. Remember your parents photo albums? Well this is like that but of your own images.
Does anybody even print out photos anymore?
I briefly mentioned that there may be many of you out there who’ve never seen or held a physical photograph that you’ve personally taken. If you’re one of those people, then I think this article is all the more important for you. Photo books, or as they were called years ago; photo albums, are becoming rarer and rarer, and in reality, the only time we see personal books of photos is to immortalise an important period or moment in our lives. Wedding photo albums are still very popular, as are family photo shoots or holidays. We like a physical reminder of those moments and we like to take those moments and share them with other people in our lives.
There’s certainly something very permanent about having a physical copy of our wedding photos over simply having them on Facebook. If you don’t believe me, then take a look at the cost of a wedding photographer that provides photo albums over one that simply provides a disk of shots. There is certainly a perceived value in the physical sentiment of holding our treasured memories over simply uploading them to the internet.

Photo books aren’t just for your best photographs, they are for memorable periods in our lives as well. People make albums of their babies, their weddings or even their holidays.
But I’m not a wedding photographer
So even if you aren’t a wedding photographer or going on fancy holidays that need photo albums, do you still need to be printing out photo books? In my opinion yes, and here’s why I think it’s an important part of our ongoing photographic process.
As creatives, we can and need to be hard on ourselves about the work we produce. I don’t know a single creative who is 100% happy with every project they produce. Sure we may be pleased with the outcome, but there is nearly always something we’re not happy with or something that we’d do differently next time. Unfortunately this seemingly harsh or pessimistic approach to our work is a necessary evil as we simply cannot improve as artists unless we aspire to change something about our work. Imagine finishing a shoot and not wanting to change anything about it. The next time you’re shooting, you’d simply do exactly the same thing as before.
This process of repetition without iteration is the very antithesis of creatively. Trying something new will often lead to mistakes, but ultimately mistakes are the seeds of creativity.

Looking back at your past work may not seem important now, but in years to come it will become clear how you’ve improved.
Celebrate everything that went well
Now don’t worry, I’m not going to start getting philosophical and quoting Descartes or anything, but I just want get across how all of us are hard on ourselves about the work we produce. This is a perfectly normal and healthy part of the creative process but as a result, we can sometimes get a little despondent about our work as we all have a tendency to only remember the things that didn’t go as well as we’d hoped. A photo book is a great excuse to look back over an annual period and celebrate everything that went well with your shoots.
Like I said, we all focus on what could’ve gone better, myself included. Because of this I’m always surprised when I look back at the previous years work to see that I did in fact take some great shots, and a photo book is the perfect way to catalogue that.
Doing this once a year is a good way to keep things in perspective as you should then start to see some form of progression from year to year over simply picking a random time period.
Select your most bestest shots!
Okay so now that I’ve convinced you to make an annual photo book of your work, all you need to do now is make it. First off you’ll need to collect together all your shots from the previous year, then all you have to do is choose your favourites for the book.
It’s actually this selection process that will make you feel better about your work as I guarantee you’ll find it hard to choose your favourites. This surely proves that you have a bunch of great shots if you’re struggling to just pick your best ones.
It’s up to you how many shots you want to include in this annual hall of fame of yours and that will largely be determined by how many shoots you had in that year. It’s also up to you as to what size you want your photo book and how many pages you want it to have.

Lay-flat bindings are almost a necessity for photo books in my opinion. They’ll allow for the images to be viewed without that annoying curved centre spine that will obscure some of the image on both pages.
Choosing Our Photo Book Format
Photo book sizing
For the purpose of this article, I’ll be recommending an A4 size book to maximise the visual impact and quality of your shots. I’ll also be using a page count of 50 pages to compare prices but your photo book may well have more or less pages than that.
Photo book quality
The other thing we’ll be paying close attention to is print quality. As digital photographers we all now own incredibly powerful cameras that are all capable of capturing incredibly detailed shots, we want our photo books to showcase that quality to its fullest. Whilst we’re on the subject of quality, it’s probably a good time to talk about paper surfaces and the differences between gloss and matte. I personally always get my photo books printed on a matte finish and I’d recommend you do the same. The matte finish simply reduces reflections and glare on the surface of the pages. As a result you’re more likely to see the actual printed image rather than a reflection of yourself looking at it.
Photo book cover & binding
All books have covers and bindings and we will have to decide what we feel will look best for our photos. It’s my opinion that a ‘lay-flat’ binding is the best way to display your photos. If you’re unfamiliar with what this is then imagine a normal book, open it up and where the two pages meet in the middle is called a gutter. This gutter is often very curved and photos will not look great when they’re heavily curved like this so the ‘lay-flat’ gutter means that when the book is open, there are no curved pages to distort your shots. So because I believe this ‘lay-flat’ gutter option is so important, it does make our cover decision far easier. The ‘lay-flat’ is normally only an option if you have a hardback cover, so for the purposes of this article we’ll be looking at all hardcover books with lay-flat bindings.

I’ve been making an annual photo book for many years now, but before I settled on what I believe to be the best one, I tried out several different photo book companies along the way.
Photo Book Publisher Comparison
There are of course many, many photo book publishers out there but I’ve chosen three here that I believe offer different options for different needs. But remember, I’m looking for the optimum photo book publisher for us photographers in particular where image quality will likely taken president over everything else.
myphotobook
Founded in 2004
Let’s start with this very versatile and affordable photo book printer. If you’re after anything to be printed on literals anything else, then this is a good choice. Myphotobook don’t just do photo books and they offer all manner of printing options including the calendars, mugs, mousepads etc
Printing a myphotobook A4, hardback, lay-flat photo quality book with 50 pages looks something like this.
Format: A4 portrait, 21.5 x 27.6 cm (8.4 x 10.8") approx.
Cover: Hardcover
Binding: lay-flat binding
Paper: premium photographic paper (380 gsm)
Production: photo developing on silver halide photographic sheets
Price: £59.49 (price for 52 page book)
Shipping: 3 days +£5.95
Blurb
Founded in 2005
Blurb is a printing company that is fairly well know globally now and although they don’t print miscellaneous items like mugs and mousemats, they do print magazines and trade books that may require a larger run of books over simple one-offs.
Printing a Blurb A4, hardback, lay-flat photo quality book with 50 pages looks something like this.
Format: 20x25cm (this is their closest size to A4 which is actually 21x29.7cm)
Cover: Hardcover
Binding: lay-flat binding
Paper: Double-thick, 148 gsm
Production: 4 colour CMYK printing
Price: £72.49 for 50 pages
Shipping: 10 days +£7.99
Bob Books
Founded in 2006
Bob Books is a far smaller company than the other two and based out of the U.K. so shipping times will be longer for international orders. Bob Books does offer a small selection of other printing options including calendars and wall art but their main focus is still photo books and their printing options available support this.
Printing a Bob Books A4, hardback, lay-flat photo quality book with 50 pages looks something like this.
Format: A4 Portrait, 21x28cm
Cover: Hardcover
Binding: lay-flat binding
Paper: Matte Photographic Paper - 300 gsm Fuji matte photographic paper
Production: Traditional chemical photographic processes
Price: £79.99 for 50 pages
Shipping: 10-12 days +£4.99 (delivery time for international orders may double, but the shipping fee remains the same).

Image quality is obviously very important to us photographers and especially when we’re printing a photo book or own work. For me personally though, I found Bob Books to have the best quality image reproduction overall.
Conclusions
All three of these companies offer something different, so bottom line it really depends on what you’re after.
myphotobook
If you want to print a quick photo album of a family holiday then myphotobook will definitely do the job perfectly if cost is more important than quality. Myphotobooks is clearly a huge production company that prints anything onto anything and will get it to you in next to no time too. Their print process is actually surprisingly good for the price as they use silver halide printing over ink on their photo books. Their paper is also incredibly thick (potentially too thick) at 380gsm. So with books that have a lot of pages, this can get very big and heavy very quickly. Their turnaround is also very quick and they'll get it out the door in next to no time. Unfortunately I feel this volume of production and turnaround time means a drop in quality, as although everything looks good on paper (no pun intended) the resulting book quality reflects a more rushed approach. These guys are great if you’re in a mad rush, or if you’re after printing a few copies for friends and family where cost is going to mount up quickly.
Blurb
If you’re after a magazine run or large amount of photo books printing, I’d recommend Blurb for that. Blurb are pretty well known, but they openly target themselves to those who wish to self publish and that comes with the ability to produce large volumes of decent quality books that is affordable to the individual. If you want a half decent photo book then Blurb can do it, but due to their printing methods, I personally don’t believe this is the best choice. Blurb ask for the photo book files to be converted to RGB before uploading, but they state that they print in 4 colour CMYK so the files then get converted back to CMYK. This will often result in disappointing colours and more importantly in terms of quality, the CMYK printing method pales in comparison to a more traditional silver halide print process. This printing method is all the more apparent with the paper thickness too. Their books are printed on 148 gsm paper which gives the feel of a high quality magazine rather than a high quality photo book.
Bob Books
So although I’ve used both myphotobook and Blurb in the past, I found Bob Books a few years ago and never looked back. I personally believe that if your priority is a one off, excellent quality photo book that showcases your images in their best possible light, Bob Books is the best option. Yes they offer a few side products like calendars and wall art but their main focus is very high quality photo books and that alone. The Bob Books print quality is very high and although their colours struggle in the reds (like all digital printing does), if you provide them with 300dpi files, you will be unable to see any pixelation or printing degradation that is present with other ink jet printing methods. Their paper is also very thick at 300 gsm (borderline too thick) but this thick paper does keep you images incredibly flat as you thumb through the book, plus this weighted paper will also ensure the book lays totally flat when open. The downsides of Bob Books are obviously the high cost and long turnaround times, especially if you live outside of the U.K. where you may have to wait up to 3 weeks to receive your book. But if a quality annual photo book is your goal, then this is well worth the cost and wait in my opinion.

I’ve been using Bob Books since 2014 when I first started printing out my annual photo books. For me, Bob Books is expensive, but they do offer a very high quality service and produce excellent photo books that I think may well outlive me.
Closing Comments
Annual photo books are not only a way for us stay motivated about our progression as artists, but a record of our work over an annual period to reflect on in years to come. Our day to day work is often remembered for only fleeting moments and measured by ambiguously pointless ‘likes’.
A high quality photo book will be around for generations, and the absolute best of the best of your images in there will be measured by the memory of you crafting them, not ‘likes’.
So although photo books seem expensive now, their value will only grow. Be sure to start making yours as soon as you can.

Thanks as always for checking out my articles. I know your time is precious and there’s almost an infinite amount of other things you could have done with the last 15 minutes of your life, so I really do appreciate you checking this out :)
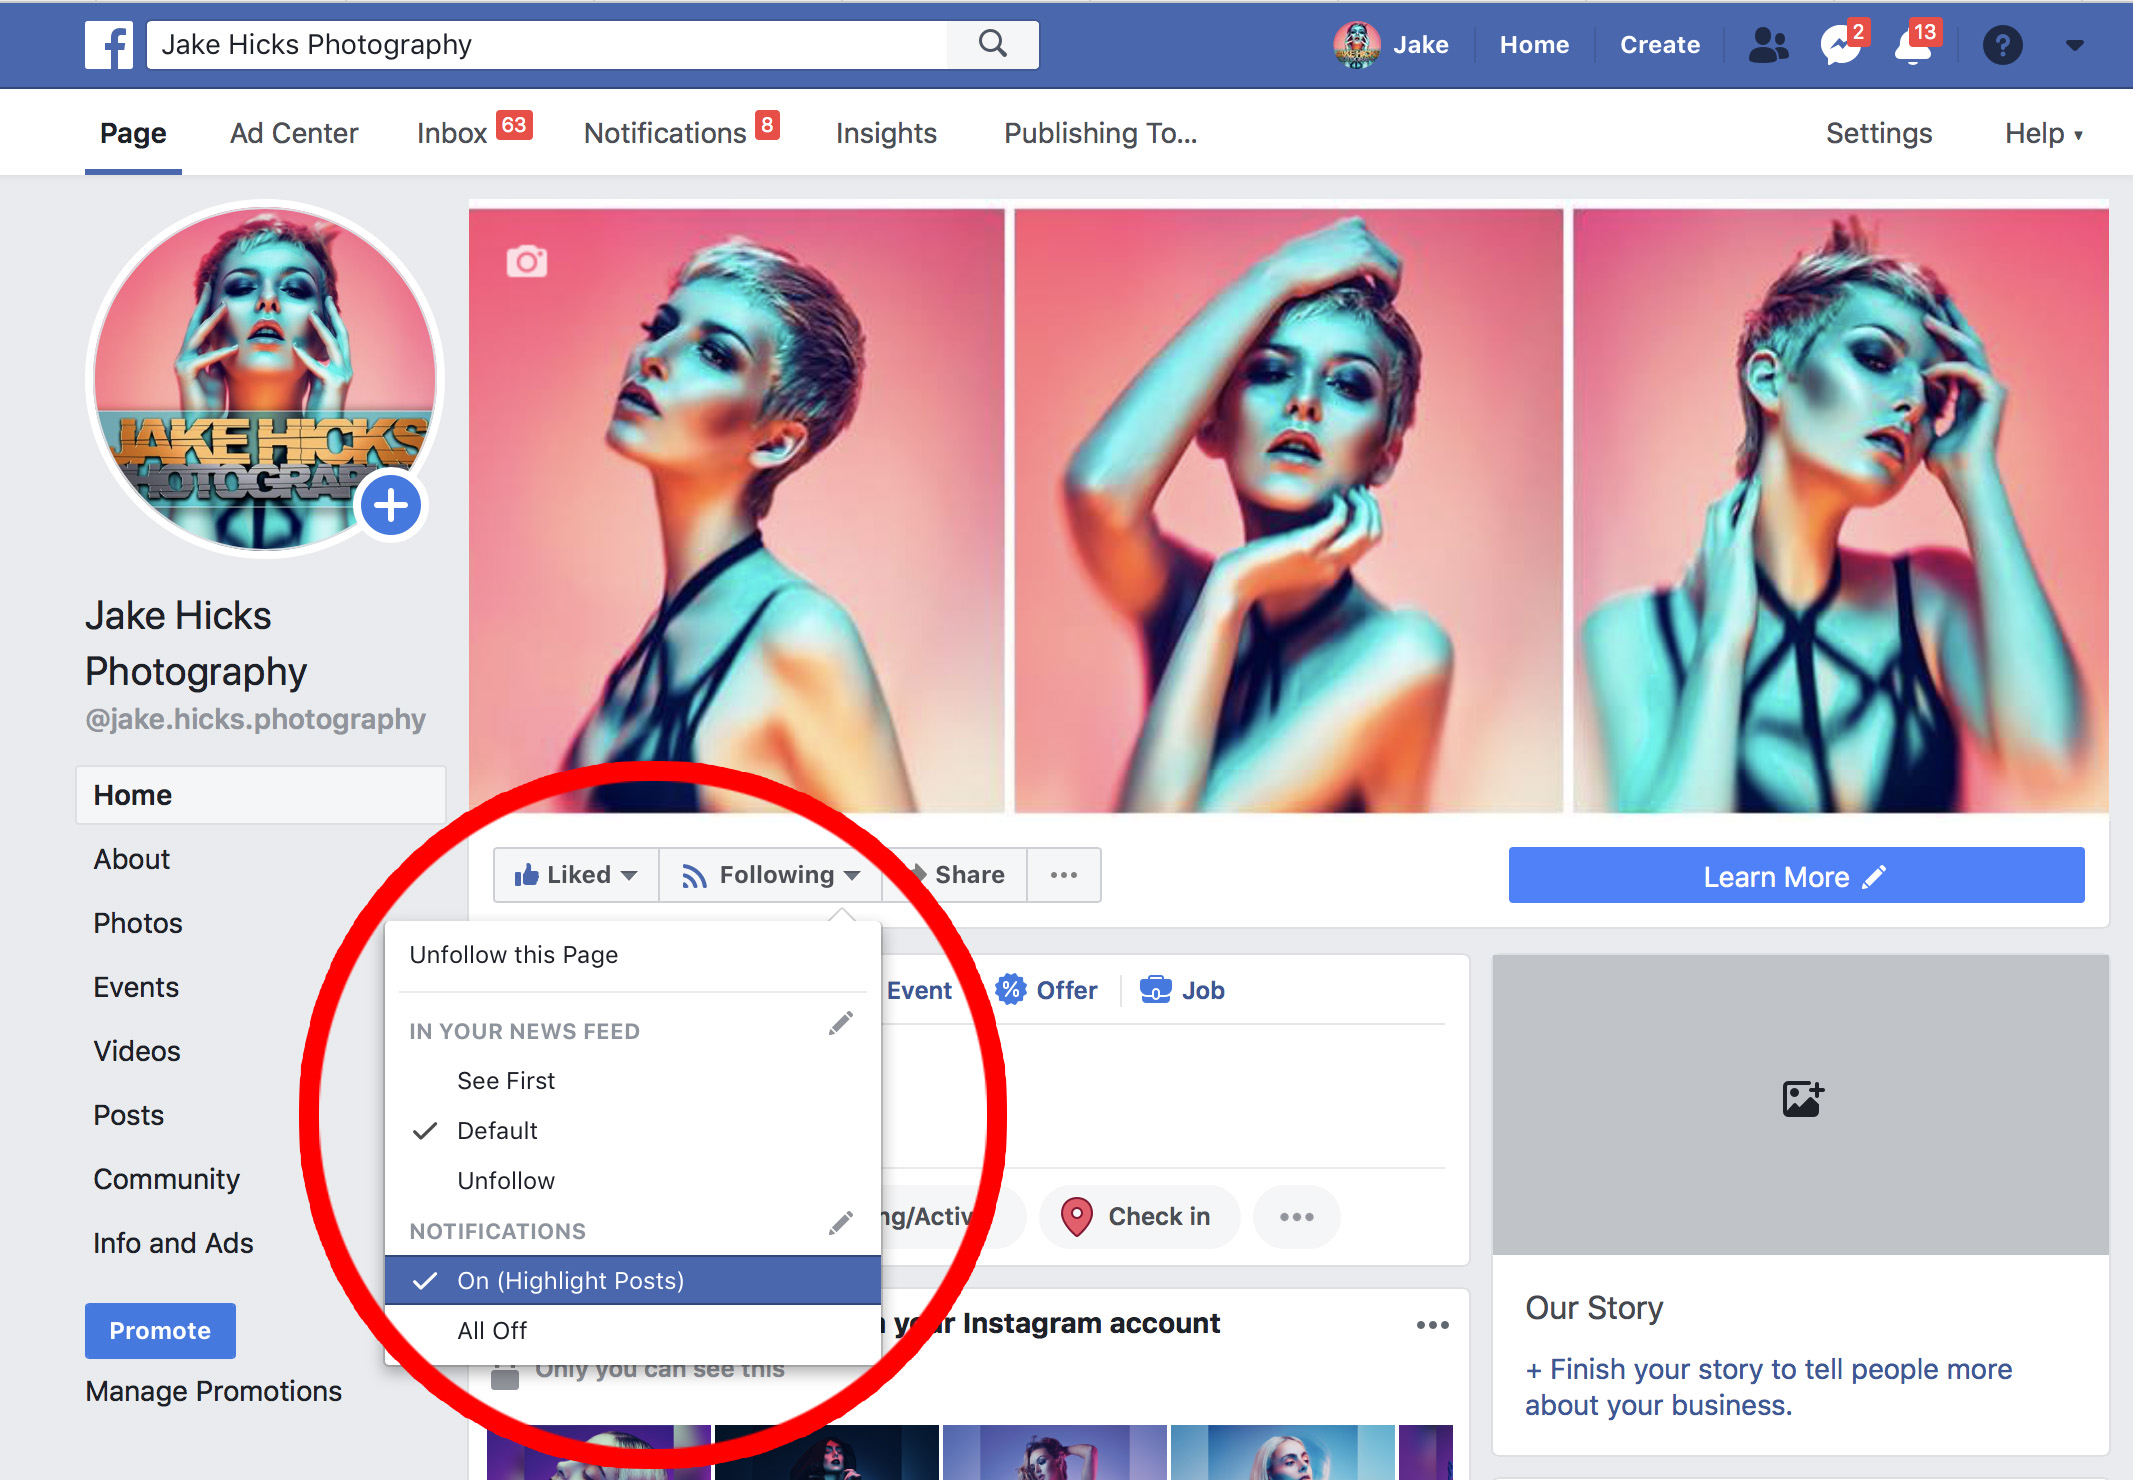
If you’re after more tips and tricks on studio lighting then don’t forget to check out my monthly newsletter and my free 10 page pdf on studio lighting techniques. If you’re interested then follow the link below and download it immediately.
Did you receive my FREE 10 page PDF on Studio Lighting Tips yet?
Sign up to my monthly newsletter and receive my free 10 page pdf of my all time ‘Top 10 Photography Tips & Techniques’.
Once a month I’ll send you a newsletter of at least four photo related tips and tricks (one for each week I post them on here if you miss them) plus I’ll also keep you apprised of my new workshop dates as well.