• Technique
    • Latest Techniques
    • FREE TIPS
    • Quick Tips
    • Video
    • Site Search
    • Blog
    • Archives
  • Mentoring
  • >Online Workshops<
  • Workshops
  • Studio Lighting Books
  • Contact
    • Newsletter
    • Contact
    • Statement
Jake Hicks Photography
  • Technique
    • Latest Techniques
    • FREE TIPS
    • Quick Tips
    • Video
    • Site Search
    • Blog
    • Archives
  • Mentoring
  • >Online Workshops<
  • Workshops
  • Studio Lighting Books
  • Contact
    • Newsletter
    • Contact
    • Statement

Getting Creative with Speedlights - 5 Simple DIY Setups

Technique Tuesday Facebook Thumbnail speedlights 5 simple setups.jpg

As some of you already know, I recently developed and released a brand new lighting workshop called Creatively Simple Lighting. In that workshop, one of the core foundations of what I teach is how to get creative with simple lighting and simple lighting doesn't get any simpler than when you use Speedlights. At their most basic, Speedlights can simply sit on top of your camera and illuminate whatever is in front of you. If you want to get a little more creative however, the first thing to do is to get that flash off your camera and step into the vast world of off-camera flash.

Off-camera flash is where it gets interesting and it's very easy to throw a cheap softbox on your speedlight and take some pleasant yet fairly basic shots. So how do we make it a little more engaging without spending a fortune? Well, as part of my workshop I wanted to prove that all the setups I was teaching could be achieved with a couple of Speedlights and some very basic modifiers. The following article is the result of me dusting off my Speedlights and playing with some homemade modifiers to see if I could create some engaging and creative effects without it costing me a penny.

20 Years Ago

About 20 years ago when I was at Uni studying photography (yes, I'm that guy who actually studied a course he eventually got a job in) we were pretty poor. In fact there was a group of three of us that always hung out and we helped each other do shoots but only one of us had a Speedlight. We all used that single Speedlight but we had no real modifiers to speak of (unless you count the Rizla [cigarette paper] over the end to act as a diffuser 'modifier') so we had to get creative with how we modified the light that emerged from that poor little overworked Speedlight.

Circa 1998: Behold, the power of a single Speedlight and a Frosties cereal box at work!

Circa 1998: Behold, the power of a single Speedlight and a Frosties cereal box at work!

The above image that I took well over 20 years ago now is a great example of working within the constraints you've been afforded. My good friend Dan is the model here, I'm taking the picture and my good friend Chris is holding the flash by hand off to my right. Because we had no fancy telemetry systems this flash is firing 'cold' which means it's not connected to the camera in any way. Because we couldn't fire this flash remotely, we had to come to this old abandoned bus factory in the middle of the night so it was dark enough for me to use a one second exposure on my old OM-1 35mm camera. During that single second exposure, I would count down from 3 and then Chris would manually fire the flash by hand down an opened cereal box... hopefully at Dan. I remember he struggled because he had a broken arm at the time and his cast kept getting stuck in the box. Good times haha ;)

Now remember, it's pitch black and the middle of the night in place that we weren't technically supposed to be. Also there were no mobile phones back then to act as lights (I know right?! I'm that old - NO MOBILE PHONES!) so with no auto focus on the camera, focusing in the dark was almost an impossibility beyond judging the distance and then adjusting the lens accordingly. Plus, there's no modelling bulbs on the Speedlight so Chris had to use his best guess that he was pointing his Frosties box in roughly the right direction.

PLUS: It was an old film camera - NO BACK OF CAMERA IMAGE!

I think I shot an entire roll of 24 frames of just this setup and hoped we had at least one frame that was passable. But we wouldn't know until tomorrow.

Looking back on that now, I learned about and worked through so many problems on that one little shoot and for that I'm so grateful I grew up learning with the madness that is film photography. It forced us to be so creative every single time we picked up a camera where we now may be guilty of relying on post-pro just a little too much a little too often.

Using Speedlights 20 years on

JakeHicksPhotography (1 of 9) speedlight square.jpg

So fast forward nearly 20 years and I pick up speedlights once again to prove a point. It fact it had been so long since I'd used Speedlights that I actually started the shoot with no batteries and had to run out and get some. I was certainly a little rusty with using them. But if Speedlights are so versatile and simple to use, why did I ever leave Speedlights in favour of strobes to begin with? Essentially Speedlights are fantastic but they do have limitations and in the end your skill with lighting will exceed what they can offer you.

I liken using Speedlights versus strobes to a master chef making a fine meal. The chef can either make the meal with fresh meat and vegetables from a country market or they can make the exact same meal from ingredients bought from the corner store. Both results will produce the same meal but one will definitely taste better than the other. The result is only ever as good as the ingredients.

So now that we're aware of what Speedlights can do and the limitations they have, let's take a look at some of the creative ways I used them without spending any money.

The Humble Speedlight

I'm sure you all know the type of light that a Speedlight produces, its pretty hard due to the nature of its size. If you aren't aware of what I mean by 'hard' light then I simply mean that it's quite harsh and generates a contrasting light. The shadows are very dark and the highlights are very bright so it's not always that flattering or interesting to look at.

Let's add some household product packaging into the mix and see if we cant rustle up something a little more visually engaging with very little effort.


5 Simple and Very Cheap Creative Effects with Speedlights

Setup 1 - Controlling the Light

First off, I got one of those silver tubes you eat crisps out of. I cut the end off and put the Speedlight inside. In this first shot I had the Speedlight quite far into the tube so that I could control the light and stop it from bouncing around the white room. This resulted in some very strong and very clean shadows.

A simple silver lined crisp tube with the base cut off and a Speedlight inserted.

A simple silver lined crisp tube with the base cut off and a Speedlight inserted.

JakeHicksPhotography (3 of 6).jpg

Normally what happens when you use a Speedlight in a small white room is that light bounces everywhere and you loose some of the contrast. Channeling the light down this silver tube allows you to limit this light from bouncing unnecessarily and results in a stronger shot.


Setup 2 - Drawing your Viewer in

The simplest way to engage a viewer is to control where they look. If you can guide their eyes to the focal point of your shot then you automatically create a more engaging image. For this next shot I simply pulled the Speedlight out from the silver tube as much as I could and it created a very clear vignette of shadow around the model resulting in a more visually engaging lighting effect.

With the Speedlight pulled further out of the tube I was able to create a vignette of shadow around the model resulting in a more engaging lighting.

With the Speedlight pulled further out of the tube I was able to create a vignette of shadow around the model resulting in a more engaging lighting.

JakeHicksPhotography (2 of 6).jpg

Setup 3 - Directional Yet Soft Shadows

So can we take the edge off this strong yet directional light? Well thankfully yes and you'll be pleased to know its simple and very cheap to implement. All you will need is your crisp tube lid and a piece of toilet tissue and you're done.

Simply place a single sheet of toilet tissue over the lid and attach it to the tube.

It's not classy nor does it look pretty but it is cheap :D &nbsp;Take the edge off your hard lit portraits.

It's not classy nor does it look pretty but it is cheap :D  Take the edge off your hard lit portraits.

The resulting image is far softer than before yet it still maintains a strong directionality. Compare those shadows on the wall behind the model to the previous shots.

The resulting image is far softer than before yet it still maintains a strong directionality. Compare those shadows on the wall behind the model to the previous shots.

So with the minor addition of a single sheet of toilet tissue you should see a dramatic difference in the way the shot looks. Pay close attention to how soft the shadow edges are now. Ironically this type of lighting is actually fairly tricky to achieve with strobes. The reason for this is because there's actually a lot of light in the shadows. Look at how bright the shadows are compared to the original shot with no diffusion tissue on the end. The lighting now creates very strong directional lighting but with detail in the shadows thanks to the light spread.


Setup 4 - Channeling the Light

Next up I'm going back to my roots of 20 years ago and channelling the speedlight down a cardboard box once again. This next idea, couldn't be simpler. All you need is to find a cardboard box and open up the end and fire the speedlgiht through it. Once you have that in place you can adjust the angle and tilt of the box to create more interesting slits of light and shadow.

Any long and thin cardboard box will do, even an old Frosties cereal box will do if you've still got one ;)

Any long and thin cardboard box will do, even an old Frosties cereal box will do if you've still got one ;)

Adjusting the angle of your box can create different effects and simply twisting it a little will creates slits of light and shadow like this.&nbsp;

Adjusting the angle of your box can create different effects and simply twisting it a little will creates slits of light and shadow like this. 

It should be pretty easy to see how effective and engaging this look can be with a little effort. Plus, remember that this is just a single speedlight and a cardboard box! Nothing fancy here yet its a beautiful looking light.


Setup 5 - Adding some Colour

This next step is for those that want to take the creativity to the next step by adding an extra light. This time around we will take the 'Channelling the Light' technique from before, leave that exactly as it but with the addition of a second light and softbox.

We can place this softbox where we like but just out of shot will be fine. Before we attach a softbox to our speedlight though, we're going to add a blue gel to it. This will add a whole other dimension of colour and interest to the shot and thereby making it far more engaging for the viewer.

Adding a second light can obviously open up a whole new world of creative possibilities but adding some colour to that light can certainly be a great way to go if you want to add some interest.

Adding a second light can obviously open up a whole new world of creative possibilities but adding some colour to that light can certainly be a great way to go if you want to add some interest.

The addition of some colour here completely changes the way the shot looks.

The addition of some colour here completely changes the way the shot looks.

With very little effort, an inexpensive softbox and a cardboard box found at home and you can quickly add a lot of interest into your images.&nbsp;

With very little effort, an inexpensive softbox and a cardboard box found at home and you can quickly add a lot of interest into your images. 


So there you have it, a look at some cheap and very basic ways of getting creative with a speedlight. It's good to see that I'm still able to make use of an old cardboard box as a speedlight modifier 20 years on from when I first played with it haha ;)

But I'd love to hear about your cheap and homemade modifiers. Have you ever used something odd as a modifier to create some interesting effects? If you have then let me know in the comments below. As always, if you have any questions then fire away and I'll do my best to answer them as soon as I can :)

Thanks for reading.

Patient model: Jaye


WARNING: Slightly more expensive ways of improving your photography await below :D


NEW 2017 WORKSHOP DATES ANNOUNCED - If you're interested in any of my work and would like to know more about how I created some of my shots then why not check out my workshops. Here you can find out everything there is to know about Gelled Lighting, Long Exposure Flash Photography and my entire Post-Pro Workflow. Jake Hicks Photography - Workshops

gel workshop trio.jpg

I've also just released a brand new 22 hour complete Gelled Lighting Tutorial video. I go over everything from studio lighting setups with gels to being on location with gels plus I also go through my complete retouching and post pro workflow. For more details and complete breakdown of everything that's include check out my Coloured Gel Portraits Tutorial

gel trio set video.jpg

I also offer comprehensive coloured gel packs. These collections of gels are what I use day to day to create some of the most highly saturated colours around. If you're looking at getting into gelled lighting or need to get stronger and richer colours in your coloured gel work why not check out my Jake Hicks Photography Gel Packs

gel trio set crop.jpg
Tuesday 09.26.17
Posted by Jake Hicks
Comments: 3
 

5 Hidden Tips & Tricks in Photoshop

This weeks article comes in the form of a video of me discussing some of the less intuitive features of Photoshop. Although I would class these five things as 'hidden' they're not exactly secret so you may already know some of them of have been aware of them but never used them in this way before. I certainly hope theres something in here for you and as always if you have any questions let me know :)

A list of five hidden things in Photoshop that can certainly save you time and speed up your workflow.

1. Fade Function 0:42

2. Content Aware 3:55

3. Mask Stacking 11:27

4. Multi-Document Layer Dragging 16:47

5. Accessing Legacy Versions of Photoshop 22:48

Tuesday 09.19.17
Posted by Jake Hicks
Comments: 2
 

Shooting through Prisms at Home or in the Studio

Technique Tuesday Facebook Thumbnail Temp edge 80.jpg

In this tutorial we will be going over how to create gorgeous in-camera flared effects that can add a lot of depth and interest to a simple portrait image. To do this we will be using a glass prism which can be found on any number of online retail sites. The glass prisms are generally used for school science experiments so they're readily available and very inexpensive.

25mmx100mm glass prism on Amazon link here

The prisms are very easy to use out on location as you simply hold them in front of the lens and shoot away. If you're looking to use them in a studio environment though there are a few key things to bear in mind to maximise the flared effect that creates that signature look.

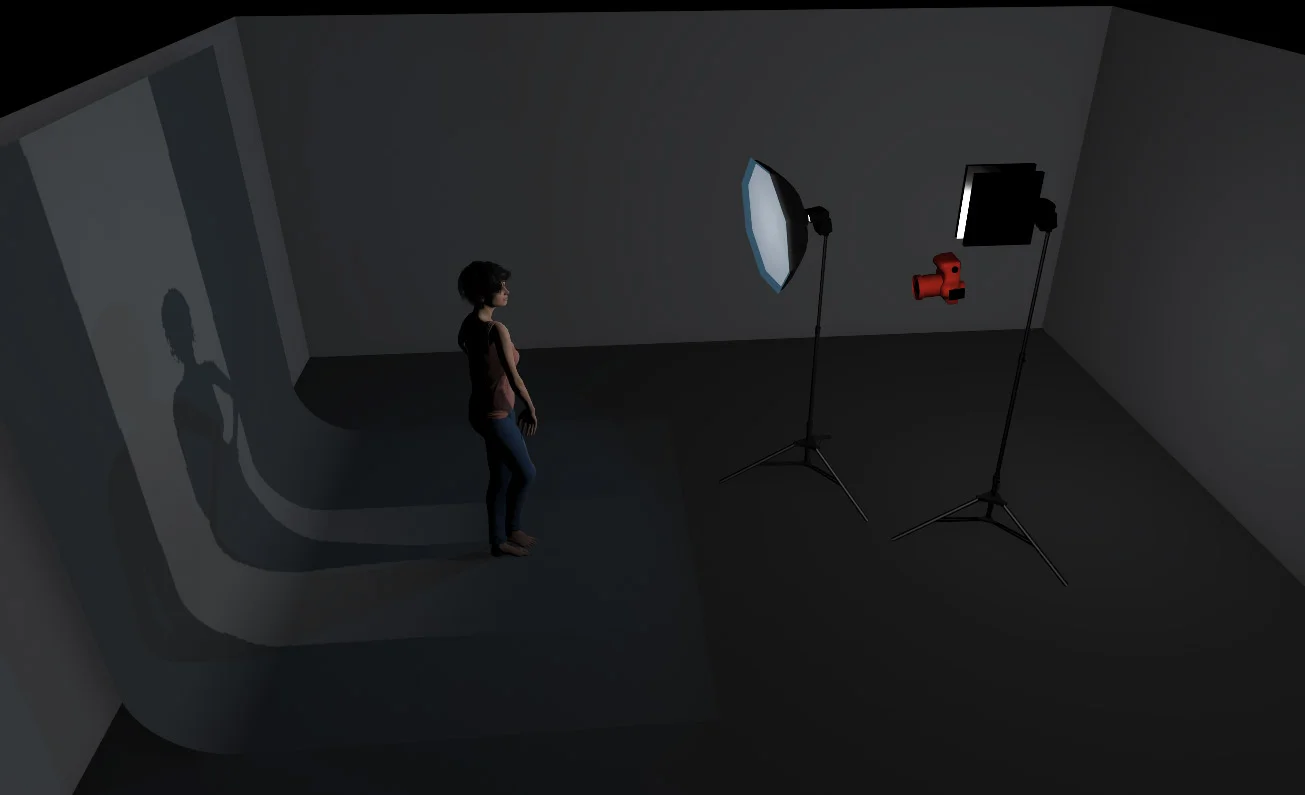
In this setup we'll be keeping it super simple with just two lights and a backdrop. One light to illuminate the model and one light to shine into the prism to create the effect. Even the backdrop used here is a simple window blind so the whole thing is very cost effective and I even shot this in my front room so it doesn't even need much space either.

Prisms reflect the surrounding scene into your lens so shooting with prisms indoors is a little tricker than when you're outside. They're harder to use indoors because quite often there's nothing else that interesting around you to reflect into the …

Prisms reflect the surrounding scene into your lens so shooting with prisms indoors is a little tricker than when you're outside. They're harder to use indoors because quite often there's nothing else that interesting around you to reflect into the shot. In this instance we'll be using an additional light behind the model to shine back into the scene to create this flare and additional interest.


Predicted shoot time

30-40 minutes

Suggested shoot skill level

Beginner - Intermediate

If you're happy shooting with off-camera flash and want to get a little more creative, this is a great next step to add some interesting elements.

You will need

  • 1x Prism
  • 1x Camera
  • 2x Light stands
  • 2x Flash heads or Speedlights
  • 1x Key light modifier (Beauty Dish/Softbox/Umbrella)
  • 1x Simple Reflector Dish Modifier
  • 1x Backdrop

Setting up Your Camera

Step 1 Camera Settings Full Res.jpg

If you're going to be shooting outside on location with available light then simply setting your camera to aperture priority will be enough. To get the most out of this technique though, a wider aperture of around f2.8 to f5.6 will yield the best results. If you're in a studio then setting the camera to manual mode will be best.

Have your starting settings at a wider aperture, around f2.8 to f5.6 should be fine. Set the ISO 100 (as low as your camera will go) and your shutter speed to 1/160, this will be fast enough to limit ambient light but still sync to the flash.


Selecting the Key Light Modifier

Step 3 Beauty Dish Full Res .jpg

It's worth thinking about which modifier you'll be using for your key light. I used a 22" white beauty dish here but a small 60cm softbox or umbrella would do equally well too. Using any of these modifiers will give you a softer more flattering light on the subjects skin. I prefer to use the softer lighting modifiers like these over the less flattering modifiers like grids and snoots. Roughly translated, the larger the light source the softer and more flattering the light will be. Also the other benefit to using larger modifiers like this is that the light will spill onto the background behind the model. This eliminates the need for an additional background light.


Setting up Your Key Light

Step 2 Key Ligth Postion Full Res.jpg

You want to position your key light above the models head, angled down and about 2-3 ft away. Your subject should be about half way from the background to the key light, by doing this the key light should now illuminate the model and spill onto the backdrop to light that as well. I'm using strobes here but speedlights will be just as good. You can either take a light meter reading or take a shot and review the results. Remember we are adjusting the lights to the camera not the other way around. If the shot is too bright then turn down the power of the light, don't adjust the camera to compensate.


Setting up Your Backdrop

Step 4 Setting up Your Backdrop Full Res.jpg

When using prisms in your photography it's important to pay close attention to your backdrop. This becomes less important when shooting on location because the whole world is your backdrop but in a studio environment the prism will distort the field of view so make sure that you have a backdrop large enough to accommodate for this effect. I actually shot this in my front room so I simply used a window blind as a backdrop. They're relatively inexpensive, and there's loads of variety plus it can easily be rolled up and stored away after use.


The Flare Light

Step 5 Flare Light Full Res.jpg

This flare light was simply an open reflector dish. The trick here is this flare light will double up as our hair light as well as the light that generates flare into the prism we're holding to get the lovely soft glow effect in-camera. Place this light behind the model and off to the side just out of shot. A good starting point on the power of this light is to set it about one stop brighter than our key light, this will ensure a strong flaring effect through the prism into the camera lens. Take a few shot and adjust the power until you get the desired amount of flare into the lens.


The Complete Setup

Set up Diagram.jpg
Set up Diagram Plan View.jpg

Backdrop - This is a very inexpensive silver window blind. We will be shooting at a wider aperture so this wont be in focus.

Model - Position the model a couple of feet away from the backdrop. Get them correctly placed and the key light will fall off nicely onto the backdrop simultaneously lighting them both.

Keylight - Beauty Dish. You can substitute this for a softbox or umbrella but you should position it above the models head and about 2-3 feet away.

Flare Light - Open wide reflector. This will be the light positioned just over the models shoulder and pointing towards the lens and prism we will be holding. 


The Prism

Step 6 Prism Full Res.jpg

Now the fun part begins. Simply start shooting away whilst holding the prism in front of your lens at different angles. Try it with the prism held horizontally above the lens or to the side and don't forget to try twisting it as well to produce different looks. One thing to keep in mind is to always keep the prism quite close to the lens and to just have it creeping into shot, don't have it dominating the frame to much otherwise it will obscure the image entirely.

Experimentation is key here as there is no right or wrong way to do this, only what you prefer.


The Final Image

Using prisms indoors can be tricky at first but if you persevere with them you can get some beautiful in-camera effects like the flare and rainbow effects you see here.

Using prisms indoors can be tricky at first but if you persevere with them you can get some beautiful in-camera effects like the flare and rainbow effects you see here.


Shooting through Crystals

You needn't stop with just the prism in front of the lens, in fact you can try any number of glass objects to produce some stunning results. Think about trying simple wine glasses and other glassware or even crystals. Crystals give a slightly more distorted look compared to the prism but simply holding a crystal or several crystals directly in front of your lens can create some gorgeous colours and bokeh effects. One quick tip to bear in mind for best results is to try and get your hands on some antique crystals, these slightly older crystals were coated in a very thin film of lead which gave them those gorgeous rainbow colours as you look through them. You can get away with shining lights directly into them to get some great bokeh effects too.

Using crystals or anything vaguely transparent that refracts the light can be shot through. Experimenting with a variety objects can produce some vey interesting results.

Using crystals or anything vaguely transparent that refracts the light can be shot through. Experimenting with a variety objects can produce some vey interesting results.


The Retouch

Plus, if you're interested in the five minute retouch techniques I used to edit this image, take a look at the image below for the details :)

Click to enlarge...

As always, questions comments and ideas are always welcomed :) If you've given this a go yourself then please feel free to let me know as I'd love to hear how you got on. Thanks again for reading and good luck!


:WARNING: Pay-To-Win below :D


NEW 2017 WORKSHOP DATES ANNOUNCED - If you're interested in any of my work and would like to know more about how I created some of my shots then why not check out my workshops. Here you can find out everything there is to know about Gelled Lighting, Long Exposure Flash Photography and my entire Post-Pro Workflow. Jake Hicks Photography - Workshops

gel workshop trio.jpg

I've also just released a brand new 22 hour complete Gelled Lighting Tutorial video. I go over everything from studio lighting setups with gels to being on location with gels plus I also go through my complete retouching and post pro workflow. For more details and complete breakdown of everything that's include check out my Coloured Gel Portraits Tutorial

gel trio set video.jpg

I also offer comprehensive coloured gel packs. These collections of gels are what I use day to day to create some of the most highly saturated colours around. If you're looking at getting into gelled lighting or need to get stronger and richer colours in your coloured gel work why not check out my Jake Hicks Photography Gel Packs

gel trio set crop.jpg

Tuesday 09.12.17
Posted by Jake Hicks
 

Comparing the Lensbaby Lens Effects

Technique Tuesday Facebook Thumbnail Temp lensbaby lens effects.jpg

If you've ever wondered what effect a specific Lensbaby lens has or if you've ever wondered how that compares to other lensbaby lenses or even standard lenses then this article is for you.

I took the same image of a model using a wide variety of Lensbaby lenses as well as standard prime lenses and compared the results. All images were taken with flash with an ISO 100 at 1/125 second and all at f4. You should notice that the model stays a similar size in the frame when using a variety of focal length lenses, that was to create 'real-life' look to the test. I have taken the images as I would do normally regardless of focal length and they all appear here completely un-cropped.


Standard 50mm Lens

This is your standard 50mm lens and probably the most common prime lens you'll use. You should be very familiar with how this image will look but it's good to have this shot as a baseline to compare the subsequent Lensbaby lenses against.

Click to enlarge

stan 50.jpg
standard 50 grid.jpg

Standard 85mm Lens

Again, you should be fairly familiar with how the images should look taken with this lens. The only significant point to make is how the background looks compared to the standard 50mm and other 50mm lenses. You can quite clearly see that the background is far softer as a result of the extended focal length at a similar aperture to the 50mm.

Click to enlarge

stan 85.jpg
standard85 grid.jpg

Sweet 50

This is probably the most well known Lensbaby and just to be clear, the Sweet 50 is an optic that is situated in the Composer Pro cradle. What that means is that the ball-joint and focusing part of the lens called the Composer Pro can hold other Lensbaby optics like the Edge 80 for example. The Sweet 50 creates a radial type blur that emanates from a user defined epicentre. The user can dictate where the in-focus area is and then the lens blurs the image the further you get from that. I use this technique a lot in portraits as I can get the subjects face in focus and then blur the surrounding shot to create a sense of depth and movement. It's also worth pointing out that the aperture also affects the blur. At f16 for example the blur is very subtle and at f2.8, the blur is very strong. For more examples of the image this lens takes, take a look at one of my previous photographic projects 'The Moving Portrait'

Click to enlarge

sweet 50.jpg
sweet 50 grid.jpg

Edge 80

The Edge 80 optic, like the Sweet 50, sits in the Composer Pro cradle and that controls focus and tilt. The Edge 80 is an incredibly powerful lens that has the ability to creates very clean slices of focus at any angle in your image. This effect is often seen in those 'toy-town' photos where a drastic illusion of forced depth of field gives a false impression of scale. The slice of focus can be placed in any way the user wants, from vertically to horizontally and everything else in between. I have used this lens to create a sense of an incredibly narrow depth of field in portraits and you can see some more of those results here in the close head shots from this shoot 'Lucid Dreams' 

Click to enlarge

edge 80.jpg
edge grid.jpg

Twist 60

This is one of the few Lensbaby lenses that creates an effect that can't be heavily influenced by the user. The Twist 60 creates a swirling pattern towards the edge of the frame leaving a cleaner, more untouched centre. This lens is a little trickier to use in a studio as composing your shot with a sharp subject requires you to place them in the centre of the frame. In the image you see here, you should notice that the subjects eyes are a little soft because the effect can't be kept off them. I took another image where the subjects face was in the centre of the frame and the eyes were pin sharp so a little care and thought is needed when composing your images with the Twist 60. The effect this lens creates can be increased with shallower f numbers like f2.8 and reduced with higher apertures like f16. A full review of this lens can be found here 'Twist 60 Review'

Click to enlarge

twist 60.jpg
twist grid.jpg

Velvet 56

Lensbaby have released two Velvet lenses, a 56mm and a 85mm. This version is one of the first lenses that Lensbaby released that produced a more subtle effect. Their previous lenses have been very popular for their very defining results whereas the Velvet lenses explore a more refined effect. They have been called art lenses that create an almost 'vintage' lens effect. Although this is a quick and easy way of explaining what they do, it falls a little short as there is a lot going on in the making of the resulting image. The best way that I can explain is that there's almost a sharp image nestled underneath a soft and creamy image. The effect is more dramatic towards the edge of the frame and can also be increased further by opening up the aperture to f2.8 and beyond. For a more comprehensive look at the lens, take a look at my review 'Velvet 56 Lens Review'

Click to enlarge

velvet 56.jpg
velvet 56 grid.jpg

Velvet 85

Like the Velvet 56, this is another of the Lensbaby lenses that creates a more subtle effect. The 85mm is almost identical at the 56 apart from the obvious focal length difference. If you're a portrait shooter you may prefer this longer focal length over the 56 but it's also worth pointing out that the Velvet effect seems to be stronger on this lens compared to the 56. The reason of this is simple; like other 85mm lenses, the depth of field blur is more pronounced on longer focal length lenses and the same is true here. Like other Lensbaby lenses, the signature lens effect is often more pronounced with wider apertures so when shooting the same shot at 56mm at f4 and 85mm at f4 the lens appears to create a stronger effect. Take a look and compare the backgrounds in the two Velvet lens shots and make your own decisions. If you'd like to know more about the Velvet 85 then check out my complete review here 'Velvet 85 Lens Review'

Click to enlarge

velvet 85.jpg
velvet 85 grid.jpg

Simple cheat-sheet to save for reference - Click to enlarge

For more information on these lenses, take a look at the Lensbaby website for the full descriptions and specifications via the links below.

  • Sweet 50
  • Edge 80
  • Twist 60
  • Velvet 56
  • Velvet 85

I also have a discount code for anybody who is interested in picking up any of the Lensbaby lenses here in the U.K. via WEX Photographic

I have worked very closely with the fine people over at Lensbaby for many years and they have very kindly allowed me to share my discount code with you. If you decide to use my code to get some money off your purchases then I will also receive a few pennies for the beer fund so please feel free to use it if you'd like to :)

Use the code JAKEHICKS10 at checkout to get 10% off any Lensbaby lens at WEX Photographic.


As always, if you have any questions about any of these lenses then fire away in the comments below. But if you own any of these lenses already, I'd love to hear what you think of them. Do you have a favourite lens? Are you considering getting an additional one? Feel free to link me to your Lensbaby shots too as I'd love to see how you guys use them :)


:WARNING: Yet more tempting products lie in wait below!


gel workshop trio.jpg

If you're interested in any of my work and would like to know more about how I created some of my shots then why not check out my workshops. Here you can find out everything there is to know about Gelled Lighting, Long Exposure Flash Photography and my entire Post-Pro Workflow. Jake Hicks Photography - Workshops


gel trio set video.jpg

I've also just released a brand new 22 hour complete Gelled Lighting Tutorial video. I go over everything from studio lighting setups with gels to being on location with gels plus I also go through my complete retouching and post pro workflow. For more details and complete breakdown of everything that's include check out my Coloured Gel Portraits Tutorial


gel trio set crop.jpg

I also offer comprehensive coloured gel packs. These collections of gels are what I use day to day to create some of the most highly saturated colours around. If you're looking at getting into gelled lighting or need to get stronger and richer colours in your coloured gel work why not check out my Jake Hicks Photography Gel Packs

Tuesday 08.29.17
Posted by Jake Hicks
 

Studio Polyboards & DIY Alternatives

Technique Tuesday Facebook Thumbnail poly boards.jpg

Studio Polyboards & DIY Alternatives

Nearly every professional studio I’ve ever used has these ‘polyboards’ and you‘ve probably even seen them yourself but may not have known what they’re used for. Polyboards are polystyrene boards that usually measure 4 feet wide by 8 feet high and are normally 2 inches thick. One of the other defining characteristics is that they are often white on one side and black on the other. This dual colour is very important as this gives them two key uses. The white side is used for bouncing light back into the shadows of an image, for example a light would be placed on one side of the model and a white polyboard on the other side of them. The light would illuminate one side and the polyboard would fill in the shadows from the other side providing a very beautifying light. The black side is used for the opposite reason, to reduce the bounce of light. In certain situations in a big white studio, your lighting can bounce around and result in the lighting on the model looking quite flat and uninteresting. By placing black polybords either side of your subject can help sculpt shape and form by adding shadows where there was none before.

Using polyboards, whether that be in a studio or on location, can be a great way to control your lighting. Here I'm using the black sides of the polyboards to create shadow on the side of the models face when using a softer light source.

Using polyboards, whether that be in a studio or on location, can be a great way to control your lighting. Here I'm using the black sides of the polyboards to create shadow on the side of the models face when using a softer light source.

For your reference, 'polyboards' can be purchased under the name of polystyrene sheets from DIY stores under the insulation section. An 8 foot by 4 foot board is 2400mm by 1200mm. You also want to watch out for the thickness. We'll be using them for a purpose that they aren't intended for so you need to purchase a thickness that is substantial enough to hold it's own weight when upright. I recommend a 2 inch thick sheet and that translates to 50mm. Here's a link to a £15.99 sheet in U.K. store called Wickes 50mm General Purpose Polystyrene 1200 x 2400mm

In the U.S. you'll probably find a very similar product in your hardware stores and again under the term insulation rather than simply polystyrene.


diy poly board bike stand.jpg

Polyboards are primarily used in the construction industry for insulation, as a result they’re relatively cheap to buy. When you buy them, they normally arrive bright white on both sides so the first step is to paint one side black. But the biggest issue with them is not painting them but getting them to stand up. Normally this is quite costly as purpose built metal stands need to be purchased. But here’s a far cheaper hack that works perfectly, a simple bike stand. In the above image you’ll see a single bike stand that holds your polyboards upright perfectly and very cheaply. Just make sure it’s at least 2 inches wide and you’re all set.

Here's a link to the bike stand I'm referring to on Amazon. This one has a confirmed tyre width of 53mm which is perfect to hold your 2 inch polyboards and for less than £15 Silver Bike Stand


JakeHicksPhotography diy poy refelctor.jpg

But what if you want the benefits of a polyboard but you’re on the move and working on location? Obviously brining a 8 foot by 4 foot sheet of polystyrene is hardly very practical so here’s a mobile alternative. Simply use a large white reflector and attach it to a lightstand via a couple of multi-purpose clamps and brackets. No matter how big or small the job, I always carry around these handy clamps and they come in especially handy here. Simply take your lightstand, put an umbrella bracket at a right angles on top and then attach a spring loaded clamp onto that. This will now hold your reflector firmly in place. 

The light stand you'll probably already have but here's some links to the other clamps and brackets.

Large White 5 in 1 Reflector (200x150)

Umbrella Bracket

Manfrotto Spring Clamp


JakeHicksPhotography diy poly sheet.jpg

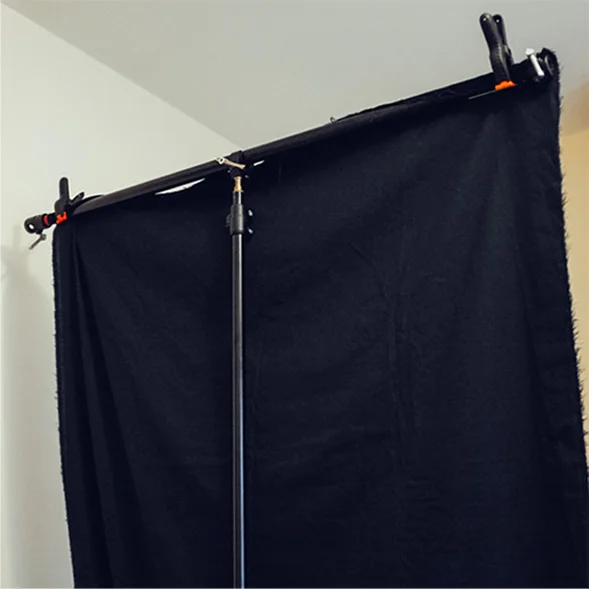
When things get really desperate and you don’t even have a large reflector with you, then a simple white sheet can be utilised to just as good effect. Any white sheet will do and by simply screwing a small crab-clamp atop your lightstand and then getting that in turn to hold a crossbar (any pole or even broom-handle will do), you can then simply clip your sheet to that and you’re ready to shoot.

The white sheet can be anything from a large sheet of white cotton fabric to a simple bed sheet. The clamps and crossbars links can be found below.

I actually own a couple of these heavy duty crossbars by Manfrotto but any pole or even stick will do the same job in this instance.

Manfrotto Telescopic Crossbar

Crab-Clamps


Get your stand to hold black velvet rather than a white sheet when needed.

Get your stand to hold black velvet rather than a white sheet when needed.

Pro Tip: Remember that these mobile 'polyboard' alternatives can be implemented with the black variations. Most reflectors now come with a black flip-side and that can be clipped in place instead of the white side. Also, if you're after a black alternative to the white sheet, I recommend black cotton velvet. This fabric soaks up more light than anything else and I will often use this fabric in a studio environment over the black polyboards as it's so good at reducing bounced light.

You can see me using the black velvet sheets on stands here in a studio to heavily control the bounce of light. In large white spaces like studios, the light will keep bouncing around the walls, floor and ceiling which can leave your lighting lookin…

You can see me using the black velvet sheets on stands here in a studio to heavily control the bounce of light. In large white spaces like studios, the light will keep bouncing around the walls, floor and ceiling which can leave your lighting looking flat. You should be able to see here on the final image that there is very soft beautiful light on the models face but there are still strong shadows on the sides of her face to give depth and shape.

Click to enlarge this single cheat-sheet of studio polyboards and DIY alternatives

Click to enlarge this single cheat-sheet of studio polyboards and DIY alternatives


If you guys have any questions then fire away below. If you also have anything to add as your own way of dealing with polyboards or DIY polyboards on the move then I'd definitely love to hear them :)


Editors Note: Just to be clear, I am NOT sponsored by Manfrotto nor do I receive kick-backs from Amazon. I've received messages saying that I shouldn't share links that I make money from without stating it. I wish I did make money from links, but I don't. I have no problem with photographers who are making money from links but believe it or not, I provide links to HELP the readers (shock horror I know)  and they're provided here simply for your convenience. By all means if you still feel that I may be making a few pennies on the side from these links for this entirely free article, please feel free to use Google (or your preferred unsponsored) search engine instead of clicking on them :D Have a great day.


:WARNING: The JHP sales links below are most definitely sponsored by JHP :D


gel workshop trio.jpg

If you're interested in any of my work and would like to know more about how I created some of my shots then why not check out my workshops. Here you can find out everything there is to know about Gelled Lighting, Long Exposure Flash Photography and my entire Post-Pro Workflow. Jake Hicks Photography - Workshops


gel trio set video.jpg

I've also just released a brand new 22 hour complete Gelled Lighting Tutorial video. I go over everything from studio lighting setups with gels to being on location with gels plus I also go through my complete retouching and post pro workflow. For more details and complete breakdown of everything that's include check out my Coloured Gel Portraits Tutorial


gel trio set crop.jpg

I also offer comprehensive coloured gel packs. These collections of gels are what I use day to day to create some of the most highly saturated colours around. If you're looking at getting into gelled lighting or need to get stronger and richer colours in your coloured gel work why not check out my Jake Hicks Photography Gel Packs

Tuesday 08.22.17
Posted by Jake Hicks
Comments: 4
 
Newer / Older