• Technique
    • Latest Techniques
    • FREE TIPS
    • Quick Tips
    • Video
    • Site Search
    • Blog
    • Archives
  • Mentoring
  • >Online Workshops<
  • Workshops
  • Studio Lighting Books
  • Contact
    • Newsletter
    • Contact
    • Statement
Jake Hicks Photography
  • Technique
    • Latest Techniques
    • FREE TIPS
    • Quick Tips
    • Video
    • Site Search
    • Blog
    • Archives
  • Mentoring
  • >Online Workshops<
  • Workshops
  • Studio Lighting Books
  • Contact
    • Newsletter
    • Contact
    • Statement

T.W.i.P Talks Video Interview - Using Coloured Gels with Jake Hicks

After being a massive fan of This Week in Photo for many years I was incredibly honoured to be asked by the legend himself, Fredrick Van Johnson, for a video interview.

If you're not aware, Fredrick is the mastermind at the helm of This Week in Photo, one of the top photography podcasts out there and his weekly show has been in my podcast queue for many, many years.
In the video we discuss my early beginnings, my path to coloured gels and how I organise my model shoots as well as some all important lighting tips with gels.


I hope you guys like it and like I said I'm a huge fan of TWiP and have been an avid listener for many years so to be interviewed by Fredrick was a real treat for me indeed

In this episode of TWiP Talks I speak with Jake Hicks, not only does Jake have amazing style and talent, but he's a master of the art of using colored gels. In this interview you'll be "exposed" to how Jake manipulates his background, shadows and highlights in both exposure and color.
Tuesday 08.16.16
Posted by Jake Hicks
 

Set a Light 3D Software Review and Showcase

Something a little different this week in the form of a video. I've been asked multiple times about the lighting diagram software I use to create my Tech Tues articles so I thought I'd do a little review on the software and it's features.
Set.a.light 3D is the extremely powerful lighting setup software that allows users to build complex 3D lighting diagrams in mere minutes. I was going to write a review but realised there was way to much to cover so I decided to go through and actually record myself as I build a gelled lighting setup that I use to showcase some of its powerful features.
It does come in at 25 minutes which I know is beyond the scope of most internet users but grab a coffee and see what this awesome software has to offer :)
Thanks for watching!

If you're looking to purchase a copy of this software, then head on over to their home on the web https://www.elixxier.com/en/products/... and if you decide to purchase then make sure to use the promo code at checkout for a 15% saving JAKE-ROCKS2016.

Disclaimer - I don't get any kick-backs on that purchase code.  I reached out to the developers and said I was going to write this review, they'd seen my work, they love what I do and so offered up this code to you guys. The review is completely unbiased in terms of any monetary compensation.

Tuesday 08.02.16
Posted by Jake Hicks
Comments: 2
 

Models Beware!

Michael Hunter and his delightful request to see a new model in her underwear before he will photograph her.

Michael Hunter and his delightful request to see a new model in her underwear before he will photograph her.

For the second time in as many months somebody has tried to use my images to deceive models about their skill level in photography.

Because of this deception it's certainly no giant leap to accuse these individuals of ill intent, especially if they are actively seeking out images of models in their underwear in their first messages of contact.

At the weekend I received a concerning email from somebody who follows my work. I have said that I will keep their name anonymous and they have kindly let me share the situation but I will change the models name in question to Sue for the purpose of this article.

 
The above images were sent to Sue as images of models 'we've worked with'. Although the wording is clever in that it doesn't specifically state these images were directly taken by them Sue spotted the shots were not theirs and it was enough of a war…

The above images were sent to Sue as images of models 'we've worked with'. Although the wording is clever in that it doesn't specifically state these images were directly taken by them Sue spotted the shots were not theirs and it was enough of a warning sign to prompt her to thankfully investigate further.

It started when the model Sue was contacted by a lady on Facebook called Jess Nicholl who photographs under the name of Jess Nicholl & Michael Hunter Photography. The conversation began as it usually does, but then Sue asked to see some pictures that Jess & Michael had previously taken. Jess sent some shots and that was when Sue first realised something was up. They'd sent pictures taken by me and Sue recognised them as such straight away.

Jess then requested that the shoot details be finalised via email with her 'partner' Michael (I don't know if this was a security risk on Facebook for them or wether moving to email was just a way to introduce 'Michael').  Once Sue had finalised a date via email, Michael then started to request images of Sue. Then 11 minutes later Michael requested images of Sue in her underwear following it up with a statement that really made my skin crawl 'or should I find another model?' A nasty little threat that insinuates that failing to send underwear pics could result in Sue loosing the shoot.

Below is the screen captures I have from the conversation between Sue, Jess and Michael.

IMG_0017.jpg
Untitled-1.jpg
Untitled-2.jpg
IMG_0021.jpg
IMG_0020.jpg
IMG_0017.jpg Untitled-1.jpg Untitled-2.jpg IMG_0021.jpg IMG_0020.jpg

Now there is couple of ways to look at this, firstly I'm sure there are photographers who would argue that if you were shooting a lingerie shoot that you'd require said underwear pics up front. Personally I don't think that Michael went about this in anywhere near the right way and adding 'or should I find another model?' is just a perfect example of how not to be professional.

Secondly I'm sure there are experienced models out there who are screaming 'RED LIGHT' at the absolute deluge of evidence to suggest that Jess & Michael are the very personification of dodgy.

Either way Sue, spotted the warning signs with the suspect images and Googled both of their names and found no reference anywhere to them shooting anything anywhere. As a result she confronted Michael about the stolen images and called him out as a fraud.

Neither Jess or Michael have yet to respond to Sue and she has either been blocked or all profiles and accounts have been deleted and taken down.

Whether you felt Jess (if Jess ever really existed) and Michael were real and just incredibly unprofessional and stupid it would seem that their response to being confronted could be perceived as proof enough of their guilt and ill intent.

We live in a digital age of photography and connectivity, rightly or wrongly it is now the norm for models to attend a photographers home for a photoshoot, I know I for one have photographed a lot of models in my home. But to others outside of our industry this seems like complete madness. A young lady attending a stange mans house alone?! Surely that is a recipe for disaster?! Well the good news is that 99% of the time it isn't a disaster at all and that's firstly because most people are inherently good and secondly with a little knowledge and experience any model can spot a fraud a mile away.

Not to long ago I was again informed of another &nbsp;little parasite on Model Mayhem operating under the name JHicksStudios and using my images to set up photo shoots with new models. This sort of thing sickens and terrifies me, not only is he open…

Not to long ago I was again informed of another  little parasite on Model Mayhem operating under the name JHicksStudios and using my images to set up photo shoots with new models. This sort of thing sickens and terrifies me, not only is he openly lying but the lie is so blatant that I shudder to think what his real intentions are for setting up photoshoots with young girls are. Model Mayhem doesn't have a reference system in place so if you're starting out be wary of the photographers you're intending to shoot with and try and contact the models they've worked with. The trick here is that a model maybe contacted that has worked with me and be told 'hey Im looking to work with JHcksStudios I see you've worked with him in the past whats he like?'. The model being contacted may well assume that they're referring to me with a name like that so its best to include as much info and links where possible too.

All models start somewhere and remember that at some point even the most experienced models had zero photos in their portfolio to begin with. So what are some of the things to look out for when starting out in modelling to give you the confidence to get some great first shoots under your belt?

 
I had to dig around in the archives to find this shot of Natasha I took nearly 4 years ago on our first shoot together. I'll be honest, I was surprised that even back then I was messing around with gels and long exposures too!

I had to dig around in the archives to find this shot of Natasha I took nearly 4 years ago on our first shoot together. I'll be honest, I was surprised that even back then I was messing around with gels and long exposures too!

First and foremost you can simply ask other models for this advice and that's exactly what I did. When I was building a portfolio I was curious as to why new models would turn up to my home when I didn't have many shots to show them at the start. I asked the first model I ever worked with on Purple Port why she decided to come along. Her name is Natasha Kalashnikova and she already had a ton of shoots in the bag before we worked together and had a wealth of experience in booking shoots at this point so she knew what to look for.

I'll just preface this and say that Natasha was an outstanding model, I would recommend her to anyone as a total professional and I certainly appreciated her being so candid in her responses to my questions about her new-photographer vetting process. It was 3 or 4 years ago now but Natasha said that firstly she Googled my name and looked for my work elsewhere online. She could see that I had done a few shoots previously on Model Mayhem so it seemed like I was legit so far.

Secondly she asked questions in her original messages that were triggers for her to see if I knew what I was talking about. Natasha said that she's been put off shoots in the past because the new 'photographer' just wants you to come over and 'get some shots of you in your underwear'. She went on to say that if a photographer really is looking to create a photograph for artistic reasons then they will have an idea of styling to work with their lighting ideas and will even send example pictures of what they're after. Natasha said that based on my responses and ideas and the fact that I had pictures elsewhere online she felt confident enough to turn up to the shoot.

Lastly Natasha mentioned that when she arrived she stayed in her car and messaged me to say she was outside. She waited in her car until I came to answer the door just so she could get a final analysis of who I was in person. It might seem a little over the top but I thought it was a pretty smart idea. We all have inbuilt warning lights that go off when we see somebody face-to-face for the first time and if something doesn't seem quite right we instantly know it. Natasha gave herself that last option to go with her gut instinct and if it didn't seem right she could quite easily have driven off.

 
Another shot from the archives of the stunning Natasha Kalashnikova.

Another shot from the archives of the stunning Natasha Kalashnikova.

One alternative or additional option I hear a lot is to bring a chaperone to your photoshoot. This is a personal choice but in my opinion, if you don't trust them enough to go alone, bringing one other person with you doesn't help you trust that photographer any more. In fact it means you haven't done enough research in my opinion to decide one way or another. Also in my experience having a chaperone in tow can make for an awkward shoot, yes I know there are lots of cases where it has been fine but the reality is, if you don't trust the photographer enough to go alone, you shouldn't go at all.

On a more personal note my partner also models and I see her getting those warning lights when something doesn't quite seem right with a photographer that she's about to work with. If that's the case she never hesitates to get in touch with a model who has worked with that photographer before and get an honest no bull-shit response as to what that photographer was like. The reason she takes this extra level of precaution is because we all know how saccharin social media and online communities can be and even though there may be a ton of models who are praising the photographer on a public forum there has been occasions where the private story has been a different matter altogether.

Again, go with your gut instinct and don't hesitate to get in touch with other models who've worked with your potential client if you feel something is not quite right. Please models, feel free to correct me if I'm wrong but I cannot think that any of you would mind responding to a fellow models concerns. Every time my partner has reached out to another model the responses have been very quick and extremely honest and informative. These private reviews from other models are invaluable so always use them if you think you'd like that extra piece of mind. No model would ever begrudge you asking them for one.

Just briefly whilst we're on the subject of reviews and testimonials I would also recommend starting modelling on a platform that has a community based around other models and photographers. I know there are plenty of non agency signed models out there who make a very successful living from Facebook and Instagram photoshoot bookings but if you're starting out and you don't yet have the experience then beginning on a modelling community site is probably a safer place to start. For example Purple Port here in the UK has a very active community that tend to look out for one another. If a photographer screws up on there then everybody knows about it very quickly indeed. Purple Port is by no means perfect but it does at least allow for positive feedback to be left by people who have worked with the photographer in the past. No, you can't leave negative feedback (a site initiative to avoid any knee-jerk witch-hunting) but the absence of positive feedback is often proof enough of their experience level. Other modelling websites like Model Mayhem have colossal communities but don't offer the facility to leave any feedback about specific shoots. If you're planning shoots on there then directly message the photographers previous models to find out more.

After my shoot with Natasha she kindly left me my very first reference on Purple Port. Thankfully she was happy with the way our shoot went and I'm sure this first reference helped give other models a clearer idea of bye and my work before they deci…

After my shoot with Natasha she kindly left me my very first reference on Purple Port. Thankfully she was happy with the way our shoot went and I'm sure this first reference helped give other models a clearer idea of bye and my work before they decided to work with me.

So to all the photographers out there, models talk to one another a huge amount about every aspect of the shoot, you have to be on your best behaviour at all times. I recently heard one private review from a model about a tog that went something like this 'he made awful tea but his images were awesome' (glad that wasn't me). One stupid mistake and models far and wide will hear about it long before you've even finished packing up. You have been warned so stick to what was arranged in the pre-shoot messages, don't ask your model to do anything that hasn't been discussed and make great tea and you'll be absolutely fine.

I understand that most of the people who actually read my blog are likely to be photographers but if this warning reaches and helps at least one model then it will have been time well spent on my part. 

So to re-cap some of the points that new models should bear in mind when organising their first shoots.
1. Simply Google the photographers name. If nothing comes up then this should be your first warning sign.
2. Ask your photographer questions, 'what type of lighting or setups will we be shooting?', 'what kind of styling are you looking for?' and 'what sort of makeup do you think will work best?'. If all you're getting back is 'whatever you think looks best just bring lots of lingerie' then this photographer might require a bit more research.
3. Ask the photographer to send you example pictures of the ideas they're looking to achieve. Remember when somebody says 'I want to shoot boudoir' images this could mean anything from suggestive well lit black and white shots or it could mean Playboy centrefold imagery. Make sure you're both aware of what to expect from the shoot.
4. If you decide to arrange a shoot then you could also get them to meet you at a public place like collecting you from the train station or stay in your car until you're happy they seem to be who they say they are. This is not ideal but it is something to consider if you have the option.
5. If you don't trust the photographer enough to go alone but instead would rather attend with a chaperone I'd think about why you're not trusting them in the first place. If you don't trust the photographer enough to go alone, you shouldn't go at all.
6. Reach out to other models who have worked with the photographer in the past. Message them directly, mention that you're starting and get them to give you an honest and private opinion.
7. Use a model community site like Purple Port. They have a community of models that have worked with more well known photographers and you're sure to find plenty of good ones that have a great track record.

The main reason I put this list together is because I know when you're starting out as a model it's tricky to get experienced photographers to work with you. As a result you end up working with less experienced photographers who don't always have a strong reputation in the industry or a lot of testimonials.  Be smart like our model Sue and spot the frauds long before you organise anything.

Remember most of the photographers out there are just trying to get experience with photoshoots just like you are, they have no ill intent and most models go through a career without incident at all. These pointers are there to give you the best possible chance of a successful shoot and highlight some things to look out for when starting out.

If theres any more experienced models out there then please feel free to add any other pointers that you feel are relevant to new models. I'm not a model so I apologise if I've missed anything blazingly obvious. Also feel free to recommend any other modelling communities that you feel might be relevant to new models too and please feel free to share this with any model friends starting out and let me know your thoughts in the comments below. Many thanks indeed for reading.

Tuesday 07.26.16
Posted by Jake Hicks
Comments: 17
 

KEEPING Perfectly Lit Gelled Backgrounds

Technique Tuesday KEEPING Perfectly Lit Gelled Backgrounds.jpg
Sometimes you can have a fairly complicated lighting setup on your model but stopping all those lights from ruining your gelled background can be a real pain.

Sometimes you can have a fairly complicated lighting setup on your model but stopping all those lights from ruining your gelled background can be a real pain.

In the previous article we spoke about the best ways to perfectly light your background with coloured gels. If you missed it then here's the link 'Creating the Perfect Gelled Background '. In that post I went through the best things to keep in mind if strong and vibrant colours across your backdrop are your objective. It turns out, that gelling your background is actually relatively simple, it's keeping those strong vibrant colours that's actually the tricky part.

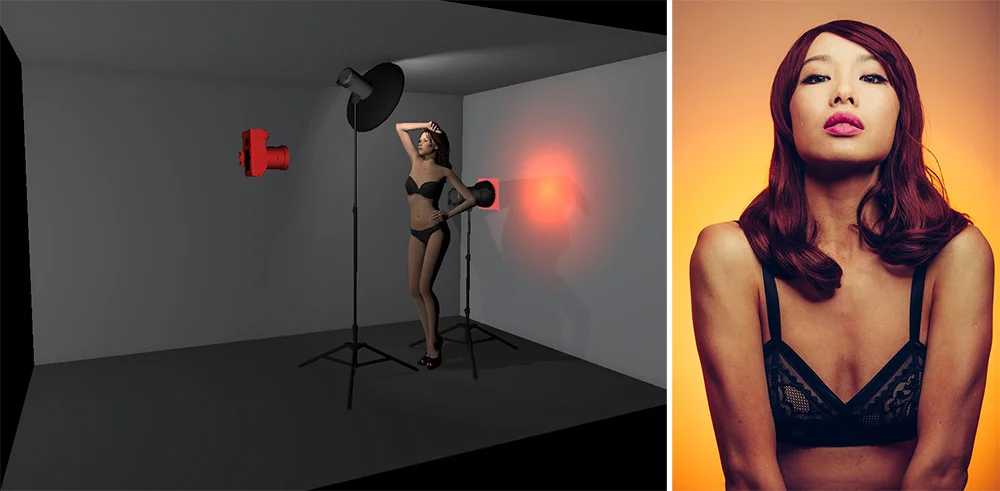
What usually happens when we begin a portrait shoot is we setup our key-light to light our subject and once we're happy with that, we then move on to place another flash to light and gel the background. This is your first mistake!

What happens next is we set up the gelled background light, take a picture and see that the background gel colour behind the model looks pretty washed out and insipid. There's no rich colour saturation back there and it's not giving you the colour that is promised on the Jake Hicks Photography Gel Packs at all!

The model looks great though, she's evenly exposed, but the background has no saturation whatsoever. So what do you do? Well it's clearly not the key light, as the model is looking great so we go to the gelled background light and faff about with that by turning the power up and down and start moving it closer and further away….. but to no avail. Obviously the gels must be broken!

Thankfully no, the gels aren't broken and there's a relatively easy solution which simply requires you to turn off your key light that's lighting the model and setup up your gelled background light first. As I described in the previous article, this is the easy bit, getting a great looking gelled background is pretty straight forward, but once you're happy with your gelled background DO NOT TOUCH THIS LIGHT AGAIN.

Yup, getting the gelled background is easy, it's keeping that rich colour that's the real problem. The reason this is strange is because we always set up our lighting with a key-light first and then add and adjust the other lights around it. Key-light, fill-light, then hair-lights and so on, but we need to rethink this process with a background light and treat it like a completely separate setup. Think about it like two different lighting setups in one shot rather than one big one, this way you can clearly separate the two. The background gel shouldn't affect the model and the model lights shouldn't affect the gelled background.

Simple Right?

Ok, so let's assume we've followed all the steps to getting the perfect gelled background. We're in love with the colour we've achieved behind the model, it's looking great with all its saturation and strong colour and we know that once we're happy with it not to touch that light again. What are the things we need to know when setting up our key light on our model to avoid ruining that beautiful coloured background?

5 Reasons your Gelled Backgrounds are Getting Ruined:

Modifiers - Soft light modifiers and hard light modifiers on key lights 

Directionality of Key Light - The angle of key light in relation to the model

Distance of Key light to Model - The inverse square law effect

Light Control - Flagging and controlling light spill

Distance of Model to Backdrop - Where in relation to your backdrop to place the model

Don’t panic! I get it, that sounds like a lot of nerd-talk right there, but trust me, if my tiny brain can make this work, anyones can.

The trick to making this easy, is to simply tackle it one piece at a time…

 
On the left you have the umbrellas and softboxes, these are soft light modifiers and on the right you have grids and snoots, these are hard light modifiers.

On the left you have the umbrellas and softboxes, these are soft light modifiers and on the right you have grids and snoots, these are hard light modifiers.

1. Modifiers

The modifiers I'm referring to are the modifiers that are attached to your key-light. I'll keep it simple by breaking them into two groups; hard and soft light modifiers. The soft ones are modifiers like softboxes and umbrellas as these spread the light over a far wider area. The hard-light modifiers are the ones that provide a very directional light like the grids and snoots.

If you light your model with a soft light modifier, you need to be aware that your light will quickly and easily spill onto your gelled backdrop unless you take great care to control it properly. Using hard light modifiers is a lot easier to control, but will obviously give you a very different look to the key-light and how it affects your models appearance.

Choosing your key light modifier shouldn't be dictated by whether or not you're using a gelled background, but you should be aware of what effect each one has so you can plan your setup accordingly. If you're using a hard-light then you can afford to be a little more relaxed with its placement, whereas if you want to use soft-lights like softboxes, you need to pay careful attention to the other factors I'll be going over to ensure your background doesn't get washed out.

Take a look at the diagram below to see how different a gelled background looks when using a soft-light on the model compared to when using a hard-light.

 
On the left is how your gelled background looks before you introduce another light to the set. In the middle we have a softbox as our key light and on the right we have a gridded dish as our key light. It's very clear to see that the key light modifier plays a big role in how our gelled background is affected.

On the left is how your gelled background looks before you introduce another light to the set. In the middle we have a softbox as our key light and on the right we have a gridded dish as our key light. It's very clear to see that the key light modifier plays a big role in how our gelled background is affected.


2. Directionality of Key Light

Even though my model is only a few feet from my gelled background, none of the saturation has been lost because I've placed the models key light to one side of her.

Even though my model is only a few feet from my gelled background, none of the saturation has been lost because I've placed the models key light to one side of her.

The directionality of your key-light refers to which angle you place it in relation to your gelled background. A lot of us like to use varying lighting styles on our subjects like narrow lighting, butterfly lighting, broad lighting, split etc, etc. Some of these lighting styles will lend themselves to gelled backgrounds more than others though.

For example, butterfly lighting is a beautifying lighting technique that requires the light to be directly in front of the model, thereby accentuating symmetry within the look. Conversely, narrow lighting highlights shape and form by placing the light to the side and uses directionality of light to cast shadows on the model in relation to the camera.

Butterfly lighting usually requires you to point the light straight at the model which unfortunately means you often wash out the gelled lighting behind her. Narrow lighting on the other hand requires you to place your light to one side in relation to the camera and model. This usually means that it isn't pointing towards the background. As a result, it doesn't wash out the coloured gel nearly as much.

I appreciate all that came with the expectation you had intimate knowledge about the lighting styles I was referencing, so take a look at the following diagrams to see exactly what I mean.


Never let the gelled background dictate your models key-light. Just because shooting with direct light on the model will make it a little trickier, it doesn't mean you can't shoot popular styles like butterfly lighting, it just means you may have to employ other techniques and workarounds to achieve the desired look.

Butterfly lighting requires our models key-light to be directly in front of her. If we have a gelled light behind her lighting the background, it can mean the background gels are washed out.

Butterfly lighting requires our models key-light to be directly in front of her. If we have a gelled light behind her lighting the background, it can mean the background gels are washed out.

Narrow lighting means our key-light is placed to the side of our model and creates more shape and form by casting shadows across our model. The benefit of this lighting is that our key-light isn't pointed towards the background and thereby isn't affecting our gelled light.

Narrow lighting means our key-light is placed to the side of our model and creates more shape and form by casting shadows across our model. The benefit of this lighting is that our key-light isn't pointed towards the background and thereby isn't affecting our gelled light.

In the image above, we've placed our key-light straight on to the model to get the butterfly lighting effect. Unfortunately, as a result we've lost all the saturation on our gel behind her.

In this setup we've opted for a more directional light on our model and we've placed our key-light to the side and not pointed it straight towards the background. As a result, all of the light is on the model and none is on the background.


3. Distance of Key Light to Model

Utilising this technique of bringing your key light quite close the model is often easiest to achieve on beauty shots. The beauty dish key light I'm using here is probably no more than 3 feet from the model and she in turn is no more than 5 feet fro…

Utilising this technique of bringing your key light quite close the model is often easiest to achieve on beauty shots. The beauty dish key light I'm using here is probably no more than 3 feet from the model and she in turn is no more than 5 feet from the gelled background. Use this technique correctly and you can shoot with gels in very small spaces.

Utilise this technique properly and it may well be the most powerful tool in your lighting arsenal.

The distance of your key-light to your model is crucial to getting uncontaminated gelled backgrounds and it's a common problem that is often overlooked. This is tricky to explain with mere words, but essentially the closer the key light to the model, the less light that actually falls onto the background. The principles of this are based around the inverse square law theory which is a whole other article, but essentially; as you bring your key light closer to the model, the more you have to turn your key light down to compensate for the increase in brightness.

The Inverse Square Law in relation to light states that when you double the distance of the light to the subject, you quarter the amount of light that falls upon them.

For example, if your key light was 2 metres away from your model and you took a correctly exposed picture at f8 (we're assuming a constant shutter speed of 1/160th and an ISO 100 for a normal studio setup) and we moved our key-light closer so that it was now 1 metre away from our model (half the distance) and took a shot it would now be 2 stops overexposed (one stop equals double the light). We don't want to change the settings on the camera because remember our gelled background light is set to those settings, so we turn the power of our key-light strobe down 2 stops (quarter the light to match half the distance moved). If we take a picture now, the model is correctly exposed again.

Like I said this is a real pain to explain coherently with text alone, so let's take look at a diagram below to elaborate on what I mean. Pay close attention to the brightness of the background her. See how different it looks when the light is a lot further away compared to when it’s close?

In this setup our key light is relatively close to our subject but she's evenly exposed.

In this setup we have our key light a lot further away so we have to turn the power of the light up to compensate.

So we can see that by moving the light away and upping the power of that one light, we can still correctly expose the model without having to change any settings on our camera. The same applies if we want to move the light closer, we just have to turn the power of the light down to compensate. We don't have to adjust the camera.

Now lets see what happens when we introduce our gelled background light that we already had perfectly set up before. How does this technique affect the colours of that gel we so painstakingly got right previously.

In this shot our key-light is close to the model and closer to the background, but the gelled background colour has maintained its tone because we've turned down the power of the key light.

In this setup we've moved our key-light a lot further away from the background, but also a lot further away from our model. To compensate for that extra distance we've had to increase the power of the light but in doing so our background gel now looks completely washed out.

As I mentioned a moment ago, if you get your head around this concept, your mastery of lighting will go through the roof and it’s an incredibly powerful tool if you can utilise it to your advantage. I know it's tricky and a little counterintuitive though. When I was teaching this to new photographers in the studio where I worked, this was always the hardest part for them to get their heads around. I think the reason for this is because when you move your light further away from the background you're actually adding more light to the background, whereas normally you'd think that by moving it further away you'd get less light back there. Granted you've added more power the to the light, but it still seems odd when you're starting out that this happens.

There are of course downsides to this technique and that is that by moving your key-light closer to the model you change the effect the light has on the model as well. This is something that you'll have to play with, but if you're happy with how your modifier looks when it's quite close to the model then this may be the technique you need.


4. Light Control

The term light control has many connotations, but in this context I'm referring to controlling the light after it has left the modifier. If you have complete control of your light after it has left the light source, then that means no light is spilling onto your gelled backdrop. This is a little easier said than done, but there are a few little studio tricks that you can employ to ensure your light is only going where you want it to and this technique is often referred to as ‘flagging’ the light. Still-life photographers are absolute masters of this as they’re often working with very small objects like food and bottles, but their light sources are still the same size as ours when we light larger objects like people. As a result, they need to be extra careful of where their light is going and spend a long time before shooting begins ensuring no unwanted light spills anywhere where it shouldn't.

I've used Cinefoil here to mould onto my barn door to create an extra large flag to control the spill of light.

I've used Cinefoil here to mould onto my barn door to create an extra large flag to control the spill of light.

One tool we can use to control the light is Cinefoil or Black Wrap. This is essentially matte black, heat resistant and extra thick tinfoil that we mould onto our lights to control any spill.

It's relatively inexpensive and although more popular in the film and movie industry it's invaluable to have a few sheets in your bag incase you need it. Simply mould it into any shape you want and when you're done, flatten it back back out and return it to your bag for next time. I'm sure the benefits of this speak for themselves but if you're using a hard light source like a snoot or grid a few well placed sheets of this you can make sure that no light from your key light spills onto your gelled background, even if your quite close to it.


I use black velvet sheets as flags instead of the large poly boards when I'm on location. They are portable and cheap, but just make sure you get the cotton based version as the synthetic one acts more like a reflector than a flag.

There are going to be occasions of course when you want to use larger lighting modifiers like softboxes. Flagging unwanted light from a softbox would require either a huge amount of Cinefoil or a larger and easier to manage alternative. One option is black poly-boards, these are present in most studios and they are usually about 6ft high by 4ft wide and painted matte black on at least one side. Simply maneuverer these into place next to your lights and then angle them so they funnel the light away from the background, but still onto your model. I've used these a lot, but I also use a cheap and portable alternative when I'm on location too and that’s simply a couple of large sheets of black velvet. I hang them from spare light stands and they give me complete control of the light after it has left the modifier. It might seem silly at first, but black velvet is great at soaking up unwanted light thanks to its deep texture. Be sure to get the cotton based version though as the synthetic one is shiny and renders it useless as a light flag.


5. Distance of Model to Backdrop

You're nearly there and I'm sure you'll be pleased to know that I've saved the easiest till last. This last solution refers to how far away your model is to the background. Now I know this seems obvious, but you'd be surprised as to how many people place their model right next to their gelled backdrop even though they have the whole studio to play with. Essentially this technique is your 'do whatever you want' card to play. Set up your background gel, then place your model far away from it and you can set up whatever lighting you want with her.

In fact, you can even use the practically forbidden softbox with butterfly lighting from 2 metres away technique if you really want!

The trick to this is to treat this as two completely different lighting setups, each of them being so far apart that they have no influence whatsoever on one another regardless of what you do in them. Obviously there are limitations and you still need to tie the model and background together in one frame with a slightly longer lens, but it's certainly possible in most studios. Up until now I've been dealing with issues that most of us have encountered, but we've only really encountered them because we're dealing with a smaller space like a home studio. Eliminate that space issue and you're free to do as you please.

Even seemingly heretical gelled lighting setups like softbox-lit butterfly lighting from 2 metres away are possible if you separate your model and background. Treat your background and model like two completely different setups and you'll never have to worry about washing out your beautifully lit gelled backgrounds ever again…..as long as you have the space for it that is.

Even seemingly heretical gelled lighting setups like softbox-lit butterfly lighting from 2 metres away are possible if you separate your model and background. Treat your background and model like two completely different setups and you'll never have to worry about washing out your beautifully lit gelled backgrounds ever again…..as long as you have the space for it that is.

All joking aside, the same principle applies even in smaller spaces too. I even tried this in my front room to see if I could force the effect in a small space as well. The result is that yes, even in small spaces by simply moving your model as little as 3 feet further away from the background like I did in this test, can have a dramatic effect on how washed out your background gels look.

When you're &nbsp;shooting in small spaces you need to be aware of how close your key-light is to the background. Even when I'm using a gridded beauty dish really close to the model, I'm still getting a lot of spill onto my gelled backdrop which is washing out the colour.

When you're  shooting in small spaces you need to be aware of how close your key-light is to the background. Even when I'm using a gridded beauty dish really close to the model, I'm still getting a lot of spill onto my gelled backdrop which is washing out the colour.

By simply moving the model as little as two or three feet further away from the background can have a dramatic difference. Now that you're a little bit further away, your gelled background retains its saturation.

By simply moving the model as little as two or three feet further away from the background can have a dramatic difference. Now that you're a little bit further away, your gelled background retains its saturation.


To Conclude…

Well done, you made it to the end and my apologies for the long article on this but I do honestly believe that all the points I've raised here are valid in the pursuit of maintaining clean and saturated gelled backgrounds.

Points to remember;

1. Set up your background light first, before you set up your model lights.

2. Once you've set up that gelled background light correctly DO NOT TOUCH IT AGAIN.

3. Soft light modifiers on your key-light are harder to control and more likely to ruin your gelled background versus hard-light modifiers .

4. Certain lighting techniques like butterfly lighting are harder to implement in small spaces when using a gelled background. Instead, opt for more of a side-lit look like narrow lighting to make it easier to control the spill of light.

5. By bringing your models key-light closer to her and turning the power down, you can actually eliminate any spill of light onto the background.

6. Use Cinefoil, black velvet sheets or poly boards to control and flag the light. Use these tools to ensure no unwanted light falls onto your gelled backdrop.

7. If you have the space for it, don't be afraid to move your model and key-light well away from the gelled background.

So did I miss anything? Is there a crucial element that I've overlooked? Feel free to sound off in the comments below and as always please feel free to ask any questions and I will certainly do my best to answer them all :)


Further reading on gels:

How to perfectly light your gelled backgrounds 'Creating the Perfect Gelled Background'

How many colours can you get from just one gel? 'Colour Gels Exposed'

Some post-pro tips on getting the most out of your coloured gel shots 'Maximising the Colour in your Coloured Gel Shots'


:WARNING: Flagrant Self Promotion Ahead


Want to learn more? Believe it or not the above article just scratches the surface of what there is to know about gelled lighting. If you'd like to know more on how to create gorgeous gelled lighting shots then why not check out one of my Gelled Lighting Workshops where we cover everything from coloured flare in portraits to triadic colour washes in fashion. Click the link to find out more. See you there :)


Need some coloured gels? Why not check out my hand picked gel packs of curated colours that offer you the best saturation and consistent edge to edge tone. I've worked with LEE Filters gels for many years and their quality product offers some of the thickest and longest lasting gels I've used. Follow the link to see what we've put together Jake Hicks Photography - Gel Packs

Tuesday 06.28.16
Posted by Jake Hicks
Comments: 2
 

Creating the Perfect Gelled Background

Technique Tuesday Creating the Perfect Gelled Backgroundnew.jpg

At first glance, this seems like an easy thing to achieve. How hard can it be to get a great looking gelled background in your shot?

Getting clean, saturated and even colour from edge to edge on your gelled background with a subtle vignette needn't be a mystery. Simply remember Exposure, Modifier and Distance to get the perfect gelled background every time. *Image taken at my Gelled Lighting Workshop of the stunning Amber Tutton.

Getting clean, saturated and even colour from edge to edge on your gelled background with a subtle vignette needn't be a mystery. Simply remember Exposure, Modifier and Distance to get the perfect gelled background every time. *Image taken at my Gelled Lighting Workshop of the stunning Amber Tutton.

As anybody who’s used gels in the past will tell you, there's certainly a few key things to pay attention to if you want to avoid those washed-out and uneven gelled backgrounds. If you want clean, saturated and brightly coloured backgrounds by using gels alone, read on.

First off, why even use coloured gels rather than a coloured backdrop or Colorama? There's a couple of reasons, but the most popular is simply variety. All you need is one white wall and you can quickly and easily shine 100's of inexpensive gel colours onto it and change the look of your shot in a matter of seconds. Gels also have the ability via lighting to add depth in the form hot-spots and vignetting, whereas a Colorama (Colarama is just an industry name for long rolls of coloured paper) is a fixed tone all over. Coloured backdrops are also fairly expensive, especially if you want multiple colours and you'll have spent hundreds of pounds long before you ever get more than a few different colours in your collection.

The biggest limitation of gels over the simple coloured Colorama's is that you can't light the model if she's standing right next to the background, not without washing out the gel colour you already have back there. Gels are also pretty tricky to shoot full body shots with, if you're shooting full length fashion shots and you want the gel colour to cover the background and the floor under the models feet then yes, a seamless Colorama style backdrop is going to be the way to go.


If like me however, and you're happy to never photograph another foot ever again, gels are your inexpensive, varied and simple to use coloured background of choice.


Hot-Spots can be Good…

So let's take a look at how to create that perfect gelled background. Firstly there's a couple of options to consider in the finished look. On one hand you can go for a flat even colour and tone across the background of the image, or you can go for a vignetted look that consists of a hotspot of colour that tapers out to shadows towards the edges and corners of the frame. See below.

In the two images above we can see how the two different variations of a gelled background. The gel is shone against a white wall and depending on different factors you can either achieve a more even tone like the background on the left or a more vi…

In the two images above we can see how the two different variations of a gelled background. The gel is shone against a white wall and depending on different factors you can either achieve a more even tone like the background on the left or a more vignetted background with hotspots and darker edges like the background on the right.

There's no right or wrong version here, just personal preference but whichever version you're trying to achieve, there are three basic factors that you can control to achieve the look you want.

By taking control of the following three factors you can manipulate the look and effect your gel has on your backdrop:

1. Exposure - This is the power of light you pass through your gel.

2. Lighting Modifier - This is the type of lighting modifier you choose to use in conjunction with you gel.

3. Gel Distance - This is the distance of the gel to the background you are trying to colour.

The following results and ideas are all based on shining a gel against a white wall or backdrop, yes you can shine them against different colours but that is a topic for another day.


Exposure

This one is the easiest to control, but also has the most effect on the result. You cannot light meter a gel because a gel changes tone with more or less exposure, some gels like the richer colours of reds and blues will often look a lot better with less power passing through them whereas some lighter coloured gels like yellows will look muddy if they don't receive enough light. As a result, you cannot 'correctly' light meter the gel. Take a look at the tests I did with my gels below. You can clearly see that the colours change drastically with variations in exposure from the light being passed through them.

The above diagram shows you just how varied a gel colour can be by simply changing the amount of light that passes through them. When I was doing this test, I set up my strobe with a medium power output and simply adjusted the aperture on my camera and took a shot at each aperture increment. The same results would have been obtained had I simply kept my camera set to a specific aperture and turned my strobe power up and down.

The above diagram shows you just how varied a gel colour can be by simply changing the amount of light that passes through them. When I was doing this test, I set up my strobe with a medium power output and simply adjusted the aperture on my camera and took a shot at each aperture increment. The same results would have been obtained had I simply kept my camera set to a specific aperture and turned my strobe power up and down.

So in conclusion there is no 'correct' exposure, only the one that produces a colour and tone that you're happy with. I'd personally recommend you doing a similar test with your own gels to see just what colours you can produce at varying exposures. For more on this topic, read the specific article on Gel Exposures here Coloured Gels Exposed


Lighting Modifier

Lighting modifiers obviously play a big factor in how the gels will look on the background. In short though, soft light modifiers like softboxes will produce more of an even tone, but will never have deep saturated colours as a result. It's also a lot harder to get rich brighter hotspots with softboxes over harder lighting modifiers like grids and snoots.

The images above show the difference between modifiers when used in conjunction with gels. The image on the left is a small softbox with a blue gel. The colour is less vibrant and lacks in saturation from edge to edge, plus there is little sign of a distinctive hotspot. On the right we have a gel attached to gridded reflector dish and the resulting light is a lot more saturated but has a significant hotspot that drops off dramatically. If you wanted a flat even toned gelled backdrop, then the softbox is the way to go.

The images above show the difference between modifiers when used in conjunction with gels. The image on the left is a small softbox with a blue gel. The colour is less vibrant and lacks in saturation from edge to edge, plus there is little sign of a distinctive hotspot. On the right we have a gel attached to gridded reflector dish and the resulting light is a lot more saturated but has a significant hotspot that drops off dramatically. If you wanted a flat even toned gelled backdrop, then the softbox is the way to go.

Taking our modifier choices a step further, we also have variations within the hard light modifiers as well. Some are more open/wider than others and the addition of a gridded modifier being the most directional and hardest modifier of them all.

In the three sets of images above we can clearly see how variations in hard light modifiers affect the gel appearance. On the left we have the tightest spot with the grid on a 60 degree reflector. In the middle we have a bare 60 degree reflector that still has a relatively controlled but tight vignette and then on the right we have the open 65 degree maxilite reflector dish from Bowens. This dish is arguably my personal favourite mix of control and spread.

In the three sets of images above we can clearly see how variations in hard light modifiers affect the gel appearance. On the left we have the tightest spot with the grid on a 60 degree reflector. In the middle we have a bare 60 degree reflector that still has a relatively controlled but tight vignette and then on the right we have the open 65 degree maxilite reflector dish from Bowens. This dish is arguably my personal favourite mix of control and spread.

Every modifier will clearly affect the gel spread and even without changing any other factor, the modifier plays an important role in determining the look. For myself and what I do, I prefer a harder modifier over the softer ones as it offers more colour saturation and control and with the hard light modifiers themselves, I prefer the open dish like the Bowens Maxilite 65 degree reflector dish. This modifier offers me the best balance of saturation, control and spread of colour.


Gel Distance

Gel distance technically refers to the distance of your gelled light and modifier from the backdrop. The closer the light to the backdrop the smaller and tighter the vignette of colour is going to be. Also, if the exposure isn't modified, the brighter the hotspot at the centre will be too. Again, this is personal  preference and it depends greatly on how far away you'll be when shooting the model. For example if you're quite close to the model and shooting on a 50mm lens the gelled effect on the background will look very different than if you're a long way away but shooting at 200mm.

The two images above are drastically different, but the only thing that has changed is the length of lens used. The image on the left is a 200mm lens that has compressed the background so you get a more even tone of gel exposure. The right hand image is shot on a 50mm lens and shows a far wider area of the background in shot which in turn shows the heavy vignetting present at the edges of the gel.

The two images above are drastically different, but the only thing that has changed is the length of lens used. The image on the left is a 200mm lens that has compressed the background so you get a more even tone of gel exposure. The right hand image is shot on a 50mm lens and shows a far wider area of the background in shot which in turn shows the heavy vignetting present at the edges of the gel.

Playing with your preferred lens length and gel placement (distance to background) will be key to getting the right look for you. For example if you want to shoot at 50mm you can still get the 200mm background look, you simply have to move your gel further away from the backdrop to get a wider spread of colour.

Once you're happy with the lens choice you need to fine-tune the look you're after. Moving the gelled light closer to the backdrop will produce a stronger vignette of colour compared to moving it further away, as this will produce a smoother tone from centre to edge.

The following images below were actually taken on my Gelled Lighting Workshop to show attendees exactly what was going on. I've included a lighting setup diagram with each of the images to explain the setups visually here.

The image above was taken at my gelled lighting workshop, but it shows what a gelled background looks like when the gelled light is placed quite close to the backdrop. The background has a very heavy vignette and you start to lose colour altogether at the top of the frame.

The image above was taken at my gelled lighting workshop, but it shows what a gelled background looks like when the gelled light is placed quite close to the backdrop. The background has a very heavy vignette and you start to lose colour altogether at the top of the frame.

By bringing the gelled light further away from the background and hiding it just behind the model, you get a far more even colour tone from centre to edge.

By bringing the gelled light further away from the background and hiding it just behind the model, you get a far more even colour tone from centre to edge.

So bringing your gelled light further away creates a more even tone of colour across the background which is what I prefer, but moving it closer will provide a similar look if you're shooting on a longer lens.


In Conclusion…

That's it, keep those three things in mind; exposure, modifier and distance. Just remember to adjust each of them to your taste. Lowering the exposure of a gel will often add saturation, using soft light modifiers will reduce saturation and moving your light further away will even out the tone and reduce vignetting.

REMEMBER - There's no right or wrong, just personal preference, so play with what suits your style.

Keep it Clean…

There's just one last thing and that's how to actually maintain that richly saturated colour backdrop with a perfect vignette that you've just crafted.

I get sent gelled lighting shots all the time from people asking for a little advice, 9 times out of 10, it's with a gelled background that looks washed out. When I respond with 'Your background colour looks a little washed out' I tend to get the response 'Oh no, I was going for more of a pastel tone'. Uh huh, I believe you ;)

Joking aside, we've all done it and I spent years teaching in studios where washed out colours in the background is by far and away the biggest offender of ruined gelled lighting shots.

I've rambled on long enough for one article so in the follow-up piece, I'll be going through 'How to Keep Perfectly Lit Gelled Backgrounds'. I shall see you then :D

The image on the left is the result of our hard-earned efforts to sculpt a perfectly lit gelled background. We've exposed the gel to get the tone we want, we've used the perfect modifier, we've placed it at the right distance from the wall and we've even chosen the right lens…. but it's all been ruined in an instant with the addition of just one more light!!! :'( Learn how to avoid gel-nemesis in my KEEPING Perfectly Lit Gelled Backgrounds article.

The image on the left is the result of our hard-earned efforts to sculpt a perfectly lit gelled background. We've exposed the gel to get the tone we want, we've used the perfect modifier, we've placed it at the right distance from the wall and we've even chosen the right lens…. but it's all been ruined in an instant with the addition of just one more light!!! :'( Learn how to avoid gel-nemesis in my KEEPING Perfectly Lit Gelled Backgrounds article.

Let me know your thoughts guys, is there anything I've missed here? Are there any modifiers that you swear-by to get great results? Post a comment down below as I'd love to hear your experiences and as always, if you have any questions, please feel free to sound off and I'll try to answer them the best I can.


Another article that might interest you is the one on 'Colour Gels Exposed'

Also here's the article I wrote on some Photoshop techniques 'Maximising the Colour in Your Coloured Gel Shots'


:WARNING: Self Promotion is rife beyond this point!


If you're interested in finding out literally everything there is to know about gelled lighting then why not check out my new Gelled Lighting Workshops


Don't forget that if you need some more awesome gels that have been curated into some phenomenal collections of must-have colours ;) then why not check out my own Jake Hicks Photography Gel Packs

Tuesday 06.21.16
Posted by Jake Hicks
Comments: 7
 
Newer / Older