• >>>NEW Colour 2.0 Workshop<<<
  • Technique
    • Latest Techniques
    • FREE TIPS
    • Quick Tips
    • Video
    • Site Search
    • Blog
    • Archives
  • Mentoring
  • 2026 Workshops
  • >Online Workshops<
  • Studio Lighting Books
  • Contact
    • Newsletter
    • Contact
    • Statement
Jake Hicks Photography
  • >>>NEW Colour 2.0 Workshop<<<
  • Technique
    • Latest Techniques
    • FREE TIPS
    • Quick Tips
    • Video
    • Site Search
    • Blog
    • Archives
  • Mentoring
  • 2026 Workshops
  • >Online Workshops<
  • Studio Lighting Books
  • Contact
    • Newsletter
    • Contact
    • Statement

WATER & LIGHT

Canon EOS 1Ds Mark II - CAMERA

85 mm - LENS

F 5.6 - F-STOP

1/125 sec - SHUTTER SPEED

100 - FILM SPEED

Flash - LIGHT SOURCE


Caution is always the staple of any shoot that mixes 4000w of electricity with water, consequently I made sure that all four of the flash heads were wrapped in plastic to avoid impromptu flying trips across the studio. It is also worth noting that the make and model of the flash used will have an effect on how the falling water droplets appear in the finished image. I was using the older model Bowens Esprit 500w monobloc heads, these are great multi purpose studio and location lights but they are certainly not renowned for their short flash duration. Monobloc flash heads like these will light up quickly but will still glow as the flash fades. This may not seem to the human eye as slow, but when flash durations range from 1/700th of a second to 1/7000th it can have a dramatic effect on how sharp your final image will look. When shooting relatively stationary objects or portraiture it goes unnoticed, but when you are trying to capture fast moving objects like water droplets it can create an issue. The flash can capture the droplets with its initial burst but as the light fades it is still capturing the image as the droplet falls further, resulting in the droplet to appear as if it is travelling up not down. The type of photography you do should have a distinct effect on the flash unit you choose, if your planning on shooting a lot of fast moving objects or people like dancers then choosing a flash unit with a short flash duration is paramount.

Tuesday 07.19.11
Posted by Jake Hicks
Comments: 3
 

"As photographers we create 2D representations of 3D objects" - Dave Montizambert

Objective and Subjective Lighting

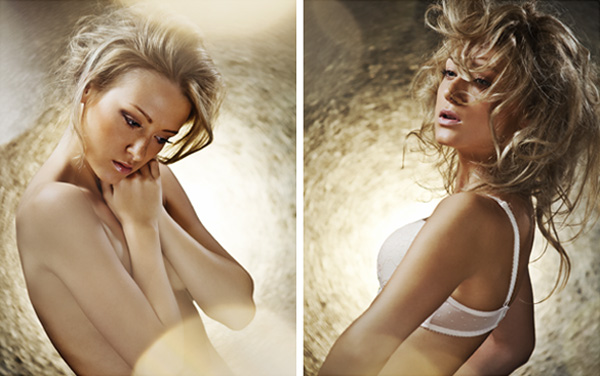
Previously I have mentioned how we all make a conscious decision on how we want our finished image to look like before we release the shutter. No matter how vague that initial idea, there will still be a deliberate choice to allow light to be exposed to the frame therefore representing our subject in a chosen way. In its most basic form this idea will be that there is enough light hitting (reflecting off) the object to make it visible in the image all the way up to deciding if and how we want to modify the size, angle, intensity and shape of our light source to intentionally capitalise on the semiotic relationship the viewer has with the subject. Included here are two images of the same subject but lit in two very different ways to evoke varying responses. The image on the left is shot with a directional soft light that envelops the skin and emulates the light from a window. The image on the right however is shot using a very hard-light from a ring flash that accentuates any tone with a sharp drop-off in light to dark and is used to give a more fashion feel to the shot. I have not even mentioned the choice of pose, styling, colours or post production options, all of which should be decided upon consciously or otherwise, to achieve a shot. In short, apart from actually lighting a subject accurately to portray its shape and features, and by accurately I mean correctly exposed, the rest is down to personal style. To photograph a fresh green apple correctly it would be lit to portray it as green, this is objective, portraying it as anything else is seen as the image looking wrong. You choosing to hard-light the apple to accentuate its shine with spectrals or deciding to add more light to fill in the shadows and minimise shine by using a softer light to portray it as a more natural and organic apple is subjective, this is up to you.

Areas of Illumination

If you were to point a single light source at an object that is of one tone you would see at least three different densities occur. The areas of light on a subject can be classified as shadow, diffused and specular. You would also witness the areas of change between these regions, they are known as edge transfers.

Diffused Area

This is the correctly exposed area, representing the true tonality of the subject, or the natural brightness of the subject. This is objective, to truly represent the subject in question we have to document it accurately. A purple ball photographed in any other way than to depict it as purple would be classed as the image looking wrong.

Shadow Area

This is under exposed in relation to the correctly exposed diffuse area. This is subjective, there can be no light or it can have a fill light to lessen the shadow. You can’t say this shadow is wrong, you can only say I like it or don’t like it. Altering the shadow edge transfer and the rate of transfer from the shadow tone into the diffused value tone can control how much shadow there is.

Specular Area

This is over exposed in relation to the correctly exposed diffuse area. Traditionally called, shine, hot-spot or sheen. It is the mirror image of the light source seen on the surface of the subject, most commonly seen as catch-lights in people’s eyes. Speculars as well as shadows, have edge transfers, only these govern how shiny a surface appears. Speculars are subjective and the size of them can be adjusted to personal preference, not rightly or wrongly.

Tuesday 07.12.11
Posted by Jake Hicks
Comments: 1
 

DARK FIELD ILLUMINATION

Canon EOS 1Ds Mark II - CAMERA

70 mm - LENS

F 13 -F-STOP

1/250 sec -SHUTTER SPEED

100 -FILM SPEED

Flash - LIGHT SOURCE

This type of lighting technique is more commonly seen in still life lighting, the even light that wraps around an object is perfect for giving darker shiny objects that extra ‘pop’ when shot against a dark background. This can be seen clearly here on the image of the model with the guitar and on the still life shot of the metal bodied camera. 

This lighting technique is actually very easy to achieve even with just one light. The trick is to use a large light source (larger than your subject at least), here I used a large soft-box but a large window could have the same effect, and block out the middle area of light. This blocked out area will effectively be your background for the shot. For mine I hung a large piece of black velvet in front of my soft-box but a large black card would also do the same. I like to use black velvet because of its deep texture it reflects very little light and should be part of every photographers kit. It will come in handy on many occasions on set and I use it as a backdrops or for flagging light.

What you are trying to achieve by blocking out most of the light is a narrow strip of light all the way around your subject, varying the size of this strip will vary the results so its worth experimenting with it. What this does is to light just the edges of the subject which really makes them stand out from the darker background.

Considering that this image is pretty much shot with just one light, you can quickly and easily get some great results. The secondary light you see being used here is really just adding some shine to the guitar and therefore turned down very low and thanks to the barn-doors not affecting the model. Shooting this shot with one light effectively though means that you will need to bounce some of that light back into the shot. Here I used a white bounce board but a simple white sheet would have the same effect. By moving that white bounce board closer to the model I was able to brighten the model and conversely by moving it further away I was able to darken the model. Again playing with this will offer different looks so its a good idea to try a couple of different distances.

Both of the photographs of the model and the camera were shot using the same lighting technique even though they are made of very different materials and very different sizes. The shot of the model shows clear edge lighting on both the shiny guitar and on the models skin and a good tip when trying to get strong edge lighting on naturally non-shiny objects like skin is to apply a small amount of oil or other liquid. This will allow the skin to catch the light and give you some strong spectral highlights (a direct reflection of the light that is behind) and it also helps to enhance any colours and contrast in tattoos.

In the picture of the camera the same technique picks up on the naturally shiny metal casing making it clearly stand out from the background. This is one of the reasons it's a very popular still life lighting technique because it means the product is very easy to remove from the background and place it in a composite scene afterwards.

I hope I’ve given you a few new ideas to try next time you want to shoot something different.  Let me know your thoughts on this article by commenting below or reaching out to me on my Facebook page I do my best to respond to all questions and comments.

Sunday 07.03.11
Posted by Jake Hicks
Comments: 3
 

"Aside from the laws of physics, there are no rules to good photography" - Christopher Grey

Constructing an image

As photographers we create two-dimensional representations of three-dimensional objects. This is achieved purely by manipulating light in such a way that it is clear to the viewer exactly what it is we are trying to portray.

Constructing an image should involve the photographer working to a set brief and having a clear goal in mind of what the finished image will look like. Whether it is shooting a portrait, fashion or still life, the photograph should clearly and accurately represent the subject. To do this it is necessary to light the subject correctly so as to portray its features distinctly. The characters face in a portrait or a fashion models clothes will have to be correctly exposed or the highlights on a shiny object in sill life, will have to be accurately placed to clearly show its glossy surface. These things are objective, they are not open to interpretation, and they are there to accurately fulfill the brief in their most fundamental way.

To do this, we must be aware of what we are shooting and have the necessary skills to accomplish the task. This is done through planning and knowing how the equipment works. From subject to background, lights to subject, subject to camera, and every combination in-between, everything in the studio plays a part in affecting the finished image. Failure to acknowledge this fact will result in a trial and error process that will result in a drawn out procedure where the accomplishment of a final image that fits the brief is far from guaranteed.

Although the title quote is true, it can be useful to have few key 'guidelines' in the back of your mind before you release the shutter. The following statements are aimed more towards studio lighting but most of their principles apply to all fields of photography.

  • Try and avoid cross-contamination when using multiple lights, overlapping shadows create confusion for the viewer. The most successful photos have always given the ‘appearance’ of being lit from a single source.
  • Correctly expose one light at a time with a light meter, then turn them all on and meter them again. This will show you if they affecting one another.
  • If you are lighting your background with coloured gels, try under-exposing them by a couple of stops to get strong vibrant colours.
  • Ensure that your key light, the one lighting the models face, is working with your models pose. Try to keep clean crisp shadows and try to avoid dark eye sockets without the telltale sparkle or catch-lights in the subject’s eyes. Talk to the model before you start shooting, explain where your key-light is which way you want them to direct most of their poses.
  • With your secondary lights, ensure that they are giving you the desired effect. Remember, these lights are subjective; you can use them to either fill in shadows or create highlights in the hair. The power and exposure that they give you is down to your discretion, if you want to blow the highlights in the hair to give it extra shine you can.
  • Try to match your poses to your chosen lighting style. If your going for a hard-lit style, try to capitalize on the dramatic shadows with dynamic and strong poses, remember that the absence of light in areas of the image will create shapes, capitalise on this to draw the viewer around the photograph.
  • Keep an eye on background clutter. Check for objects that shouldn’t be in the image. A cable coming out of side of models head can take seconds to move on set but hours remove later in post, especially where hair is involved.
  • Utilize your space. If your finding your key light spilling onto the background, move your lighting setup further away to compensate.
  • Always light meter but above all check the histogram of your images whilst your shooting, it's to late to check them later in post.
Tuesday 06.28.11
Posted by Jake Hicks
Comments: 2
 

BOKEH

Cannon EOS 5D Mark II - CAMERA

130mm - LENS

F 5.6 -F-STOP

1.4 sec -SHUTTER SPEED

100 -FILM SPEED

Mixed - Tungsten/Flash - LIGHT SOURCE

Bokeh refers to how a lens renders out-of-focus areas of an image, or more accurately the way the lens renders out-of-focus points of light. Bokeh is most commonly seen in small highlights such as specular reflections and light source areas of an out-of-focus background. This technique aims to bring that visual effect firmly into the foreground. This is achieved by shining light through glassware very close to the lens thereby creating strong specular highlights which when viewed through a long lens at a low f-number create these blurred circles. For these particular shots the model was captured with flash and the bokeh was captured with the tungsten light from the modelling bulb from a flash head, hence the longer shutter speeds. This was a personal choice to try and 'warm up' the foreground but you could just as easily use flash for both, personally I found the stark white of the flashed foreground bokeh to be too distracting but in theory using coloured gels would also resolve this. Take care not to get ‘unwanted’ flare in the lens by using barn-doors or flags, removing lens filters (screw on UV lens protectors etc) will also greatly reduce the chance of unwanted flare. It is important to note that different lens create very different results, lens coatings, aperture blade shape, and amount of glass used all play a part in how the final bokeh appear. Varying the lens length and f-stop though are the two key contributors as to how the final bokeh will appear. Experimentation is key.

dawnlightjy.jpg
Friday 06.24.11
Posted by Jake Hicks
Comments: 2
 
Newer / Older