

I've always wanted my photography education on here to be free, so although there is no paywall to any of my -Technique Tuesdays-, any and all support is greatly appreciated. ❤️
PLUS: Donate any amount and I’ll send you a link to the hi-res print version of my studio lighting book.
||
PLUS: Donate any amount and I’ll send you a link to the hi-res print version of my studio lighting book. ||
My guess is that lighting engineers get their nomenclature from the same store as astronomers, and although the FC500C and SAO 113271 both produce an awful lot of light, only one of them is a truly excellent addition to the studio.
No, the Nanlite FC-500-C isn’t quite as bright as the Betelgeuse star off the shoulder of Orion, but its 500w (520w, to be precise) does mark a turning point in LED lighting. Why? Well, for one, this is an extremely well-priced light for its power and quality. Yes, there are many brighter LEDs out there on film sets today, but they are also extremely expensive. The same thing was true 5 years ago too. Back then, 500w LEDs were hitting film sets, but they were $5000 …. and they were only white light!
Fast-forward from the LEDs of Y2K to today, and the very feature-rich Nanlite FC-500-C is now less than a fifth of the price. I can get one here in the UK for a little under £800, and thanks to our economy being weaker than my love for black-and-white photography, it doesn’t cost much more than that in freedom bucks either.
So, the cost of a feature-rich studio head seems palatable to many of us, but why is this a turning point in lighting?
The Goldilocks Light
For me, and I think a lot of studio shooters, 500w is the sweet spot in terms of power. Sure, more power is always a good thing, but to get just one more stop of power from a 500w light, we’d need to get a 1000w light. Once we do that, prices start to get exorbitant. For that extra stop of power, which, as you know, is also the equivalent of switching from ISO 100 to ISO 200, you can end up paying nearly 5 times the amount. For example, many 1000W+ LEDs cost £3,000 and up, and the price difference was the same back in the flash days. If you want that extra stop of light, you gotta pay through the nose for it. The same is also true with lenses. The Canon 50mm f1.4 is around £400, but the Canon 50mm f1.2….. costs £1600! You want a little more light, it’s gonna cost you.
The Nanlite FC-500C
As I said, I believe the 500w is the sweet spot between sensible pricing and very usable power. Sure, you can make it work with a less powerful light thanks to higher ISO values, but a 500w gives you more options with modifiers and distances without you having to buy that f1.2 lens!
For reference, and to give you some perspective on the actual brightness of a 500w light, the Nanlite FC-500C positioned 2.5m (~8ft) from the background comes in at f5.6, ISO 100, and 1/125th.
For 20 years, I primarily used 500w strobes in the studio. Sure, I had a couple of 1000w heads, but I never used them. The 500w heads did everything I needed, and I’m very pleased to see that 500w full RGB LED heads, like this Nanlite FC-500C, are now very affordable for many of us. But what’s particularly impressive about this head is what you get for that price.
If you’re not sure about the specifics of the Nanlite FC-500C, here’s the TL;DR:
Full RGB and CCT LED Head (2700K-7500K)
Flash head and external power supply - can be powered via batteries if needed.
Takes Bowens mount (S-fit) modifiers
Preface: I am reviewing this light as a stills photographer not a videographer. I shoot zero video, so I am not approaching this light from the perspective of fan noise or hertz cycles for frame rates. If that’s what you’re after, you may like to seek another opinion.
Nanlite has sent me this light to review. I am not being paid, and they are not previewing or editing my review before I post it.

NanGuang, founded in 1992, changed their name to Nanlite in 2019
NanGuang Who?
Whenever I review a new product from a new company, I like to include a little lore on who we’re dealing with. This has become even more important now that many of us photographers are migrating from flash to LED, and some of these LED companies, although well established in their own right, are still new to many of us stills-shooters.
I find it incredible that Nanlite, a brand name so synonymous with lighting in today's market, was only introduced back in 2019! Nanlite is one of those brands that feels like it’s been around forever, and I guess in the very fast-paced evolution of LED lighting, it kinda has. But even though Nanlite's name has only been around since 2019, the company behind it, NanGuang, has been around since 1992 and they’ve been making lights for video and photography from the start.
The name change in 2019 makes smart business sense in a global market, but don’t be fooled if you think Nanlite has only been at this a few years, as they have well over 30 years of light-making experience to draw from. Plus, Nanlite is still one of the few lighting companies that still makes its own lights. That may sound odd, but in reality, most lighting companies farm out their lights to be made in other factories, whereas Nanlite still makes them in-house. This means far stricter quality control, and Nanlite is very well known for this quality and reliability. It’s actually this reputation that made me stop and look when I saw the price of this FC-500-C. In my mind, Nanlite is known for making excellent lights, but that quality often comes at a price. So, to see this full RGB 500w head from Nanlite at this price certainly made me stop and pay attention.
The FC-500C
First Impressions - The case
As soon as it arrived, I was pleasantly surprised. Many heads these days don’t come with a case or box, but the FC-500C, along with all the other Nanlite products I’ve seen, do. Their case style is clever; hence my bothering to mention it here. The light comes in a branded grey polystyrene box, and although this may sound cheap, the polystyrene is very sturdy and weighs almost nothing when empty. This is very useful when you have to move a ton of kit, and sturdy, not-soft cases that weigh very little is a big plus.
Parts and Setup
The head itself is not like our monoblocks of yore, which were all one unit; instead, the FC-500C, as with many powerful LED heads today, comes with the light itself as well as the power supply unit. Many brands seemingly ignore the fact that this is a very annoying, heavy box that has to be hung from your light, and I cannot stand that box clanging about and getting caught on anything and everything whenever you touch the light stand. Thankfully, Nanlite has this taken care of, and you can either attach the power supply via a very sturdy super-clamp bracket and quick-release V-lock, or you can simply hang it from the stand via a hidden coated-cable loop that sits snugly in the back of the box.
Nanlite has very efficient ways to deal with the external power supply
The power supply also has a hidden loop that can extended
The power supply box can be attached via a super-clamp and V-Lock
Simply use that loop to hang your power supply

Modes and Menus
Nanlite gets you right to the action immediately, so as soon as the light comes on, you have your power and Kelvin right there. All of the menus are navigated by two large knobs and two buttons, making this light adjustable from any angle, even if you can’t see the menu from where you are. Both of the knobs also double as buttons and can be pressed in to confirm your selections.
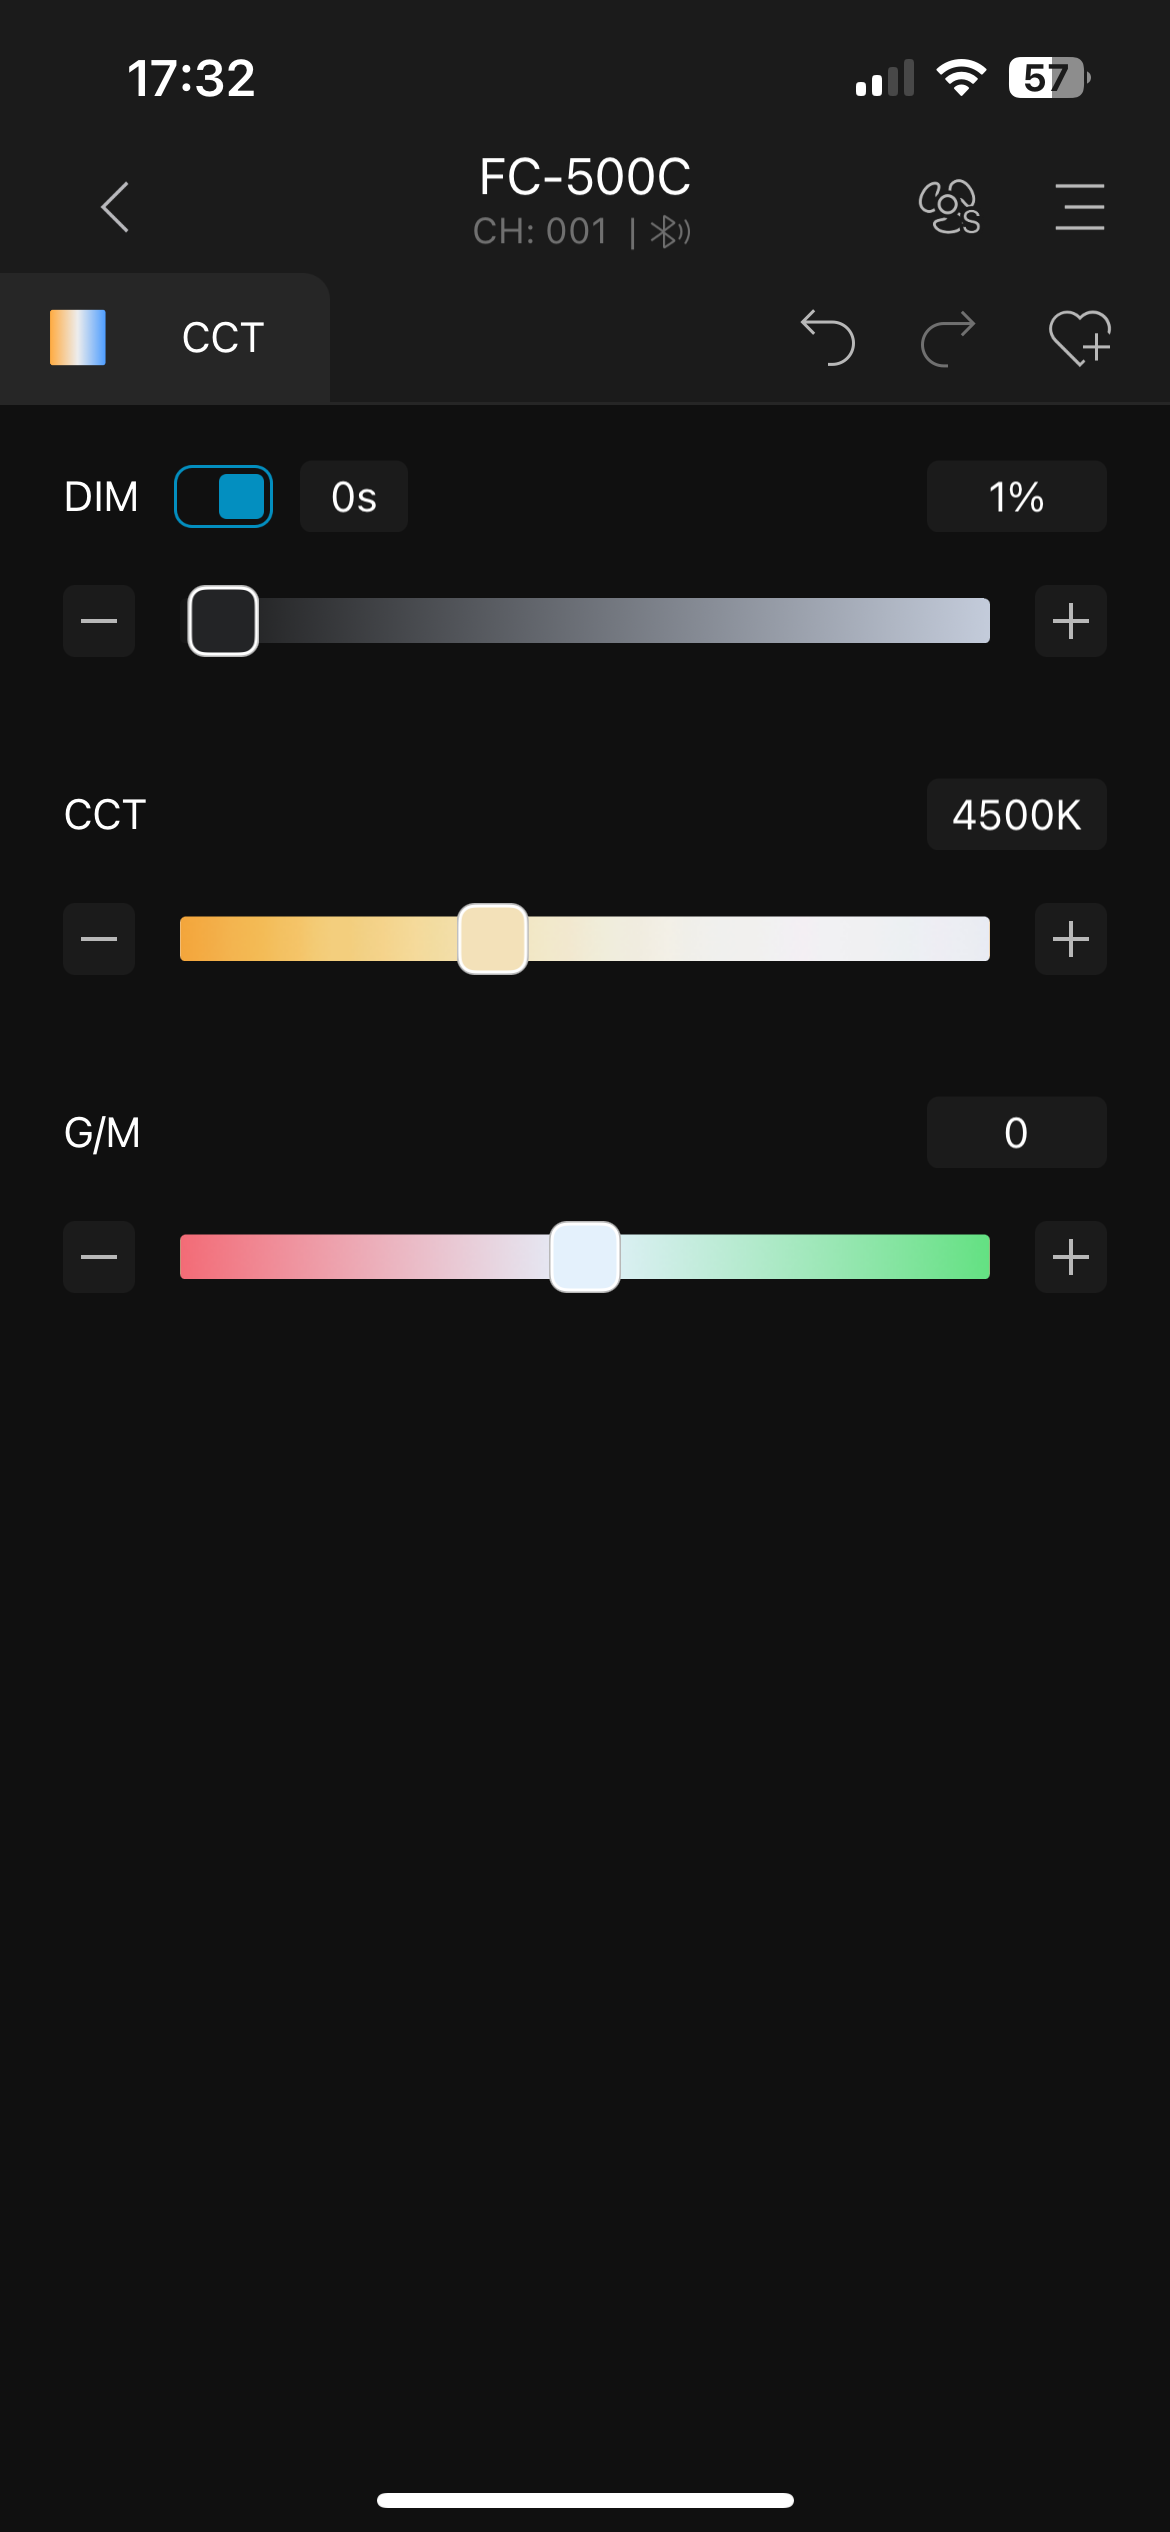
Your main screen shows the power (DIM) in percentages, and below that are your Kelvin and Green/Magenta tint.
Hitting the Mode button at any point will take you to the main lighting options and from here, you select…
CCT Mode
HSI Mode
RGBW Mode
Gel Mode
Effect Mode
Most of these modes are likely obvious to many of you, but I’ll briefly cover them in case some are new to you.
One important note here before we dive in further (and it’s important as most other LED lights don't have this functionality), is that the brightness of the light (DIM) can be adjusted via 0.1% increments. This is actually more useful than you might think, and I’ve already found myself falling between whole percents to fine-tune a light.

CCT Mode
Dim 0-100%
CCT (White Light) 2700K - 7500K
G/M (Green & Magenta) +/- 150
The Kelvin range isn’t the largest, but for the vast majority of users, this will be more than enough. The low 2700K is fairly standard and most LEDs go down that low, but the 7500K is fairly limiting in the top end, but again, there is only extremely niche cases where I’ve had to go above 10,000K.

HSI Mode (Hue Saturation Intensity)
Dim 0-100%
Hue 0 - 360
Sat (Saturation) 0-100
This is your standard full-colour mode that many of us are now used to on these RGB heads. The hue covers the entire spectrum, and you can manage the colours within it using saturation control.

RGBW Mode (Red Green Blue White)
Dim 0-100%
R (Red) 0-255
G (Green) 0-255
B (Blue) 0-255
W (White) 0-255
This mode is useful if you’re looking to copy a colour from a document like a Photoshop file and is especially useful for maintaining brand colours in product photography, for example. Simply copy the RGB values (and then struggle to translate the brightness 0-100 value into the W 0-255 value).

Gel Mode
Dim 0-100%
CCT 3200K/5600K
Gels Around 140+ popular gels to choose from
These gel modes are becoming increasingly comprehensive for those of us who are used to the gels of yesteryear. This version has a sizable library and although not the largest, at nearly 150 gels (I roughly counted as I couldn't find a number online), it certainly has more than enough of the main colours to keep us happy. As you may imagine, copying a gel number from a previous shoot and transferring it to the light makes life a lot easier. Plus, this is the only mode that actually shows us a visual representation of the pretty colours on the back of the light for us ‘visual learners’ out there. To that point, I’d prefer seeing a visual representation of hue from end to end in the HSI mode, but it’s in the app, and it’s a simple firmware update to add it, and I only say this as the ‘Gel Mode’ here is really the only indication that this is a full-colour screen on the light. I was just surprised they didnt use it more.
One other very important (for me) feature of this mode is the ability to display these gels in either 3200K or 5600K. This may not seem like much, but being able to simulate a tungsten light (3200K) or a flash (5600K) passing through a gel is extremely useful when mixing and matching lights on set, especially if you're trying to match light to a practical light on set, for example. This is the first light I’ve come across that enables this.
These are your core modes for controlling brightness and colour, but I want to discuss the last mode, the Effect Mode, a little more in-depth.

Effect Mode
Lastly, there’s the Effect Mode. This is typically a mode I rarely use, but this time around, I was encouraged to explore a couple of options that Nanlite has that I may be able to utilise in my photography. Before I get into it, let me explain what’s included in the Effect Mode. First, let me cover the ‘loop’ modes.
Hue Loop
Dim 0-100%
Hue 0-360
Sat 0-100
Speed 2 seconds - 30 seconds
CCT Loop
Dim 0-100%
CCT 2700K - 7500K
G/M 0-150
Speed 2 seconds - 30 seconds
INT (Intensity) Loop
Dim 0-100% - 0-100%
Colour HSI/CCT
CCT 2700K - 7500K
G/M 0-150
Speed 2 seconds - 30 seconds
These three loop modes allow you to program a transition of light. For example, in the Hue Loop, you can assign the light to play a 8-second loop and during that time, the light will transition from hue 25 to hue 125. You can also assign it a brightness to play the loop and a saturation to play the hue. The CCT Loop is the same for Kelvins, and the INT Loop allows you to loop through a designated brightness value, essentially pulsing the light in a loop.
The Effects Mode also has the standard disco effects that many other LED lights have, including Flash, Pulse, Storm Auto, Storm Manual, Police Car, TV, Paparazzi, Candle/Fire, Disco, Bad Bulb, Fireworks, Explosion Auto, Explosion Manual, and Welding.
To be fair to Nanlite, although these effects are a staple on all LED lights now, Nanlite has included a ton of adjustability and options within each of these, so you can get the perfect Dicso light just for you.
My indifference to the video effects aside, I was encouraged to test out the hue loops, and after a little inspiration from a fellow photographer, I set about looking into how I could use the hue loops as part of a long exposure setup. Here’s how I got on.
Setup 1 - Hue-Loops
First, let’s look at the shots I captured using this effect and then I’ll break down how I achieved them.
Click on any of the images below to see them full-screen
Featured Model: Esmeralda.gb
Camera Settings
Camera - Nikon D850
Lens - 24-70mm f2.8
Shutter Speed - 1.6 seconds
Aperture - f2.8
ISO - 31
Kelvin - 4700K
Focal Length - ~50mm
Cut out & Keep
TL;DR/ADHD/Artist Setup Explanation
Place model in front of white backdrop
Point Nanlite FC-500-C at backdrop with assigned Hue Loop running
Position a flash close to model so as not to wash out background
Shoot with a 1 - 2 second exposure on your camera
Take image, and as soon as the shutter is depressed, move the camera around
Setup Explanation
The trick to this setup is to show various colours from the assigned hue-loop via a long exposure on my camera. I had my shutter set to 1.6 seconds, and the hue-loop speed was set to 2 seconds (its lowest value). During those 2 seconds, the hue-loop played a smooth transition of colours, and I played with several of them to get the different results you see above. During the 1.6 seconds where the camera was taking in light, I would move my camera around the model, intentionally revealing and covering sections of the white background. As I did this, the camera would see various colours from the hue-loop in different sections of the background that the model was effectively masking out during the exposure. Couple this with the fact that I have a flash at the start of the exposure to capture a crisp image of my model, and the whole image starts to come together.
Once we’re comfortable with the basics of the technique, we can then start implementing a little of our colour theory here to understand what’s happening in some of these shots. For example, the easiest one to understand is the image with a white background displayed above.
We’re seeing a white background because I am assigning the full hue-loop of the entire hue spectrum of colours to play during my exposure.
As we know, white light is made up of a rainbow of colours, or a full spectrum of light. If we play the entire spectrum of light during the exposure of my image, that rainbow background will now appear white, where all of the colours have been displayed. But, since I’m moving the camera around the model during that time, not all of the colours are shown to the camera, and that is why we see those coloured masks around the model. It’s worth noting that the hue-loop was 2 seconds and my shutter duration was only 1.6 seconds. This resulted in the camera not seeing the entire spectrum, hence the background not being fully white.
All that makes sense, right? Ready for the advanced hue-loop setup?
Setup 2 - Advanced Hue-Loops
Now that we’ve covered the basics, we can move on to a slightly more involved setup. - I am being slightly tongue-in-cheek when I refer to this as ‘basic’. I fully appreciate we’re now a long way from learning Rembrandt lighting, turning it black & white and calling it art. Long exposure photography is tricky to get your head around at the best of times; couple that with mixing coloured light during an exposure time where the viewfinder is completely black, and we’re now a long way from Kansas.
That said, take a look at this next setup, and hopefully, you can follow my slightly abstract vision for using hue-loops to create truly unique imagery.
Click on any of the images below to see them full-screen
Camera Settings
Camera - Nikon D850
Lens - 24-70mm f2.8
Shutter Speed - 1.6 seconds
Aperture - f2.8
ISO - 31
Kelvin - 4700K
Focal Length - ~50mm
Cut out & Keep

You can see the slit of light I created with the Projection Attachment here.
TL;DR/ADHD/Artist Setup Explanation
Place model in front of white backdrop
Point Nanlite FC-500-C and attach Projection Attachment
Adjust the Projection mask blades to a horizontal slit of light
Place horizontal slit of light on the background, below model and out of shot
Assign relevant hue-loop
Position a flash close to model so as not to wash out background
Place large gelled soft box behind you - set to flash only
Shoot with a 1 - 2 second exposure on you camera
Take image, and as soon as the shutter is depressed, move the camera down
Setup Explanation
Look, normally the TL;DR version above is 3 steps, this setup does require a little setting up, but thankfully, with the groundwork from the previous setup, this shouldn't be too bad to explain.
Everything is basically the same as before, except this time, I've added another flash behind me in the form of a large softbox. This is going to be our fill light, and if you look at the images again, you’ll see a dark blue colour in many of the shadows in some of the shots.
The other major difference, of course, is the fact that I've now added a Protection Attachment to the FC-500C. I’ve then positioned the blades of the mask from the Projection Attachment to make a horizontal slit of light on the wall low and behind the model. It’s this slit of light that will play our hue-loop.
So how does this all work? As before, we depress the shutter and a crisp image of the model is captured from the flash. With the shutter open, I now drag the camera downwards and pass the camera over that hue-loop strip of light behind her. As the camera passes that stip, the hue-loop cycles its colours, and it’s through this process of us effectively scanning those varying colours that we get the visualisation of moving sheets of multi-coloured light in the final image. This setup can be a bit of a mind-bender to do at the time, and I was playing with varying hue-loops and camera movements to get a multitude of looks. Granted, I only had limited time before the model thought I’d completely lost my mind from waving the camera around the room and only occasionally pointing it at her.
Here I have the Projector Attachment on the FC-500C and that enables me to mask the light into slits for this setup.
Below are some examples of the hue-loops I created on the white wall whilst I was waiting for the model. These are created in exactly the same way as I explained above, it’s just that the model isn’t standing in place and being lit by the flash.
These are kinda wild, right? They look I just created these with the gradient tool in Photoshop, but I assure you, these are actual photos of hue-loops on the white wall.
Let’s wind it back in a little.
Granted, I went down a rabbit hole with the hue-loops, but I’m always fascinated by products and techniques that can produce something unique. That said, and as much as I absolutely love them, those Y2K portraits above won’t be to everyone’s taste. So now, let’s dial it back and look at what the FC-500C can do in a more traditional setup and with more standard modifiers.
FC-500C & 22” Beauty Dish
Click to enlarge
Click to enlarge
Cut out & Keep


Camera Settings
Camera - Nikon D850
Lens - 85mm f1.4
Shutter Speed - 1/125th
Aperture - f1.4
ISO - 50
Kelvin - 4800K
Focal Length - 85mm
FC-500-C & Lantern
Click to enlarge
Click to enlarge
Cut Out & Keep
Camera Settings
Camera - Nikon D850
Lens - 24-70 f2.8
Shutter Speed - 1/125th
Aperture - f2.8
ISO - 200
Kelvin - 4800K
Focal Length - 62mm
FC-500C & Softbox
Click to enlarge
Click to enlarge
Cut Out & Keep
Camera Settings
Camera - Nikon D850
Lens - 85mm f1.4
Shutter Speed - 1/125th
Aperture - f1.4
ISO - 50
Kelvin - 4800K
Focal Length - 85mm
These images were all taken on a Nikon too, so the light must be doing something right!
Nanlite’s very distinctive LED lens cover.
Modifiers Conclusion
The results speak for themselves, and there were no surprises with whatever modifier I attached to the FC-500C. It is worth noting that the FC-500C and many of the Nanlite heads have that unique-looking ‘lens’ affixed to the front, right in front of the actual LED. Many brands will simply leave that exposed, and I’m sure you’ve all seen the bright yellow disc at the front of your COB (chip on board) lights.
Some brands, like Godox, will encase the chip in a diffusion dome, and this does have the benefit of taking the harshness of the light away, but it can also never be a super-hard light with the permanently affixed diffusion dome. Nanlite opted for the fly’s eyeball-like cover, and I’ve not heard from them what the reasoning for this is. My best guess is that all those mini lenses help push the light out evenly, almost like collimated light. This would have its benefits, but I was concerned that the light wouldn’t spread around the modifier. But those concerns were alleviated when I used the light, and you can see, especially in the BTS of the lantern modifier above, that the light is very evenly spread. I’ll have to try to get an engineer's response for the chip lens choice here though, as I am very intrigued.
Kelvin Range Test
This is a test I often do with the lights I get for review. Essentially, it involves me adjusting the light to the desired Kelvin and then matching that with my camera, for example, 3500K on the light and 3500K on the camera. It’s far from definitive, and there are several variables at work here, but it gives you a pretty good example of the quality of the light. For one, when setting the light to 2700K, they typically use very different LEDs to make that ‘white’ light compared to when you shift it to 7500K.
I’ve done this test with countless manufactures lights, and this is easily one of the cleanest and best I’ve seen. Sure, the whole range seems a touch on the magenta side, but its remarkably consistent throughout the entire Kelvin range whereas other brands shift all over the place.
Another very important point to mention here, is how consistent that exposure is thoughout the Kelvin range. Typically you’d see the light being darker at the extreme ends of 2700K and 7500K, but this is almost a perfectly even exposure throughout. Again, something that is not typical.
Nanlite App
This light review is extremely long already, so I won’t go into this in too much detail here, but I will say that the app Nanlite uses, called ‘Nanlink’, is excellent. Again, this is one of the best LED apps I’ve used in terms of consistency of connection. Sure, it may lack some extreme-nerd functionality of other apps, but this is one of the best apps in terms of stability. I’ve never once lost connection to the light and even with app and light both off and on several times, the app always comes right back on to that light you had. No need to reconnect. No need to restart. There was no need to readjust; everything was very fast and smooth.


You can also see me playing with the Nanlink app live on stream via the video below as I was using it to manage the Hue-Loops from earlier.

The above video will open in YouTube at the correct start point….
Closing Comments
This has been a monster review and I don’t doubt you skipped around a bit up there. So, let me add my final thoughts on Nanlite FC-500C.
Let’s put aside the fact that Nanlite gave up trying to name this product properly here for a moment. Their Foza lights and, of course, Nanlites’s iconic and industry-leading LED PavoTubes are good examples of how names are more memorable to humans than barcodes. So, assuming they aren’t preparing for some secret technological singularity where they only need to sell lights to bots, I hope they return to naming lights, not star clusters.
Now that we’ve addressed the negative aspects of this light, I guess I can tell you what I do like about the FC-500C.
The Goldilocks light - An extremely well thought out and powerful product, and from a company that clearly listens to its customers.
As I said four hours ago at the start of this article, I think this is a great example of a Goldilocks light. 500w is, in my opinion, the sweet spot for lighting in the studio. Couple that with this light being full RGB along with a few other bells and whistles like the Hue-Loops and more, and now, finally, all for a very affordable price.
Those are the important aspects of any LED light today. How bright is it? Is it RGB? Can I get one without having to sell a London parking space? But this light also has a considerable amount extra on top of that. I mentioned the now-renowned build quality of Nanlite, but there are a lot of tiny details that highlight the heritage of Nanlite products, and this simply shows they've been listening to their users over the years.

I swear, if I ever have to use a light with a swinging power block ever again, imma lose it!
Tiny details like….
The metal loop that allows the power block to hang from the stand
The thumb screw on the light stand tightening bolt is big and very easy to tighten
That thumbscrew also stops you from loosening it all the way so it doesn’t pop out and roll across the studio floor
Large buttons and dials that can be operated, even if you can’t see the back of the light
You can use gels in both tungsten and flash Kelvin modes
The top of the light and handle is flush, allowing you to put the head on the floor without it rolling around
The case is very sturdy but extremely lightweight. The simple fact that you even get a case is a plus!
Generous S-fit attachment that can even be operated with one hand.
The fan blows the hot air straight up instead of out to the side, or worse still, back into your face.
I’ve only used this light for a few hours, and these are the things that I’ve noticed already. I’m sure I’ll find more.
It bears repeating, but Nanlite has clearly been listening to its customers over the years. All of these seemingly small features don’t just happen overnight, and many very established lighting brands still overlook basic elements like the swinging power block. This FC-500C light is very well made, comes in at the perfect power, has millions of colours, allows you to use all your S-fit attachments you likely already own, and is a very competitive price. What’s not to like?
Nanlite FC-500C
Learn more about the FC-500C here on Nanlite’s website FC-500C Full RGB LED Light

Includes
FC-500C × 1
Power Supply × 1
Reflector × 1
Quick Release Clamp × 1
AC Power Cable 6M × 1
DC Connection Cable 3M × 1
User Manual × 1
Carry Case × 1
Thanks so much for reading guys, if you have any questions, let me know in the comments below. Catch you in the next one where I hope to be reviewing the Nanlite Projection Attachment you saw featured here.
I've always wanted my photography education on here to be free, so although there is no paywall to any of my -Technique Tuesdays-, any and all support is greatly appreciated. ❤️
PLUS: Donate any amount and I’ll send you a link to the hi-res print version of my studio lighting book.
||
PLUS: Donate any amount and I’ll send you a link to the hi-res print version of my studio lighting book. ||

JHP Livestreams…
I livestream every other Tuesday night via YouTube and there I answer your questions, critique your shots, take community images into Photoshop to work on them and discuss all manner of lighting tips and techniques. I look forward to seeing you and your work there real soon. Jake Hicks Photography - YouTube
