• Technique
    • Latest Techniques
    • FREE TIPS
    • Quick Tips
    • Video
    • Site Search
    • Blog
    • Archives
  • Mentoring
  • >Online Workshops<
  • Workshops
  • Studio Lighting Books
  • Contact
    • Newsletter
    • Contact
    • Statement
Jake Hicks Photography
  • Technique
    • Latest Techniques
    • FREE TIPS
    • Quick Tips
    • Video
    • Site Search
    • Blog
    • Archives
  • Mentoring
  • >Online Workshops<
  • Workshops
  • Studio Lighting Books
  • Contact
    • Newsletter
    • Contact
    • Statement

Your 'basic' 6 light set-up

Canon 1Ds Mk II - CAMERA

70 mm - LENS

F 11- F-STOP

1/250 sec - SHUTTER SPEED

100 - FILM SPEED

Flash - LIGHT SOURCE 

This lighting technique is probably best referred to as beauty lighting and suits portraits and head-shots.

This lighting technique is probably best referred to as beauty lighting and suits portraits and head-shots.

Granted the slightly tongue-in-cheek title to this technique teases that there might actually be a 'basic' 6 light set-up but truth be told this is one of the easier ones to get right.


This is a shoot that I did many years ago, way back in 2009. Back then I was looking very closely at other photographers lighting and reverse engineering their set-ups. This lighting is very famously used by Jill Greenberg in her crying baby project and then later with several of her animal projects. In fact looking at her work over the years you can actually see that nearly all of her shots are a variation of this lighting technique in one form or another.

Truth be told I'm not completely happy with my finished shots for this shoot and in hindsight and with more experience under my belt I can certainly see things that I would change. Firstly let me go over the lighting technique itself and then I'll come back and talk about a few tweaks I would make if I was shooting this again. I say 'tweaks' because it's not the set-up and light placement I take issue with but more to do with the power settings for each light that could be adjusted slightly.


The 6 light set-up: 1 hair light above, 2 side lights, 2 fill lights and 1 ring-flash.

The 6 light set-up: 1 hair light above, 2 side lights, 2 fill lights and 1 ring-flash.

The set-up itself obviously requires 6 separate heads: one ring-flash, one overhead hair light, two side hair lights and two fill umbrellas. In my set-up here I was using a beauty dish above as a hair light but this could be substituted by a honeycomb or snoot (space permitting), also I'm using two fill umbrellas but again these could be substituted for soft boxes. Something to note from my diagram here is that I didn't have a boom on the day so my beauty dish hair-light is just on a stand behind the black backdrop. This isn't ideal as it would of been nice to get more light on top of the models head, something that a boom would of enabled, also I was constantly fighting the threat of flare into the lens because that light was so far back and virtually pointed straight into camera.

This technique is probably better suited to portraits, head-shots or half body shots, the reasons for this is that its a very beatifying light, it wraps the model in light and it can be tricky to define structure with so much light. When you're shooting full body or even 3/4 length some of the lighting definition gets lost and in my opinion loses impact. Also this is a major pain to light evenly when showing the full body, the side lights would either have to be large strip-boxes or the sidelights would have to be set quite far back to provide even light. On top of this I dread to think of the 'spaghetti junction' of shadows being cast on the floor at her feet, that would not be pretty to retouch.

The 6 light set-up from above

The 6 light set-up from above

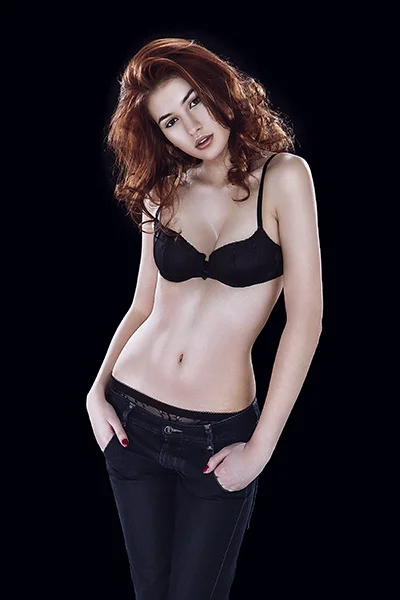
One of the most interesting points to note about this setup is obviously the use of a ring-flash. Anybody who has used a ring-flash will know that its 'drop off' of light is crucial to creating its tell-tale look. The light should appear to 'drop off' enough so as to allow for a slightly darker edge all the way around the body, its seen here in these images around the face and skin. Cleverly though this lighting technique counters that shadow nicely by transitioning to highlights thanks to the edge-lighting. This works particularly well here as the model has volume to her hair allowing for the lighting to remain separated. Something to be mindful of though is that when using a ring-flash your lighting can appear very flat and it takes some tweaking to ensure you still create shape and structure with your subject. Its for this reason that I'm not completely satisfied with the final images and I believe that by dropping the power of the ring-flash a little would of really helped to avoid the current slightly 'washed-out' look I have here.

3/4 length shot using the 6 light setup

3/4 length shot using the 6 light setup

The two sidelights and the hair-light above are metered a stop above (camera set to f11, edge-lights and hair-light metered to f16) and the two fill lights are metered a stop below (camera set to f11 two fill-lights set to f8) and finally the ring-flash was metered to the camera (f11). The tweaks I mentioned earlier are that I would probably dial down the ring-flash a little. There is so much light in this set-up that it is hard to tell whats doing what. The edge and hair-lights are easy its just getting the right combination of light from the ring-flash and the fill-lights that is down to personal preference. 

Granted this lighting technique is not for everybody, firstly you need six studio lights which is not always an option but if you're renting a studio for the day and you have those facilities to play with then it might be worth playing around with it, especially if you're shooting beauty work. In Jill Greenberg's original set-up I think she actually used 7 lights, she had an extra one lighting the background of her subject. For me, I only had 6 lights and I wanted a much darker background to contrast the edge lighting and make the model really stand out in the image.

So if you're feeling brave enough and you've got plenty of time to set-up before the model is ready then give it a go. 

Tuesday 11.05.13
Posted by Jake Hicks
Comments: 2
 

Shooting Tethered...Without the Tether

The Eye-Fi 4GB X2

The Eye-Fi 4GB X2

Many moons ago when digital cameras were first introduced, one of the biggest changes from shooting film was the advent of the LCD screen. No longer did we have to pace up and down outside photo labs to see our shots, we could now see them instantly displayed on the back of our new cameras. This was not only great for us photographers to quickly check our lighting but for everybody else in the team too. The stylist could check for any creases in the clothes, the makeup artist could check uneven eyeliner, the hair stylist could check for stray hairs and the client can check they're happy too. That's fantastic, everybody can check that everything is looking perfect right there on the back of the camera without the anxious waiting for those tardy chemicals to do their job. Well in theory this was great but the novelty of a small crowd of rubberneckers jostling for front row seats behind me, all peering over my shoulder waiting for each image to appear soon wore off.

Menu display of how you would like card slot 1 and slot 2 to manage files

Menu display of how you would like card slot 1 and slot 2 to manage files

Finally came the long awaited introduction of useable tethering, I shoot over here in peace and quiet doing my job with a cable connected to a laptop, you all stand over there gawking at the screen, perfect. Well nearly perfect anyway, I no longer had to worry about people squawking in my ear but now I had to teach everybody how to go forward and back through the images, zoom in and out, rotating and so on. The software just wasn't intuitive enough for everybody yet. On top of that the biggest bane of my life was that damn cable that connected the camera to the laptop. Tripping over it, falling out of the camera, knocking things over, clotheslining clients with it, you name it I did it. 

So now finally with the introduction of the wireless transfer cards such as the Eye-Fi cards I have the best of both worlds. No crowds breathing down my neck and no tether to break my neck.

Showing the iPad as it finds the wifi network of the Eye-Fi card

Showing the iPad as it finds the wifi network of the Eye-Fi card

The way this works is that you can now purchase SD cards that wirelessly send your images to a laptop, phone or tablet. At present this technology only works in SD cards and although I know that there are SD to compact flash converters out there they are unfortunately known to be very unreliable when coupled with a wifi SD card.  A lot of the modern compact digital cameras now will only accept SD cards and even most modern DSLR cameras now have at least one SD slot which is perfect as these little wifi cards are fantastic and I absolutely love them.

So in reality how does it work when actually shooting? Personally I use the Eye-Fi X2 4GB card (they now only do the pro version) and I shoot with a Nikon D600 which has dual SD slots. The first slot I set up to take the Raws and the second slot I set up to take the 'Basic JPEG's'. As I shoot, the camera saves the full resolution Raws to slot 1 and simultaneously saves small jpegs to slot 2 (the Eye-Fi card). Whilst the files are saving to the Eye-fi card its actually uploading them to my 'paired' device. This could be a laptop or even a smart phone but due to the issues with clumsy software not being very intuitive for the rest of the team I actually send my files to an iPad. The simplicity of this means that all but the most vehement tree-killer of the touch screen generation will be able to zoom, rotate and navigate through the images without any instruction from myself. On top of this I don't even need to be connected to a wifi network, the card itself generates its own and the free Eye-fi app on the iPad acts as a server which downloads the images seamlessly as they are taken. So to clarify, this works in the desert, you don't need to find a wifi hot-spot. The reason I mention that is because I didn't believe it would work without one but it does. Bear in mind though, it will download faster with a wifi network selected but I am only transferring small jpegs for review not the Raws so its still very fast without one.

The Nikon D600 synced with the iPad via the Eye-Fi card. The camera displays the Raws and the iPad is displaying the small transferred jpegs

The Nikon D600 synced with the iPad via the Eye-Fi card. The camera displays the Raws and the iPad is displaying the small transferred jpegs

Just so this doesn't sound like a Eye-Fi advert I know that Toshiba makes a FlashAir card that is actually supposed to be easier to set up than the X2 version but Eye-Fi has just now released the Eye-fi Mobi which is said to be even simpler and faster to set up than that.

They range dramatically in price as far as I can tell so its my advice to spend a bit of time shopping around. Also the memory size of the card has a dramatic influence on cost, I use the 4GB one because I only use it to transfer small jpegs. If you feel that you want more flexibility and will likely only be shooting where there is a wifi hotspot available and you'd like to transfer Raws for example, then you may want to buy a bigger card. I think I picked up my Eye-Fi X2 4GB card 18 months ago for £30 on eBay.

It's not a massive investment by any means so I would definitely recommend trying them out especially now that Eye-Fi have now just released the new and improved Mobi version.  Being tethered looks great but the ease of shooting without the cable is a no-brainer. For me though more importantly the client loves to be able to view whats being shot and get involved,  this ensures that things get spotted on the bigger screen before I have to spend ages fixing them in post.

Tuesday 09.03.13
Posted by Jake Hicks
 

Start taking studio lighting shots for under £25

Shot with a single silver umbrella and flashgun

Shot with a single silver umbrella and flashgun

I think we can all agree that we started out shooting at one point or another using the onboard pop-up flash. Lets be honest its not great, blown out images that show up everybody's imperfections with its incredibly hard light. Not a great look, and certainly not a great look if you want to be known for taking 'good' pictures. The next obvious stage was to get a flashgun. These powerful little guys slot on top our DSLR's and give us the much needed control we were after. We can soften the lighting a little, we can even bounce it off the walls or ceiling to soften the look even further. These flashguns are an events and wedding photographers best friend for sure. But for those of us that want the next level of control and want to take our portraits a little further and give them a really polished look we need studio lighting. That right there is a big box of minefields. Every time you go to look at investing in the world of studio lighting it seems like a pretty big commitment. Investing heavily in something that you're not sure you'd want to stick at or get the opportunity to use that often is certainly daunting.

There is another option though and thankfully with the global market for electronics being only a click away you can dip your toe into studio lighting for less than the price of most train tickets.  Plus it can be done using a lot of the equipment you probably already have, especially if you're the sort of person who wants to get into studio lighting anyway, you're bound to of accumulated a lot of the necessary kit by now already.

This one is actually for a light stand but the tripod version looks almost identical

This one is actually for a light stand but the tripod version looks almost identical

Chances are, like we discussed you already have a flashgun and there is an even greater chance you already have a tripod of some description, this doesn't even need to be any good either. If that's the case then we can look at doing a little online shopping and sorting out a great studio lighting setup.

Lets start from the bottom up, you already have a tripod so we need something to attach our flashgun and lighting modifier too. Search 'Flash mount bracket with umbrella holder for tripod'  on your favourite internet electronics wholesaler and you'll be greeted by plenty of options. This £6.99 little gizmo sits on top your tripod and holds your flash as well as our lightweight and compact lighting modifier.

36" Silver umbrella lighting modifier

36" Silver umbrella lighting modifier

The umbrella, in my opinion one of the most underused lighting modifiers around. These lightweight and compact attachments used to be all rage before soft boxes came along but as soon as there awkward and unwieldy rectangular counterparts sprang into are world the umbrella got stuffed to the back of the studio cupboard. Soft boxes are popular for there slightly softer light but I actually quite like the umbrellas crisper less diffused light. Combine that with a silver interior over the white one and you can create fantastically crisp tones across skin. Search 'Silver photographic umbrella' and you're off for as little as £4.19. One thing to note, the larger the size of umbrella the softer the light (within reason, there are other factors at play) so have a look at the different sizes on offer.

This is just a straight connection to the camera, I recommend spending a little more and getting TTL version connector

This is just a straight connection to the camera, I recommend spending a little more and getting TTL version connector

Next and oddly the most expensive is a way to connect all this to your camera. The one that I have pictured here is actually just a straight piece of cable that just makes a physical connection to the camera. The one that I would probably recommend spending a little extra on is the TTL version. This talks to the camera and lets it know how much light has been used and when to stop etc. For this one search 'Flashgun TTL cable' this will bring up a lot a different options and for £13.73 you can get yourself all set up. Bear in mind that for TTL coupling you'll probably need the right cable for your camera brand, for example Nikon and Canons ones are different.

Everything we need to start taking some great studio lighting shots

Everything we need to start taking some great studio lighting shots

So to sum up our extravagant spending spree,

Flash/umbrella bracket for tripod - £6.99

Silver umbrella lighting modifier - £4.19

TTl flashgun connection kit - £!3.73

Grand Total - £24.91

For less than £25 we now have all we need to start taking some cracking studio lighting shots. 

Keep it simple, this is a classic one light setup known as 'butterfly lighting'

Keep it simple, this is a classic one light setup known as 'butterfly lighting'

So now that we have it all lets get some shots, lets start off simple though first, we can always run later.  Start off with a classic lighting setup commonly referred to as 'Butterfly Lighting', this gets its name from the shape of the shadow created under the nose when the light is positioned correctly. The same lighting is also referred to as 'Hollywood' lighting due to its beautifying look.

Positioning the light for this shot is key, the light should be above the subjects head height but not so high as to eliminate catchlights in the eyes. The light should be angled down towards the subject at a 45 degree angle to ensure the light spreads evenly over the face. How far away you place the light is dependent on the look you would like to go for; bring the light closer for a softer more feminine look or move the light further back for stronger shadows that can suit a more masculine image. Play around with this setup because there is a lot than can be achieved with this simple technique.

Model: Jaye 


Shot with the 'Butterfly lighting' setup as outlined above.

Shot with the 'Butterfly lighting' setup as outlined above.

Monday 08.19.13
Posted by Jake Hicks
 

Modding your vintage Polaroid Land Camera

The Polaroid 320 Land Camera

The Polaroid 320 Land Camera

Fujifilm's FP-100c

Fujifilm's FP-100c

Fujifilm's FP-3000b

Fujifilm's FP-3000b

I recently picked up an old Polaroid 320 land camera, and for a camera that's over 40 years old it's in fantastic condition. The reason I got the camera in the first place was to play with the old 'peel-apart' instant film. Polaroid as a company had a turbulent history and in the wake of the modern 'instant' digital images Polaroid filed for bankruptcy late in 2008. As a result the original Polaroid film is nye-on impossible to source but companies like Fuji and 'The Impossible Project' make a select number of very good replacement films. A quick search online proves its pretty easy to pick some up (new and expired film), the two main film packs I purchased for my 320 were the 'Fuji FP-100C' (colour film rated at 75 ASA/ISO) and a black and white version 'Fuji FP-3000B' (black and white film rated at 3000ASA/ISO) which I've yet to try.

If you're looking to purchase an old Polaroid instant camera then it's worth doing a bit of research, I unfortunately made a couple of less than successful purchases with the older land cameras finding out that the ones I bought didn't take the film made by any other company or that they had updated the film carrier during one model line meaning that newer versions of the camera didn't take the current film. Very frustrating.

Electrical tape, a pair of scissors and two AAA batteries is all this mod needs

Electrical tape, a pair of scissors and two AAA batteries is all this mod needs

Classic 40 year old Duracell 3V PX24 battery

Classic 40 year old Duracell 3V PX24 battery

Tape the two AAA batteries together then tape the white wires connector to the positive and the black wires connector to the negative

Tape the two AAA batteries together then tape the white wires connector to the positive and the black wires connector to the negative

Finally though I picked up the 320 and that took the modern film perfectly.......but I wasn't up and running smoothly just yet. For a piece of technology this old you'd expect it to have more fundamental differences compared with modern cameras than it actually does, but it's essentially a light capturing device and that basic principle hasn't moved on hugely nor is it likely too. The one main thing that always changes though is how we power our technology and back then although it was still batteries they were quite different and it's not a simple case of popping to the shops to pick up some new ones. It took a 3V PX24 (never heard of it? Me neither), and although we can't strictly replace it like-for-like we can match it with a similar amount of power. The modern AAA batteries are 1.5V each so by taping two of these together and then taping the connectors on top we now have a fully powered vintage Polaroid camera. Now that I have power running to my camera I'm ready to shoot in ambient light. The camera has a remarkable (at the time) 'electric eye' which once the shutter is open, senses when the film has received enough light then closes the shutter again (the main reason for the batteries).

The Polaroids flash mount reveals a Post connection

The Polaroids flash mount reveals a Post connection

If all I wanted to do was shoot landscapes then I'd be all set but I really wanted to use it in a studio environment with strobes. To do this I would really need to sync the camera to my strobes, this actually turned out to be far easier than I expected because to my surprise when I removed the onboard flash mount underneath was the same flash sync PC (Post Connection) receiver that we still use today. Like I mentioned before some things in the camera world just haven't moved on ('if it isn't broken, don't fix it'). This means that I can quickly and easily just plug my strobe light directly into the camera and I'm ready to shoot. When shooting with strobes you are probably going to want to light meter your scene to avoid costly trial and error shots. My Polaroid 320 has an aperture of f8.8 so with the 100 ISO film its pretty easy to achieve crispy exposed shots (bear in mind that the 'electric eye' still seems to work so keeping your ambient light down will help to eliminate blurring.

The first result using the FP-100c film synced to the strobes.Model: Charlotte Norris

The first result using the FP-100c film synced to the strobes.

Model: Charlotte Norris

Useful links: 

Current official Polaroid website Polaroid.com

Fujifilm's ISO 100 FP-100C film

Fujifilm's ISO 3000 FB-3000B film

Other modern replacement Polaroid film packs by The Impossible Project 

The shockingly designed Land List tells you everything you could possibly want to know about old Polaroid cameras, its just almost impossible to find what you're after. 

Here's a useful link to a page that tells you what aperture your Polaroid land camera has: polamad.com 


Tuesday 07.16.13
Posted by Jake Hicks
Comments: 3
 

10 Things your camera bag needs - Part 2

6. Cinefoil

Cinefoil can either be bought in sheets or in a roll for custom lengths.&nbsp;

Cinefoil can either be bought in sheets or in a roll for custom lengths. 

Cinefoil is a very heat resistant, matte black, malleable foil. It gets used a lot in the film industry where the need for heat resistant light flags on the constant 'hot lights' is a must. Cinefoil can be moulded into any shape, from simply moulding it to the side of a light, to a makeshift snoot; shaping the foil into a cone shape for very directional light. It's not a permanent solution by any means but it can certainly come in handy when you run out of certain bespoke tools like flags and light modifiers, cinefoil can certainly fill many roles temporarily. Its also possible to puncture the foil and create masks and gobos with it, this can be especially useful if you just want to create a slightly more interesting look to the light.


Cinefoil can be moulded to virtually any surface, heat resistant and tearable.

Cinefoil can be moulded to virtually any surface, heat resistant and tearable.

7. Clamps

Nylon clamps in varying sizes

Nylon clamps in varying sizes

This is a pretty basic one, and in my mind has the same mandatory nature as gaffer tape. I cant remember the last shoot where I didnt use several of these clips, clamps and holders. Clamping backdrops to booms, holding gels, clipping flags they are done that much more quickly with a range of clamps. I personally have a wide range of sizes to assist with any task, from the very small clips to hold the gels all the way up to the monster powerful clamps to hold heavy backgrounds. I try and only the use the slighter softer nylon clamps as they are less likely to leave marks or damage some of the objects they hold.


8. Gels

Neutral density gels and CTB gels.

Neutral density gels and CTB gels.

Gels have been a staple in many a creatives bag for a very long time, they are very thin transparent sheets of heat resistant polycarbonate. Their most common use is to change the colour of the light that passes through them, back when Shakespeare was on stage they were limited to varying densities of wine in decanters to alter the lights colour, now we have literally thousands of different colours and tones to choose from.  It's always great to play with coloured lighting but here I'm specifically referring to the gels that are often overlooked but are invaluable to many lighting situations. Specifically I'm referring to 'neutral density' gels and 'CTO/B' gels. Firstly, the neutral density gels appear grey but don't change the colour of the light but rather reduce it, they effectively stop down the power of the light much like a neutral density filter would on the front of your lens. These are especially useful when your'e shooting with monobloc flash heads that find it difficult to produce lower amounts of light, a neutral density gel in front of the light will open up more lighting possibilities when shooting on wider apertures.

The CTO/B (colour temperature orange/blue) gels are most commonly used for changing the orange of continuous tungsten lights to the same colour as flash and conversely changing the blue of flash to the orange of tungsten. This is really useful when you are trying to mix flash with continuos lighting in the same shot without any perceptible colour shift.

9. Mini Torch

Mini LED torch with one handed on/off switch.

Mini LED torch with one handed on/off switch.

This is one that doesn't get used quite as much as the rest of the items but when I need it I'm certainly glad I have it in the bag. I use the mini torch most often in dark situations where I'm having difficulty focusing accurately. It can be those times when I'm shooting long exposures and don't have any modelling bulbs on or it can be because the ND filter on the lens is cutting to much ambient light to focus properly. Worst of all though its for those insufferable times when I don't have my strobes and Im trying to take a shot at night with speedlights that don't even have modelling bulbs. Of course you could just use it to find your last chocolate bar at the bottom of your bag.

A couple of important things to note are that LED torches are best as they're the brightest for the size and that it has an on/off switch that can be operated with one hand, the twist ones are great at stopping it from turning on in your bag but if you have to put your camera down each time you want to use it you'll get pretty annoyed very quickly.


10. Light Meter

Basic light meter, more of a learning and development tool than a modern necessity.

Basic light meter, more of a learning and development tool than a modern necessity.

I was unsure whether I would include this one, in this digital world of the instant feedback loop of image assessment surely a light meter is a bygone relic from a time when models posed in neck braces. Granted the light meter doesn't get used on every shoot but it's been in my bag for the last ten years because once in a while there will be a shoot that comes along when something just doesn't add up. There has been times when I've forgotten an ND filter on the lens, times when strobes have been intermittent and even times when the LCD screen has been set to maximum brightness from a previous location shoot.The light meter has been useful to analyse where the failure is. Granted these were complacent mistakes that I affirmed with the light meter but it really comes into its own as a learning tool. We see an image take shape over time on the back of the camera, making the hair light brighter, take another shot, review, reduce the fill light, take another shot, review. We have an idea of what looks good and we get to the image in our minds eye by trail and error but sometimes we don't exactly know whats going on in an image. Without that knowledge its harder to pre visualise and plan more complex shots in the future and so I see it as more of a learning tool than a crutch or a necessity.

Monday 06.24.13
Posted by Jake Hicks
 
Newer / Older